I thought it would be fun to take today's SCS Color Challenge colors - Really Rust, Chocolate Chip and Baja Breeze, and use them for a Christmas themed card.
Once again, no SU "In Colors", so I adapted with my prismatics. I used Desert Coral Dark, Iced Teal Light, and Suede Brown Dark. The Greetings from the Wise (Penny Black) image was stamped with Tuxedo Black (Memento) onto Neenah Solar white, colored with copics, and layered him. The sentiment (Just Rite 10 Designer Centers and Borders) was stamped with Versamark onto the smooth side of the Suede Brown Dark paper and was embossed with Detail White (Judikins) embossing powder.
The Iced Teal paper was embossed with the snowflake Cuttlebug embossing folder, and the circles were cut out with my Nestabilities. I sponged all the edges with SU's Chocolate Chip, and pierced the top and bottom panels.
Finally, I added Ultrafine glitter to the Santa cap and some thin offray ribbon.
Thank you so much for stopping by. Check out SCS's Color Challenge Gallery for more inspiration with these colors! Click HERE.
Happy Stamping!!
Supplies: Stamps - Greetings from the wise (Penny Black) Sentiment medallion (JustRite) Paper - Prismatics Ink - Tuxedo Black (Memento), Chocolate Chip (Stampin' Up) Accessories - Copics, Cuttlebug, Nestabilities, white ep, glitter, piercing tool, mat pack (SU), ribbon, dimensional tape
Tuesday, September 30, 2008
Sunday, September 28, 2008
Hot Cocoa Purse
Carolyn (Cammie) has provided some awesome challenges for our CCEE group this month. This week is the last of her challenges. Thanks Cam!!! Dawn L provided us with some fun challenges for the month of October.
Well, for today, we were to make a shaped card, and we had to stay away from circles. I received a Hallmark card in the mail this week in this shape, and thought it would be great to make it into a Hot Cocoa Carrier. (The Hallmark card was flat, mine has a bit of dimension. Here's how I did it.
1. Take a 4 1/4" x 10 1/2" piece of cs. Score it at 5" and 5 1/2". I added 1/4" smaller dp inside and then stapled the Cocoa packet to it. The staple will be hidden by the layers on the outside.
2. Decorate the outside as you wish. I stamped the Impression Obsession Marshmallow mug image on Neenah Natural White and colored it with my copics. I added liquid applique to the marshmallows, and some glitter to the cap, flakes and pom-poms. I also punched the corners with my SU Corner Tag punch.
3. For the handles, I put two Nestability Circles, one inside the other, cut and embossed them. I then punched out a small oval with the SU small Oval punch and cut off each tip to make the base of the handles. After that, I attached two brads that were inserted into two punched circles.
4. For the sentiment, I stamped the Hero Arts Clear Thinking of you Messages with Walnut Ranger Distress Ink and distressed all the edges with the same ink.
5. Finally, I had this fabulous ribbon by Making Memories that I thought looked like a scarf! I tied it at the top like you would put ribbon through a hole in a bookmark. I'm sorry, I don't know how else to explain it.
To see what the other girls created for this challenge, head on over to the CCEE Stampers Blog. They are all fantastic stampers. You won't be disappointed!!
That's it. Thank you all for your visit!! I've been a bit overwhelmed this week. It's been fun!! Thanks for all your encouragement and support. I'm heading to a wedding out of state soon, so my posting will be a bit erratic. I will be sure to postdate a couple so my blog won't be completely idle. I just didn't want you wondering where I disappeared to.
Supplies:
Stamps - Marshmallow Mug (Alesa Baker - Impression Obsession), Sentiment (Hero Arts)
Paper - Signature Life Rouge Paper (My Mind's Eye) Suede Light and Dark (Prismatics)
Ink - Tuxedo Black (Memento), Walnut (Ranger Distress Ink)
Accessories - Cuttlebug, Copics, Glitter, Liquid Applique, Nestabilities, Scor-Pal, Corner Tag Punch (SU), Brads, Ribbon, Fibers
Labels:
CCEE,
Hero Arts,
Impression Obsession,
Tutorial
Blog Candy Winner!!
I'm so excited to announce that Pegg S is the winner of my Holiday Blog Candy.
Random Org, picked #54
Pegg S said...
Random Org, picked #54
Random Integer Generator
Here are your random numbers:
54
Timestamp: 2008-09-28 19:39:06 UTC
Pegg S said...
Congrats on 40K!! Love visiting your blog and seeing your beautiful work. I have shopped at Stamper's Dream before - great service and really fast shipping!!
Email me with your snail mail address Pegg, and I'll get this package off and running!!
Thanks for all of your kind comments everyone!! It was fun reading them! However, I am a bit disappointed that those of you who are enjoying Fall weather, did not share and send some my way. High 90's here people....that's just wrong...*sniff* LOL
Happy Stamping ya'll!! Take care and have a blessed Sunday!!
A big thank you to Michelle at Stamper's Dream for helping me with this!! You're the best!!
Labels:
Blog Candy
Saturday, September 27, 2008
Season of Peace
I was reading someone's blog the other day, and they were lamenting about all the stages their card took before being finished. Starting one way and ending up totally different. Well, this card took so many twists and turns, and I'm still not happy with it. Arrrrrrrgggghhhh!!! I wanted to use this sparkly My Mind's Eye Paper (Gorgeous stuff irl) with this dove and the colors fit with the #5 Inspiration Challenge on SCS today. I just couldn't get my layout the way I wanted it. You wouldn't believe the different changes this has been through. I had my dove colored and layered right off. No problems there....well, until I saw that the edges were too white with the gold trim and tried to run a sponge just over the edge....well, of course it got on the image itself...*groan* Why didn't I just use my gold leafing pen like I did around the sentiment!! *kicking my self here* Oh well, I wasn't about to stamp, color and cut the three layers again.
I stamped the Season of Peace (Artful Stamper) dove onto Neenah Natural White, with Versamark, and embossed it with Detail Gold ep. I then colored it with copics. Now, you have to be careful with the gold, because the copics will take away the shimmer. I added a bit of sparkle with my quickie glue pen and glitter, sewed around the edges, and added Dew Drops to the corners and flower. Each panel is popped up with dimensional tape too.
I want to thank all of you for stopping by!! I hope you're having a blessed weekend!!
Don't forget to check the post below for BLOG CANDY!!! I can't wait to announce a winner tomorrow afternoon!! Woo-Hoo!! Thank you for all your kind, kind comments and your well wishes!! They truly mean a lot!!! Stampers are some of the kindest and best people out there!! There's no doubt in my mind!!! HUGS!!!
Supplies:
Stamps -Season of Peace (Artful Stamper), Peace Sentiment (Wordsworth)
Paper - Laundry Line (My Mind's Eye), Neenah Natural White, Rose Dark (Prismatics)
Ink - Versamark, Frayed Burlap, Aged Mahogany (Ranger Distress Ink)
Accessories - Dew Drops, Copics, Detail Gold ep, Small Oval Punch, Corner Tag Punch (SU), Sewing Machine, Dimensional Tape, Glitter, Quickie Glue Pen
Labels:
Artful Stamper,
SCS Challenges,
Stamper's Dream
Thursday, September 25, 2008
Holiday Blog Candy!!!
Fall is my favorite season!! I much prefer the cool, crisp, clean air of fall, to the sweltering, stickiness of summer. (ewww) Since I'm sooooo thankful that the suffocating heat of summer (it's still in the 90's here...*groan*) is almost behind me, I thought I'd share my joy with all of you.
I hit 40,000 sooner than I thought I would, and am so appreciative of all your kind comments and support. So, I'm offering this fabulous collection of Fall and Winter inspired goodies. All of these can be found at Stamper's Dream just in case you'd like a closer look. Michelle was even kind enough to throw in two extra cuttlebug folders and the Hero Arts snowflakes!! Isn't she the sweetest?!?! Thanks Michelle!!
Here's a list of what I'm offering:
1. Cats and Bats Halloween (Inkadinkado)
2. Christmas Stamp Ensemble and 3 1/4 circle stamper (JustRite)
3. Frost and Twiggy DP (Memory Box)
4. Snow Dots, Skeleton Scroll, Haunted Halloween embossing folders (Cuttlebug)
5. Candy Cane, Copper, Baby Blue (Stickles)
6. Copper and Bliss Pearls (Kaisercraft)
7. Snowflake stamps (Hero Arts)
All you have to do to be entered is leave a comment at the bottom of this post. I will use random org to pick a winner Sunday afternoon.
Thank you again for stopping by! I hope you're all enjoying the season change. (I'm still patiently waiting for mine *grin*)
Happy Stamping!!!
Labels:
Blog Candy,
Stamper's Dream
Wednesday, September 24, 2008
Christmas Mouse
I love doing SCS's Sketch each week! There are so many creative stampers here, and Rox always provides wonderful ideas from all of you!! Thanks to everyone for such creative inspiration.
I just stamped the mouse image on Papertrey White cs with Tuxedo Black (Memento) and colored it with my copics. I attached the dew drops and tiny holly with Diamond Glaze and added some sparkle to the cap and snow at the bottom.
No ink distressing!! Can you believe it? I know. I had to hold back...I almost added some at the last minute, but I wanted to prove to myself that I could stop!! I'm not that addicted!! *grin*
Oh, the head of the mouse is popped (yikes that sounds bad, but it's true) with dimensional tape, and I added the lines with my Scor-Pal. Here's a close up so you can see the sparkle and dimension.
Supplies:
Stamps - Christmas Tree Mouse, Lighten Up Mouse (Impression Obsession Clear Stamps)
Paper - Bazzill, Snowy Days (Pebbles Inc.), Papertrey White
Ink - Tuxedo Black (Memento)
Accessories - Copics, Dew Drops, Ghost Flake (Heidi Swapp), Scor-Pal, Quickie Glue Pen, Ultrafine Crystal Glitter, Tag Corner (SU)
Labels:
Impression Obsession,
SCS Challenges
Tuesday, September 23, 2008
There's no people like Snowpeople
Today's Color challenge on SCS is Baja Breeze, Kiwi Kiss, and Very Vanilla. I don't have any of the new colors so I tried to get as close as I could with my prismatics and dp.
I stamped the Snow People image by Artful Stamper in Tuxedo Black (Memento) on Neenah Natural White, and colored the snowmen with my copics.
I liked the soft, fuzzy feel of this May Arts ribbon and thought it fit with the mittens and snow caps. The edges were all ink distressed ( I know, you're all shocked...*grin*) with Frayed Burlap, and the third guy is popped up with dimensional tape.
I also distressed the corner brad by pounding it with my Tim Holtz distress hammer.
Thanks for stopping by! Have an awesome week!! And, happy stamping!!
Supplies:
Stamps - Artful Stamper
Paper - Tres Jolie (My Mind's Eye), Spring Willow Dark, Suede Brown Dark, Vanilla Cream (Prismatics)
Ink - Tuxedo Black (Memento), Frayed Burlap (Ranger Distress Ink)
Accessories - Copics, Tim Holtz Distress hammer, Brads, Mat Pack, Piercing tool, Fibers, sponge, dimensional tape
Labels:
Artful Stamper,
SCS Challenges,
Stamper's Dream
Sunday, September 21, 2008
Cam's Vase
Is it Monday already? Good grief time flies. Since it's Monday, that means it's time for me to upload this weeks CCEE challenge. Carolyn King (Cammie on SCS) sent us all her new Whimsical Autumn set and our challenge this week was to use some of those images to make a Fall themed card. I chose to use the vase and the stemmed leaves (they're stamped with Brushed Corduroy on the green plaid)
I used Beate's sketch that she had on Friday. This is the first time I've used a sketch other than SCS's. It was fun. I think I'll try it again soon.
I stamped the vase with Tuxedo Black (Memento, and colored the vase and stems with copics. The leaves were colored with my souffle pens (coral and white) All the edges were ink distressed with Frayed Burlap and Walnut (Ranger Distress Ink) and I finished off the card with some tan twill and Candy Dots (I' Kan-dee).
If you'd like to see what the other girls did with Cam's stamps, click HERE.
Read my post below this one for all the details about Cam's donation and how you can win BLOG CANDY!!
Have an awesome week!!
Supplies:
Stamps - Whimsical Autumn (Carolyn King - Gina K)
Paper - Eire Tartan (Bo Bunny), Harvest Leaves (Karen Foster) Spring Willow Dark, Suede Brown Dar, Vanilla Cream (Prismatics)
Ink - Tuxedo Black (Memento), Frayed Burlap,Brushed Corduroy, Walnut (Ranger Distress Ink)
Accessories - Twill Ribbon, Souffle pens, sponge, Candy Dots, dimensional tape
Labels:
Autumn,
Carolyn King Stamps,
Fall,
Gina K
World Alzheimer's Day Blog Candy!!
If you haven't already been to my friend Carolyn King's (aka Cammie on SCS) blog: My Blog, you need to do so now. In honor of World Alzheimer's Day, she is offering over $1000 in blog candy to one blessed winner. All you have to do is make a card for a caretaker of an Alzheimer sufferer, and follow the rules of that post and you will be entered to win stamps and supplies from some fantastic bighearted companies and individuals who have so generously donated to this. Cam recently lost her mother to Alzheimer's and is donating all the proceeds of her Whimsical Autumn set to Alzheimer's Research. Go check out her blog, My Blog, and read about everything she's done and what you too can do!!
Watercolored Apples
It's Sunday, and that means I get to case a Featured Stamper on SCS. Today it's Shannon (aka E3Stamper). Not only is she inspirational with her gallery of fabulous sketches, but she's just as inspirational with her comments. A real sweetheart for sure. Here's the card I cased: Real Soft Love I loved her sketch, so I stuck faithfully to it. The changes I made are as follows:
1. Colors
2. Images
3. Added sewing and distressing
That's it...I told ya...I loved her sketch!!
Now, for my card, I stamped the Apples image (Artful Stamper) with Black Onyx Versafine and embossed it with Detail Black Embossing Powder (Judikins). I then colored the image with Adirondack reinkers that will be listed in the supplies at the bottom of this post. The sentiment is also embossed, and each panel is ink distressed with Frayed Burlap and Walnut Ranger Distress inks. I sewed around the Cosmo Cricket dp to help give it a country feel, and added the ribbon and brads that Shannon's sketch called for.
Thanks for stopping by!! I hope ya'll have a fantastic and blessed week!!
Supplies:
Stamps - Apples (Artful Stamper) Sentiment (Thinking of you messages - Hero Arts)
Paper - Suede Brown Dark and Tawny Light (Prismatics), Gretel (Cosmo Cricket), Wheat (Creative Imaginations)
Ink - Frayed Burlap, Walnut (Range Distress Ink) Black Onyx (Versafine), Red Pepper, Lemonade, Terra Cotta, Lettuce, Latte, Espresso (Adirondack re-inkers)
Accessories - Martha Stewart Ribbon, Brads (Heidi Swapp), sewing machine, dimensional tape, sponge, distressing tool
Labels:
Artful Stamper,
Hero Arts,
SCS Challenges,
Stamper's Dream
Friday, September 19, 2008
Artful Pumpkin in Watercolor
I've really enjoyed participating in SCS's Inspiration Challenges lately. I was inspired by the colors and patterns this week. To see what they are, click HERE.
I started by stamping this Artful Stamper Autumn Pumpkin image with Black Onyx Versafine onto 140lb Hotpress Fabriano Watercolor paper. I watercolored it with Adirondack reinkers that I will list at the bottom. The background was embossed with my cuttlebug embossing folder Diamond in the Rough.
If I had it to do over again, I would have used a softer green as my background panel instead of the bright orange. I think the pumpkin would have *popped* better. But here it is in all of it's orange glory. LOL
The sentiment is from Hero Arts Clear Design Heartfelt Messages.
I added some Ultrafine glitter to the main image, Martha Stewart leaves, some Candy Dots (I Kan-dee), and Twill Ribbon (May Arts), and ink distressed the edges with Antique Linen and Walnut Ranger Distress Ink.
Supplies:
Stamps - Autumn Pumpkin (Artful Stamper), Clear Design Heartfelt Messages (Hero Arts)
Paper - Intense Orange, Vanilla Cream, Birchtone Dark (Prismatics), Watercolor
Ink - Antique Linen and Walnut Ranger Distress Ink, Adirondack reinkers - Lemonade, Rust, Willow, Lettuce, Latte, Peach Bellini, Denim
Accessories - Leaf Punches (Martha Stewart), Twill Ribbon (May Arts), Candy Dots (I Kan-dee), Nestabilities, corner rounder punch, Ultrafine glitter (Art Institute), Cuttlebug, dimensional tape, sponge
A Pencil Flower Tutorial
Okay...here goes. This is my very first tutorial, so bear with me...At the winter CHA 2008 in L.A., I learned how to make a pencil flower out of decorative paper at the "Time Flies" booth. They were teaching these floral make-and-takes to promote their green decorative paper. It's fabulous paper. You can find it HERE. Anyway, I thought it would be fun to make a floral bouquet. So, I designed my own petals and leaves, and used a pencil instead of the pen they provided. Here's what the flower should look like. Now, I'll explain the steps to get to this final result.
Supplies Needed:
1. Two Sided decorative cardstock. (The cardstock will hold its shape better than the paper)
2. A petal template (make sure you have a tab added to the bottom of the petal, this will allow you to wrap the floral tape around it.)
3. Leaf template
4. 2 1/4" x 4 3/4" strip of the same double sided cs for the center.
5. Floral Wire
6. Copper wire
7. Pencils
8. Floral Foam
9. Container (I used a mug both times because that's what I had on hand.)
10. Hot glue gun (You can use any strong glue, I'm just impatient, thus the fast drying hot glue)
11. Scissors
I cut 10 flower petals, and 2 or 3 leaves and ink distressed them to give them depth. (My leaf is True Thyme (Stampin' Up), and I took my stylus and drew random leaf pattern lines on it to make it more realistic.) I like the Walnut Ranger Distress Ink for dp's with browns in them. Make sure you do 5 petals with each side of the dp. You then glue wire to the back of the petals with hot glue. 5 with the blue showing, and 5 with the brown showing. Note to self: Don't take photos with petals in mug. Take them like the single flower above, laying on a flat surface. *grin*
After my petals were ready, I began cutting thin strips 3/4 of the way down on my 2 1/4" x 4 3/4" strip of dp. This will be the center of your flower. Put double stick tape along the bottom and wrap it around the top of the pencil. The eraser should be about 1/2 way down in the middle.
Then, starting at the base of each strip, take your thumb and index finger fingernail and slide it up to the tip. This will curl them. For the pink flowers I did this before adhering the petals, and for the blue, I did it afterward. It's easier to get a deeper curl if you do it before. It just makes it a bit more challenging to attach the petals.
Now you're ready to assemble the petals. First, choose what color you would like to be your center. For this flower, I wanted the blue. So I put 2 ink distressed petals on one side and wound the wire around and down the pencil, and then 3 on the other. Then take your brown sided petals and put 3 behind the 2 blue, and 2 behind the 3 blue and repeat the wire wrapping. You should now have 5 petals on each side. Now attach your leaves the same way. Put one behind one side and 1 or two behind the other and again, wrap the wire down. It should look like this:
For the next step, wrap floral tape thickly around the wire, starting at the base of your petals. This will hold the petals in place.
After your petals are securely attached, you can bend, curl, and arrange them. I just took one of my other pencils and wrapped the tips of the petals around it to curl them back. This gives them a bit more dimension.
I made three flowers this time and arranged them in a mug with floral foam in it. Two of the flowers are like my original arrangement, but I didn't have the same dp for the third flower. You could even make a poinsettia arrangement and glue gold micro beads to your eraser, or add stamens to the center of your flower too.
To add a bit of focal interest to my arrangement, I took thick covered floral wire and wrapped it around a pencil to create a swirl effect and placed them amidst the flowers. I also added a floral pick with a sentiment by Hero Arts Clear Design Thinking Of You Messages this time.
Here's a photo of the arrangement I made in March of this year for the Dirty Dozen on Splitcoast. I made 5 flowers for this project. You could make a variety of shaped flowers too. The "Pick a Petal" Stampin' Up set would work well for this project. Just make sure when you are cutting the petals out, that you cut a tab for the base.
I hope this was easy enough to follow. These flowers are really pretty simple and are great for teachers in a bouquet, or for little girls, or even secretaries on secretaries day. You can use a pen as a center too, I just liked the look of the eraser.
Hope you have a fantastic weekend!! And thank you so much for visiting my blog!!
Happy Stamping!!
Supplies:
Stamps - Clear Design Thinking of you messages (Hero Arts)
Paper - Bohemia (My Mind's Eye),
Ink - Walnut (Ranger Distress Ink)
Accessories: See supplies listed above
Wednesday, September 17, 2008
Christmas Peace
Rox provides such wonderful sketches for us each week for the SCS Sketch Challenge, that I find I rarely miss one. This one was really fun for me. The main panel is covered with crystal lacquer and a sprinkle of ultrafine crystal glitter.
I stamped Penny Black's Nature's Dance with Versamark onto Vanilla Cream and embossed with Malachite ep. I then sponged over it with Antique linen and sponged with edges with Walnut Ranger Distress Inks. The berries are Xmas Red Stickles. I spread a thin coat of Diamond Glaze (JudiKins) all over the main image and sprikled a touch of ultrafine crystal glitter (Art Institute)to give it sparkle to match this gorgeous dp by My Mind's Eye. If you click on the photo, you'll be able to see the sparkle better.
All the edges are ink distressed with Walnut RDI, as well as the Martha Stewart snowflakes. The Latte Pearls are Kaisercraft, and I have a Heidi Swapp ghost snowflake in the upper right hand corner that has a touch of Coffee Ice stickles on it. I finished it off with some Island Blossom dew drops and the beautiful Copper ribbon by May Arts. The Peace sentiment is Inque Boutique (Staphanie Barnard Christmas), and is cut out with nestabilities.
Thanks so much for stopping by today. I hope you're having a wonderful day filled with peace and inspiration!!
Supplies:
Stamps - Nature's Dance (Penny Black), peace sentiment (Stephanie Barnard Christmas-Inque Boutique)
Paper - Laundry Line (My Mind's Eye), Vanilla Cream, Sage Medium, Blush Red Dark (Prismatics)
Ink - Versamark, Aged Mahogany and Walnut (Ranger Distress Ink)
Accessories - Malachite embossing powder (JudiKins), Island Blossom (dew drops), Cuttlebug, Nestabilities, Snowflake punch (Martha Stewart), Latte Pearls (Kaisercraft), Copper Ribbon (May Arts), Corner Ticket Punch (SU), dimensional tape
Labels:
Inque Boutique,
Penny Black,
SCS Challenges,
Stamper's Dream
Tuesday, September 16, 2008
A Birthday Wish...
I love my kids!! I truly do. But my daughter was so totally selfish for her birthday. Now this is quite out of character. Normally, if you ask her what she wants for her birthday, she will be hard pressed to come up with something. This time, however, I made the mistake of asking her what she would like me to do for her birthday card. She was very specific. She wanted bright colors (Hot Pink, Orange and Turquoise) and funky shapes. I was like...You've got to be kidding!!! Then, she added the absolute worst request possible...No scenes or elegance!! You're kidding right? Talk about torture. See? Told you she was selfish.
Well, being "the mom" I do have certain powers...compromise....*grin* You want presents? Hmmmmm? You have to be more reasonable. (I know...I'm rotten...but brights and funky shapes? PAHLEASE....she knows I'm all hot air though...she'd already gotten a new bedroom set, so what could I really do?) I asked her how about turquoise and black....her face lit up and she was like....YEAH!! So, being the generous and thoughtful mom that I am, I even added one more bright...lime green. She LOVED it! Whew!!!
I created the background with Inque Boutiques Background 1 set by coloring the circles and stripes with Tempting Turquoise, Green galore and black (Stampin' Up markers) and stamping them on to glossy cs. The image It's a Boy Turtle and Frog (Whipper Snapper) was actually watercolored with SU markers (listed in supply section at bottom) and an aqua pen. You have to blend the colors very fast though because once they're dry they won't blend. I replaced the "It's a boy" sentiment in the sign with "happy birthday" (Wordsworth - Tiny wise words collection). The dry embossing on the green border was done with cuttlebug borders. I punched the edges with SU's Tag Corner punch, added some matching brads and ribbon, and popped up the panels with dimensional tape.
My daughter collects frogs so the frog on the turtle was a hit!! I passed!! Woo-Hoo!!
I hope you are all having a fabulous week!!
Supplies:
Stamps - It's a Boy Turtle/Frog (WhipperSnapper), Background 1 (Inque Boutique) sentiment (Wordsworth)
Paper - Tempting Turquoise, Green Galore, Black, Glossy
Ink - Tuxedo Black (Memento), Tempting Turquoise, Green Galore, Old olive, Brocade Blue, Going Grey, Barely Banana
Accessories - Cuttlebug, Tag Corner punch (SU), Ribbon, brads, dimensional tape
Sunday, September 14, 2008
A charm for a charming person...
I combined two challenges today. The Featured Stamper (lazylizard) on SCS and the weekly challenge that I do with my CCEE friends.
HERE's the card of Liz's that I chose to case. The changes I made:
1. The colors (somewhat)
2. Machine Sewing instead of a stamp
3. Added three ribbon strips
4. Added pearls to the corners instead
of the flowers at the bottom
5. Added a shrink plastic charm
Once a month, for our CCEE challenge a unique name is picked from the SCS members and we make a card for that person and mail it to them. This week Cam picked Charmwarm (Charmaine). I'm on a design team with Charmaine, and believe me when I tell you, she IS sweet and charming. I so enjoyed making this card for her!!
Check out our CCEE Stampers blog to see what the other girls made for Charmaine.
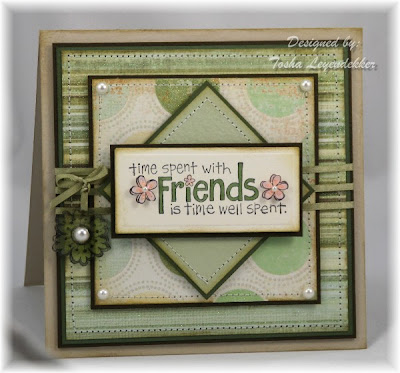
So, we were to make a card with a charm, but, Cammie, being the challenger that she is, said it couldn't be a *store bought* charm. It had to be hand made. So I stamped the large flower, from the SU set Time Well Spent, onto a sanded piece of clear shrink plastic, and colored the sanded side with my copics to match this gorgeous sparkly dp by My Mind's Eye. They have a fabulous new line called "Laundry Line"!! And every piece has sparkles in it!! Gorgeous stuff!!
The "Friends" sentiment was stamped with Tuxedo Black (Memento) onto Neenah Natural White and colored with copics. I sewed around each panel too, and popped them up with dimensional tape. I added a touch of glitter to the tiny pink flowers and a teeny tiny Kaisercraft pearl to each too, as well as to my shrunk flower.
Have a fabulous week ya'll!! I'm praying for all of you who are being hit so hard by Ike!! I can't imagine what you're all going through. Huge stampin' hugs!!
Supplies:
Stamps - Time Well Spent (SU)
Paper - Laundry Line (My Mind's Eye), Sage Medium, Birchtone Light and Dark, Neenah Natural White
Ink - Tuxedo Black (Memento), Frayed Burlap (Ranger Distress Ink) edges
Accessories - Copics, Nestabilities, Clear Shrink Plastic, Pearls (Kaisercraft), sewing machine, glitter, Quickie Glue Pen, dimensional tape, ribbon
Labels:
CCEE,
Stampin' Up
JustRite Week at Stamper's Dream
I tell ya!! Michelle has such a talented design team. I've been checking out all the samples this week, and talk about creative, beautiful, and just plain super fabulous!! WOW!!
It's been JustRite week at Stamper's Dream this week, so Michelle is offering some phenomenal blog candy. But, you've figured that out already, haven't you!!! Anyway, all you have to do is comment on one of her blog posts since Monday, and you'll be entered into a drawing to win a JustRite C-45 Monogram Stamper. And she just sweetened the deal...if she reaches 100,000 hits, she'll have a drawing for the JustRite Curlz Font and borders kit too. All you have to do is leave a comment on her pinecone card!! How fabulous is that!?!?!?! So head on over to the Stamper's Dream blog and check it all out!! She's having the drawing sometime on Sunday. And, not only does she have some of the older sets, she has many of the new JustRite sets in right now!! She ordered them all, so as they arrive, she'll be making them available in her store!!
Now, I've been wanting to make an acetate Cami tri-fold card for quite some time. There's an excellent tutorial on SCS. Just click HERE. I started off by cutting and scoring. I then punched a circle out of the upper part of the middle panel. I did this with my Cuttlebug and Nestabilities (Spellbinders). After that, I stamped the large swirl (Nightingale - Inque Boutique), with black Stazon, on the end panel. Now I can fold it up and see where I need to place my JustRite circle image that I created with the Damask 1" Borders set, and their small letters. After arranging my letters on the wooden stamper, I inked it up with Groovy Guava (SU) and then colored the dots with a black marker. I huffed...and stamped. I added a few rhinestone stickers to bling it up a bit and layered it with dimensional tape onto Light Blush Red Prismatic cardstock. The back piece is the same with the edges cut with my scallop rotary cutter.
For the front of the card (which is actually the middle panel) I stamped the Inque Boutique Nightingale dots down the side ad added an open scalloped circle frame that I cut with my Cuttlebug diecuts. The circles are each coated with Silver Stickles also.
Finally, I added a flower to the slot that holds the card together, and coral dots around the scalloped frame with a Souffle pen.
Supplies for the acetate card:
Stamps - Damask, small letters (JustRite), Nightingale (Inque Boutique)
Paper - Light Blush Red (Prismatics) Black, Acetate
Ink - Black Stazon
Accessories - Glitter, slot punch (SU), ScorPal, scallop rotary cutter, Cuttlebug, nestabilities, rhinestone stickers, stickles
Here's another "Thank You" card that I made for
my son. He recently turned 18. Now you'd think I would plan ahead knowing he would need thank you notes...but nooooooo. I was scrambling to make these after his birthday. So, I needed something fast and simple to make. Of course I thought of the JustRite stampers for this. You can make virtually any sentiment in many combinations. I used the Curlz Font and Borders kit and the small letters one to make this circled Thank you. I embossed the bottom panel with the Cuttlebug Houndstooth embossing folder, and framed each piece with black and Going Grey (SU). Now, since this was to be a masculine card, I don't know what I was thinking using this particular font. Thankfully my son was so worried about getting these out that he didn't pay attention to that part. WHEW!!!
Thank you so much for visiting my blog!! I appreciate every one of you. Hopefully you've been inspired this week, becuase all of us have had fun creating examples with this fabulous product. I hope you have a blessed weekend!!
Supplies:
Stamps - Curlz Font and small letters (JustRite)
Paper - Gray, Light Gray and Black (Prismatics), Neenah Solar White
Ink - Tuxedo Black (Memento)
Accessories - Houndstooth (Cuttlebug embossing folder), nestabilities, rhinestone stickers
Labels:
Acetate,
Cami Tri-Fold,
Inque Boutique,
JustRite,
Stamper's Dream
Saturday, September 13, 2008
Cam's Pumpkin
I made this card for two reasons. First, my friend Carolyn King (Cammie on SCS) designed a stamp set called Whimsical Autumn. It's darling, and 100% of Cam's proceeds are going toward Alzheimer's Research.
Cam is also going to honor Alzheimer Care takers on Sept. 21 (National Alzheimer's Day). Check out her blog HERE for more details. She'll be having over $600 in blog candy available. There are so many generous people out there, it just warms my heart to overflowing!!
I was inspired by todays SCS Inspirational Challenge, to use these colors and swirls and leaves. Click HERE, then on the word file below the explanation of the challenge. I'm technologically challenged, so I'm not sure how to link this any better. I'm so sorry.
I stamped the Pumpkin image, from the Whimsical Autumn set, with Tuxedo Black (Memento) and colored it with my copics. The leaves on the bg are Kaisercraft Elegance Rub ons. The brads in the corners are Crushed Velvet brads (Doodlebug) with Kaisercraft Bronze Rhinestones in the centers. All my framing was cut with my cuttlebug and Nestabilities.
Supplies:
Stamps - Whimsical Autumn (Carolyn King designs with Gina K)
Paper - Papaya Puree Dark, Tawny Medium, Black (Prismatics), Neenah Natural White,
Night Light Jack's Stripes (My Mind's Eye)
Accessories - Copics, Cuttlebug, Nestabilities, Rhinestone stickers (Kaisercraft), Quickie Glue Pen, Ultrafine crystal glitter, Oval punches (SU), scotch dimensional tape
Labels:
Autumn,
Carolyn King Stamps,
Fall,
Gina K
Thursday, September 11, 2008
Never look back...
A dear friend of mine, Cindy Motherway (Mothermark on SCS) collaborated with H&M Stamps to come up with a fun stamp set. Now, Cindy is a goofball!! (That's why I love her so much.) So, that's why all of the images in this set are back-ends of animals with clever sayings to go with them. The set is called "A Lil' Behind". There are 23 fabulous images and sentiments in this set. Too, too fun!!
Now, SCS's Ways to use it challenge today, is to get creative with a white gel pen. I love my Inkssentials pen, so I stamped this fun cow on Kraft cardstock with Tuxedo Black (Memento) ink. I then colored it with my gel pen and copics. I was actually able to shade the white edges with my C-3 Cool gray copic. It colored right over the gel pen. The dots on the side are just punched Suede Dark Brown cs circles ink distressed with Brushed Corduroy (Ranger Distress Ink) to give them a bit of depth. Each panel is inked distressed with the Brushed Corduroy also.
Supplies:
Stamps - A Lil' Behind (H&M stamps)
Paper - Tawny Medium, Herbal Garden Medium (Prismatics), Going Gray, Kraft and Black (Stampin' Up)
Ink - Tuxedo Black (Memento), Brushed Corduroy (Ranger Distress Ink)
Accessories - Tag corner (Stampin' Up), Hole punch, Copics, White gel pen (Inkssentials), sponge
Labels:
HandM Stamps,
SCS Challenges
Tuesday, September 9, 2008
Blog Candy and Elegant Greetings for a Challenge
Before I show you the card I made, I need to tell you about some fabulous blog candy that Michelle at Stamper's Dream is offering. It's HUGE!! Michelle is having a JustRite week, and you get to participate in it!! All you have to do is post a comment on her blog posts this week to be entered into a drawing to win a JustRite C-45 Monogram stamper. Check Michelle's Blog for details.
For some fabulous ideas for the JustRite Stamper, check out what Michelle's Design Team's doing this week.
Amy Westerman Monday 9-08
Carolyn King Tuesday 9-09
Charmaine Ikach Wednesday 9-10
Kurtis Amnundson Thursday 9-11
Laurie Schmidlin Friday 9-12
And Me Saturday 9-13
I made this card today for SCS's Sketch Challenge that Rox so generously provides for us each week. I flipped the sketch on its side in order to fit the stamp image I wanted to use. This layout has many layers, but it's construction is pretty straight forward. I just stamped the image with Season's Greetings (Inkadinkado) image with Aged Mahogany directly onto the MME paper, edged each panel with the same ink and Walnut, and mounted each panel with dimensional tape. I also sewed around the back panel and the three strips. To add a bit of elegance, I added the bow at the top and a bit of glitter onto the berries of the image. Finally, the flower to the bottom corner. Oh, and I forgot...I highlighted the word "Greetings" with a copic to make the letters pop a bit.
I hope you're all having a fabulous week.
Supplies: Stamps - Season's Greetings (Inkadinkado) Paper - Roam (K&Company) 29th Street (MME), Crab Apple Dark, Suede Brown Dark (Prismatics) Ink - Aged Mahogany, Walnut (Ranger Distress Ink) Accessories - Flower (Petaloo), Decorative Brad (Making Memories), Stitched Ribbon (Making Memories FaLaLa), Sewing Machine, Dimensional Tape
Labels:
christmas,
Inkadinkado,
SCS Challenges,
Stamper's Dream
Monday, September 8, 2008
Cam's Whimsical Autumn Stamps...
A dear friend of mine, Carolyn King (Cammie on SCS) has designed a fabulous Whimsical Autumn stamp set in which 100% of her proceeds will be donated to the Pennsylvania Chapter of the Alzheimer's Association, Always, in honor of her grandmother who recently passed away from this debilitating disease. And to top it off, a friend of hers promised to donate a dollar for every set sold in September.
This set has a variety of darling images. The squirrel and apples are just a couple of them. Click Here to see the rest of this cute set.
I also made this card for the SCS Featured Stamper who was Denise (Card Crazy). The card I cased can be found Here. I loved how she added the strip of magic mesh. I hadn't used mine in quite awhile. I also liked how she lined up the brads under the image. So, I changed the colors, the images, the shape of the center panel, and I added a sentiment instead of weaving the ribbon. Thanks for the inspiration Denise!! I really enjoyed perusing your gallery!!
I colored the images with copics and ink distressed the edges with Brushed Corduroy (Ranger Distress Ink). The tag is a Spellbinders diecut, and the green dots are Candy Dots by I kan' dee.
Here's a close-up so you can see the dimension.
Supplies:
Stamps - Whimsical Autumn (Stamps by Carolyn King/Gina K Designs)
Paper - My Minds Eye
Ink - Tuxedo Black (Memento), Brushed Corduroy (Ranger Distress Ink)
Accessories - Candy Dots, Copics, Magic Mesh, Spellbinders Ribbon Tags, Antique Ribbon (Making Memories), Dimensional Tape
Labels:
Carolyn King Stamps,
Gina K
Sunday, September 7, 2008
Trying to Resist...
It's time for another CCEE challenge. This week Carolyn (Cammie on SCS) challenged us to use the Crayon Resist technique. SCS has a fabulous tutorial. Click HERE. I'd never used that one before, so I was a bit intimidated!! Yikes!! Well, it was easy peasy. This card took me less than a half hour to make. And that's saying something!! It normally takes me longer than 2 hours to make a card. This was even my very first try...nothing in the garbage can. WOOT!!
Now, this is not my normal every day card either. It's quite simple. But I liked it that way.
You see, I'm mailing this card to a guy, and guys don't usually go for the frou-frou. He just found out he needs to go through 4 more sessions of chemo. I can't even imagine.
Well, for my family and me, a camping fire inspires happy thoughts. And roasting marshmallows? Heaven. Hopefully this card will help lift his spirits a bit.
If you'd like to see what the other girls have made with this technique, Click HERE.
How did I make this card? Well, I stamped this roasting scene (Morning Star Stamps) with Tuxedo Black (Memento) onto glossy card stock. I colored the marshmallows with a white crayon, and outlined some edges of the flame with the white crayon also. I then inked up a sponge with Scattered Straw (Ranger Distress Ink) and rubbed it over the flame. I edged the flame with Aged Mahogany (Ranger Distress Ink), and the logs with Walnut (Ranger Distress Ink). For the sky, I used Black Soot (Ranger Distress Ink) Love these inks!! They're fabulous!! Check out Rubbernecker Stamps for all the colors!!
I then just matted the image with black and adhered it to a standard sized glossy card with a thin black gingham ribbon tied around the top! So simple...but gets the point across I think!!
The Happy Thoughts sentiment is from the Clearly Wordsworth set Everyday Whimsy, that you can find at Stamper's Dream.
Supplies:
Stamps - campfire scene (Morning Star Stamps), Everyday Whimsy (Clearly Wordsworth)
Paper - Glossy and Black
Ink - Tuxedo Black (Memento), Scattered Straw, Aged Mahogany, Walnut, Black Soot (Ranger Distress Ink)
Accessories - White Crayon, sponge, Gingham Ribbon
Saturday, September 6, 2008
Santa Owl
I love taunting my friend Frances (StampOwl on SCS) whenever I have an owl that I think she doesn't have. Wicked, I know, but I can't help myself. So when I saw this Inspiration Challenge on SCS today...I thought this was the perfect time to enable her!!! Don't worry...she plans on paying me back with snowmen....they're my weakness!! *grin*
I liked the white on white with the touch of brown in the owl, so that was my inspiration. I added a bit of dark red just to amp it up a bit.
The Penny Black Greetings from the Wise Owl was stamped with Tuxedo Black (memento) onto White Prismatic cs. I liked the texture it gave the owl. The sentiment is from Hero Arts' Thinking of you Clear Design set. It's a fabulous set with a variety of messages and fonts, and even a butterfly and flowers. I use it often!!
The two middle panels are embossed with the cuttlebug folders Snowflakes and Argyle.
I inked up the edges with Adirondack Latte, raised the panels with dimensional tape, and added this awesome Chocolate Twill ribbon from May Arts!!
You can get all the supplies on this card from Stamper's Dream!! I tell ya, it's a one stop shop!! Michelle has everything!! A varitey of stamps, Prismatic card stock, May Arts Ribbon, tons of bling and inks...check it out!!
Supplies: Stamps - Greetings from the Wise (Penny Black), Thinking of you Clear Design (Hero Arts) Paper - White Prismatic, Bravo Burgandy (SU) Ink - Tuxedo Black (Memento), Latte (Adirondack) Accessories - Cuttlebug, Nestabilities, Copics, Velvet brad, glitter, brads, Chocolate Twill Ribbon, dimensional tape
Thursday, September 4, 2008
My Montana visit with Laurie...
I'm so excited to share with you my recent trip to Montana: a little side-trip on my way home from bringing my son to college. Laurie and I *met* about a year ago on SCS, were on the Dirty Dozen together on SCS, and are even on a design team together. We've become great friends before even meeting in person. And now that I've actually *met* her, I feel truly blessed. She's one of the kindest most generous people you'll ever meet. And......boy can she cook. Although I'm over 8 years older than her, boy do I want to be just like her when I grow up. She just oozes talent in whatever she tackles!!!
Now, Laurie lives waaaaaaaaaaay off the beaten path, but if you have the diligence to keep plodding along on the 7 mile dirt road to their ranch, it is so, so worth it. The beauty, the tranquility, and the warmth of her family is like no other. Now, here is a picture of us right before my husband and I left to drive 17 1/2 hours home. Thus, the straggly hair. Not my best picture, but hey...it's a reminder of a treasured time.
Here's a photo of the cabin we stayed in. Boy did they role out the red carpet!! A gorgeous cabin with a thoughtful gift of goodies and a gorgeous card!! Not to mention the view!!! WOW
We went to bed to the sound of rain on the cabin's tin roof (so soothing) and woke up to snow on the mountains!! GORGEOUS!!
Urs and Laurie even gave us a tour of the ranch by 4-wheeler. Oh I wish I took a picture of them riding tandem, but I was busy holding on to my husband, so I'll just show you a couple of pictures of what we saw. First...two moose. One is walking away.
Here's an antelope that had wandered away from the group that was running in the distance.
Finally, here's a picture of our gracious, kind, and generous hosts. Not only did they make us feel welcome and long to return before we even left, but they have 4 of the absolute sweetest and charming kids you'll ever meet!! Thank you guys for giving us a treasured memory!!!
Labels:
Montana photos
Pumpkin Cart
I love fun papers!! Textures, colors, shapes...all are such treats to work with. So thanks for the fun Ways to Use it challenge today Julia!!
These papers are full of texture. They're fun to touch and look at irl. The image is colored with copics, and the nestabilities rectangles are popped up with dimensionals, so the cart appears to be in a shadow box. The wheel and pumpkins are also popped up.
The fabulous ribbon is May Arts and can be found at Stamper's Dream, and I distressed the edges with Frayed Burlap (Ranger Distress Ink)
Supplies:
Stamps - Inkadinkado
Paper - Texture Pearl (Provo Craft), Rough Pavement (EK Success), Sage Dark, Suede Brown Dark (Prismatics), Neenah Classic Natural
Ink - Tuxedo Black (Memento) Frayed Burlap (Ranger Distress Ink)
Accessories - Copics, Nestabilities, brads, circle punch, Ribbon (May Arts), dimensional tape
Labels:
Fall,
Inkadinkado,
SCS Challenges
Wednesday, September 3, 2008
Christmas Stockings SCS Sketch
Well, I'm back!!! You probably didn't even know I wasn't around since I'm not a consistent uploader, and I had postdated a card to upload on Sunday evening.
Well, I just got home from taking my son over 1000 miles away to college. We left on Thursday and got home at 1:00 am Tuesday morning. WOW!! He's my first born, so this was quite the new experience. As hard as it was, I know he's at a good college. Freshman *traditiation* as they call it, focuses on teaching all the guys to be gentlemen. They have a day and a half of training. The college believes in not only training them to be academically prepared to go out into the world, but to be great men of character.
Now, after this tradiation, he'll be focusing on his studies (Mechanical Engineering). He'll be competing for their swim team also. So, he'll be extra busy. That's awesome for a mom to know...less time to get into trouble. *grin* Morning practices are at 5:30 am, and they practice 22 hours a week. Although we've only talked to him for about 1 minute since leaving him Saturday evening, we know he's having a fabulous time getting to know many of the freshman. Classes start today. Man, I wish he'd call!!!! Augh!!!!!!!!!
Leaving my son was the hard part...but what made this trip something to actually look forward to, was that I was going to get to visit Laurie (Lauraly on SCS). She and I met on SCS about a year ago and have been fabulous friends ever since, although we had never met in person. We've found that we are eerily alike, as are our husbands. She had a welcoming gift, with a FANTASTIC card, ready for us in our cabin when we arrived, cooked wonderful meals for us, gave us a tour of their ranch on four wheelers, and just plain made us feel welcome. What a blast!! She and I stayed up until almost 2:00 am talking like we've known each other our whole lives. She is one of the kindest and strongest women I know. Her DH and kids are just the best too!! What fun getting to know them!! I'll have pictures to show you soon!!
Sorry about the rambling....I'm sure you wanted to read about the card, so here goes...
Rox on SCS always supplies such wonderful sketches. And my favorite part about that is that that's one less step I have to think about.
As you've probably guessed, I made this card for today's Sketch on SCS. I stamped the Winter Glitter (Penny Black) image twice on Boxer designer paper by Basicgrey, with Tuxedo Black (Memento) and colored it with my copics. I cut out the second pieces and attached them with dimensional tape. I'm all about dimension...well, and distressing *giggle*. Thus, the distressed edges which I inked up with Antique Linen and Brushed Corduroy (Ranger Distress Ink).
The sentiment is by Stephanie Barnard (Inque Boutique).
I trimmed the edges with my corner tag punch (Stampin' Up), and added some fabulous glittery brads. The tiny ones are new ones that I just got in the mail. They're 5 mm and are called Gumdrop Brads (Imaginisce).
Well, that's it. Thanks for stopping by. I hope you're having a terrific week!!
Supplies: Stamps - Winter Glitter (Penny Black), Christmas Cheer (Stephanie Barnard Christmas - Inque Boutique) Paper - Boxer (Basicgrey), Black (Prismatics) Ink - Tuxedo Black (Memento) Accessories - Copics, glitter, brads, corner tag punch, dimensional tape
Subscribe to:
Posts (Atom)