Thursday, January 31, 2008

Happy Wishes

Julia is challenging everyone to use staples today for the Ways To Use It challenge at SCS. This is what I came up with. My top corner piece was created by cutting off the bottom of the SU tag punch. It makes the perfect angles. I stamped the image with Adirondack Salmon dye ink, and colored the stems with a SU Always Artichoke marker. I then sponged around all the edges with SU Groovy Guava and gave some dimension to the card by raising each panel with Scotch dimensional tape.

The stamp images can be found at Stamper's Dream.
Be sure to check out all of her new Penny Black and Hero Arts stamps!! She also got in some more liquid pearls, and those are awesome for amping up a card a bit!!

Stamps - Penny Black Ascent, Hero Arts Clear Thinking of You messages
Paper - Always Artichoke, Groovy Guava, Bazzill
Ink - Adirondack Salmon, Always Artichoke marker, Groovy Guava
Accessories - Fastenater and staples, nestabilities, circle punches, sakura souffle pen, Carl CarlaCraft flower punch, mini brads, SU corner ticket punch, Scotch dimensional tape, sponge

Monday, January 28, 2008

Hearts and Treasures

Ahoy ye mateys!pirate smilies

It’s TREASURE HUNT TUESDAY @ RUBBERNECKER. The Treasure if you find it, will be a free image. However, to receive the Treasure a purchase of any size is required, and your treasure must be claimed between 4:00 am PST until 9:00 pm PST Tuesday (8:00 am EST - 12:00 am EST). Not only is today Treasure Hunt Day, but for every $50 in stamps purchased, you will receive one FREE stamp. You can check out more information on the Rubbernecker Home Page. Go to Shelly's blog, Stamp with Shelly, for your first clue.

While you are on the Rubbernecker Homepage make sure and read about the Rubbernecker Bucks Monthly Drawing AND the FREE stamp offer:

*** Each month you can qualify to win $100 coupon good for Rubbernecker or Stamp Oasis stamps! For every $20 you spend, your name is entered once into a drawing.

*** For every $50 you spend on Rubbernecker, Stamp Oasis or KK Originals stamps, you get to choose a FREE stamp!

We also have some Rubber Buck Gift Certificates to give away as Blog Candy!!! These are redeemable for any stamps in the Rubbernecker, Stamp Oasis or KK Original sections!

This week's Blog Candy links:

Jeanne Streiff

Sherry Cheever

Shelly Kuck


Now, if you're still with me. Here's a card I made with Rubbernecker images and products.
First let me tell you about my homemade striped dp. I cut a piece of Ranger Cut-n-dry Stamp pad felt by Inkssentials and loaded it with ink stripes. I started in the center with Adirondack cloudy blue. Do not use the ink sparingly. Soak that baby. I then left a bit of white and loaded a thinner stripe of Lemonade on each side of the blue. After that I added Peach Bellini covering some of the Lemonade to give it a blended look. After the felt piece is soaked with ink, I just swiped it evenly down a piece of Glossy CS. I let the ends lift to give it that wispy unfinished look. I then crinkled up saran wrap and tapped it randomly over the inked surface to give it the soft distressed look. Refer to the smaller close up picture so you can see what I mean.

The topiary was stamped on Papertrey White CS with Ranger Black Soot Distress Ink. I've found that the Papertrey White is the best paper for coloring with copics. For me anyway. And the Ranger Distress inks do not blend when coloring!! The sentiment is stamped with Ranger Worn Lipstick Distress ink and has a think line of glitter on it to make it pop a bit. The Quickie glue pen is the most awesome for those fine lines. The heart topiary image is colored with copics and the green has a bit of ultrafine crystal glitter on it that I applied with my Sakura Quickie Glue Pen. I added a bit of Ice Stickles just before the sentiment, and I edged all the panels with white craft ink to soften them. The scallops were made with a scallop scissors.


Supplies:
Stamps - Rubbernecker
Paper - SU Cameo Coral, Glossy White, WorldWin Papers: Antique White, Papertrey White, Handmade dp
Inks - Adirondack reinkers - Peach Bellini, Cloudy Blue, Lemonade, Ranger Black Soot Distress Ink, SU Craft White
Accessories - Copics, JoyCrafts decorative pearls, SU ivory grossgrain ribbon, scallop scissors, nestabilities, SU horizontal slot punch, ice stickles, scotch dimensional tape, Sakura Quickie Glue Pen, Ultrafine Crystal glitter, Ranger Inkssentials Cut-N-Dry Stamp Pad Felt

Sunday, January 27, 2008

2008 Splicoaststampers Survey!!

I've been a member of the Splitcoast Fan Club for over a year and have learned and grown so very much!! I'm a huge fan of that community and all they have to offer. Right now, they're conducting an informative survey and would like members to take the time to fill it out so they can continue to serve the stamping community the best way possible. It takes very little time. I just completed it myself. Just go HERE. Thank you.

Framed challenge


I promised a card this evening, and here it is. This is the card I made with the supplies a few of us from SCS send to each other each month. We were to use the clear frame from Making Memories. I combined two challenges this week. SCS's Featured stamper Stamping Pam, and our CCEE Challenge (Cheers and Challenges Eager Eight) We challenge each other every Monday with a variety of different things. I will always have a card uploaded either Sun. evening or Monday morning for this. Here's Pam's card that I cased: Fall Flowers
Changes: Colors, images, dp, moved the sentiment up to a buckle, circle to square, added scallops to the bottom, and moved my bottom panel up a bit.

Thanks Pam for the inspiration!! I really enjoyed looking through your awesome gallery!!

Now for the deets!!

Main image: Stamped image with Ranger Black Soot Distress Ink onto Papertrey White CS, colored with copics. Glued the frame to peach Bazzill CS with Diamond stickles and framed with Nestabilites square diecut.

The red panel was created by painting Ranger Fired Brick Distress Crackle paint. I painted it on fairly thick so the cracks would show more. It's awesome stuff, and easy to use. The brush is included with the jar. It's connected to the inside lid, so you don't need to clean a separate brush. I then rubbed Ranger Walnut distress ink over it to make the crack stand out a bit more. I think it looks a bit like aged leather!!

The oval sentiment was cut out with oval nestabilities, and all the panels were ink distressed with Ranger Tea Dye Distress ink....sorry, forgot to include that one in the picture. The scallops were created with Stampin' Up's slit punch, and the velvet ribbon is threaded through the horizontal slot punched CS. All panels are raised with Scotch dimensional tape. The scallops were pierced using Tim Holtz Retractable Craft Pick.
Oh, and the inside says....are the perfect blend. Thanks for stopping and taking a look!!


Supplies:
Stamps - MFT
Paper - SU Chocolate Chip, Bazzill, peach, Fancy Pants dp, Papertrey White
Ink - Ranger Black Soot, Walnut, Tea Dye Distress Inks, SU chocolate chip marker to color sentiment
Accessories - Making Memories Frame, Diamond Stickles, Ranger Fired Brick Crackle paint, American Crafts Elements mini brads, SU slit and horizontal punches, Nestabilities, Tim Holtz Retractable Craft Pick, sponge, dimensional tape, velvet ribbon, copics

Friday, January 25, 2008

Inspiration!!

Hey y'all!!! Just wanted to let you know I won't be posting until Sunday evening. That's when I post a challenge I do with some goofy SCS friends. I'm heading to a Stamp Festival in Riverside, CA for today and Sat. I can't wait. I don't have any stamping stores anywhere near where I live, so this is a real treat for me. Plus I get to meet Dave and his wife Pat...the owners of RN, who I design for. How cool is that?!?!?! Hopefully I'll have a lot of inspiration from the vendors and their products!!

I hope you're all having an awesome weekend and are feeling the inspiration flowing through your fingers, to the stamps, and onto the cardstock!! Happy Stamping everyone!!

Wednesday, January 23, 2008

Thinking Daisies

Ever have those days when it takes you FOREVAH to make a card work? Adding some things, taking others off, adding something else...etc., etc. Grrrr. Well this card gave me fits today. It just didn't want to *come to be*!!! I didn't give up though. I would triumph!! Okay...here's the deets. I made this for SCS's sketch challenge today that you can find HERE.

This card is 5x7. The panels are each 2 1/8" x 3 1/2" with the matting 3/16" larger. The main image is 2 3/4" x 4". I started off by stamping the daisy image onto watercolor paper with Versafine Black onyx. I like using that ink the best for watercoloring because it doesn't bleed. The image is colored with Adirondack re-inkers and a waterbrush. I'll list the inks in the supplies list at the bottom of this post. The center of the flowers are coated with cinnamon stickles. And the sentiment is stamped with Versacolor black pigment ink and embossed with Black embossing powder. The panels are Memory Box dp, and the ribbon is Rusty pickle and SU stitched. The photo corner is just 1 1/4" squared with the green piece 3/16" smaller. all the panels are ink distressed with Ranger Frayed Burlap Distress Ink.


Now, here's the fun part. Tim Holtz makes this cool, cool hammer that you can distress items with. You can find this hammer at Rubbernecker Stamp Company. I distressed brads using the lined and dotted end of the hammer. I love the look, and loved the pounding too!! *grin* As you can see by the photo, there are 4 possible hammer ends. The end not showing has circular bumps on it. You can distress grungeboard too, paint it then sand the edges. I could have sanded the brads too, but I had a bit of sparkle on the flowers, so I didn't want to go completely distressed. I did, however distress the chocolate chip cs by running my fingernail over the edges. I felt like something was missing when I set my brads, so I pierced a bit between each one with Tim Holtz's Retractable Craft Pick.

Supplies:
Stamps - Penny Black: A touch, Hero Arts: Clear Thinking of you Messages found at Stamper's Dream
Paper - SU Chocolate Chip, Pumpkin, True Thyme, Very Vanilla, Memory Box DP, and Watercolor
Ink - Versafine Black Onyx, Versacolor Black Ultimate Pigment Ink
Adirondack reinkers - Butterscotch, Terra Cotta, Red Pepper, lettuce, meadow, stonewashed
Ranger Frayed Burlap Distress Ink
Accessories - brads, Cinnamon Stickles, Rusty Pickle Ribbon, SU True Thyme stitched ribbon, SU Mat Pack, Tim Holtz Retractable Craft Pick, sponge, scotch dimensional tape

We have a WINNER!!!

Drum roll please...................my first ever blog candy winner is....................#17 WendyP. I used my daughter this morning to pick the number. Being new to this whole blog world, I'm clueless with how to use the random number picker thingy.

Thank you everyone for your kind words and helpful suggestions. I know I've been changing the template a bit. I think I've finally found one that is easy on the eyes and easy to read. Some of you have asked to see altered items. I do hope to do some of those in the near future even though cards are my stamping project of choice. Tutorials? That too is doable.

Wendy, if you could email me at stamps4fun@hotmail.com, I'll give you the code to use at Rubbernecker for your free $10 Rubbernecker Bucks! Congratulations!!

Thank you to everyone who commented. I really appreciate the time you took to leave one!! Happy stamping!! And I should have a card posted later today for the SCS sketch challenge!!

Tuesday, January 22, 2008

Whimsical Blooms


I made this card for today's color challenge on SCS. The colors to use were: Blue Bayou, Soft Sky and Real Red. My red's i the flowers. *grin*

This card is pretty straight forward. All I did was stamp the image on Papertrey White CS with Ranger Black Soot Distress Ink. colored them with copics and gave them a little sparkle with my Sakura Quickie Glue Pen and Ultrafine crystal glitter. The scallop border was done with scallop scissors, and to get a straight scallop, I just lay another piece of cardstock over it with about a half inch of the cs I want to cut exposed, and cut along the cs guide. Woila...straight scallop! The scalloped border and sentiment are popped up with dimensionals. Thanks for stopping by. The stamped images, and other supplies can be found at Stamper's Dream Stamps store. Michelle has quite the variety of stamps and supplies!! If you haven't checked out her site, you are soooooo missing out. From stickles, to liquid pearls, to rhinestone stickers, to many stamp compaines....Gina K, MFT, Penny Black, Hero Arts, Paper Inspirations, Outlines, etc.


Supplies:
Stamps - Penney Black Winsome, Gina K Rectangle Greetings
Paper - SU Blue Bayou, Soft Sky, Papertrey White
Ink - Ranger Black Soot Distress Ink
Accessories - yellow Marvy rectangle scallop punch, scallop scissors, Sakura Quickie Glue Pen, Hero Arts Ultrafine crystal glitter

Monday, January 21, 2008

Satisfy your Sweet Tooth!!


Okay!!! Here's the deal!! Rubbernecker has soooooo many awesome deals going on right now, you can not afford to miss visiting their site. Dave has offered us some $10 Rubber Buck (good for Stamp Oasis and Rubbernecker stamps only) gift certificates to use as Blog Candy.
Now, it's been just over a month since I started my blog, so I'd appreciate some constructive criticism. What would you like to see added, deleted, or stay the same? Be honest. I can take it. I would like my blog to be as informative and inspirational as possible. Please leave a comment and the number of your comment. I will randomly draw a number and post the winner on Wednesday.

Check out these other blogs for blog candy too!
Kittie - Kittie Kraft (she also has the Treasure Hunt clue)
Broni - Splashes of Watercolor
Frances - StampOwl's Studio

How Sweet!!


I have two cards to share with you this evening. I used the same colors and the new Basicgrey "Two Scoops" dp.

They're both fairly simple, just a few layers. The first is a standard A2 card and the second is 5 1/4" x 5 1/4".
For the first, I just used SU Chocolate Chip, Bazzill, Papertrey White and the Basicgrey. The MFT image is stamped with Ranger Black Soot Distress ink. I love this ink for many reasons. One is because it does not smear when I color with my copics, and two you can emboss with it also. It also stamps clean and rich. LOVE it!! Anyway, the image is colored with copics and has a coating of Sakura Hobby Craft 3D Crystal Lacquer on it. You can find this image at Stamper's Dream. Michelle also has quite the variety of liquid pearls, stickles, and many different stamp companies are represented. Basically, a one stop shop!! yee-ha! Love that. I have to take a minute to tell you why I love the liquid pearls. I love decorating with embellishments, and I do like using pearls at times, but to put one pearl on each scallop.....OH MY, that would take the whole package and then some. So I get the look without sacrificing my pearls. How cool is that? The lace is by Rusty Pickle!! They have the most awesome ribbons. The squares were cut with nestabilities, as were the tabs where the ribbon is tied. I'm not sure who the ribbon is by since it was a gift. And the scallops have white opal liquid pearls on them.


Supplies:
Stamps - MFT Be Mine, from Stamper's Dream
Paper - SU Chocolate Chip, Bazzill, Papertrey, Basicgrey Two Scoops
Ink - Ranger Black Soot Distress Ink, Adirondack Ginger, SU Chocolate Chip
Accessories - copics, Sakura 3D Crystal Lacquer, Ranger Liquid Pearls, nestabilities, Rusty Pickle Lace, sponge

Okay, before I share the next card with you, I'd like to share with you the most awesome stamp cleaner by Judikins. I don't know about you, but I don't always clean my stamps right away. And some of these inks are atrocious to clean off. Well, last year when I went to an Heirloom Productions event in Riverside, CA...which I get to go to this weekend...WOOT...Judikins had a booth there with her cleaning product. Oh, my goodness...that stuff works like magic. And I don't know how, but it moisturizes the rubber too. So I bought a huge refill bottle then and there. I was going to wait to buy it there again this year....but guess what?!?!?! Michelle sells it at Stamper's Dream!!! Ye-ha!! LOVE this stuff. It's Rubber Stamp Permanent and Fabric Ink Cleaner!! Check it out!!

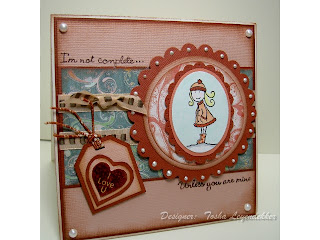
Okay, for this second card I mixed it up a bit...Elzybells (love this little girl) You can find her at Amuse. And MFT that you can find at Stamper's Dream.
The circles and oval were cut with nestabilities, and the tag is the two Stampin' Up tag punches. I put liquid pearls around the circle scallops, and pierced the oval one. Pearls by Joy Crafts are around the square. The sentiment and heart are part of the MFT Be Mine set. The edges are all ink distressed with Adirondack Ginger, and the sentiment is stamped with Adirondack Espresso.

Supplies:
Stamps - MFT - Stamper's Dream Elzybells (Amuse)
Paper - Bazzill, Basicgrey Two scoops
Ink - Ranger Black Soot distress ink, Adirondack Ginger, espresso
Accessories - nestabilities, liquid pearls, pearls, SU tag punches, ribbon, dimensional tape by scotch, copics

Treasure Hunt Tuesday at Rubbernecker!!

Now, head on over to Kittie's blog: Kittie Kraft for the first clue to go on your treasure hunt.
After getting the clue, head on over to Rubbernecker and follow where the clues lead. You could win a free stamp. Not only that...check out their site for more ways to get stamps for free!!

Blog Candy First!!!!

Hey y'all!!! Most every stamper loves to get free supplies and stamps. And I'm soooo one of them. So, I just wanted to let you know that I'm going to be offering some blog candy tomorrow. So please stop by. You're not going to want to miss this!!!

And don't forget to check out the Rubbernecker website tomorrow either!! Every Tuesday is Treasure Hunt Tuesday. You follow the clues, find the treasure and get a free stamp. There are a limited amount of stamps, so it's a first come basis.

Also, at Rubbernecker you have an opportunity to win $100 worth of Rubbernecker or Stamp Oasis images. For every $20 you spend, you get entered in a drawing. So if you spend $40, you get two entries, $60, 3 entries and so on. There will be a drawing each month, so the more entries you have, the greater chance you have of winning. The first drawing will be Feb. 5.

Not only that.....but for every $50 you spend, you get to pick a stamp for free. Check out the Rubbernecker site for all the rules!!

Photo Finish


Since it's Monday, it's time for me to post the card from the challenge that I do with 8 goofy friends from SCS. This week we had to make a card with a photo on it. It could be your own photo or from a magazine. I chose to use one of my own photos. However, my printer started to act up, so I had a hard time getting a clear picture without all of the computer's little marks. So, I printed my (not too clear picture...it is a gorgeous picture, but the printer.....argh)picture on regular paper and gave it two coats of clear embossing powder. I matted it with SU Orchid Opulence and black that were cut out with spellbinder's Nestabilities, as was the medallion on the right and the *love sentiment* at the top.

Supplies:
Stamps - MFT Essential Sentiments
Paper - SU Orchid Opulence, Basic Gray, Black, Papertrey White
Ink - Ranger Black Soot Distress Ink, versamark
Accessories - Irridescent Ice Embossing Powder, Clear EP, Nestabilities, K&Company Rhinestone stickers, Doodlebug Design Jewels, American Craft Ribbon,

Wednesday, January 16, 2008

Asian Hope


Okay....I messed up on the SCS sketch challenge again...nothing new for me. I'm always missing details. That's why I can't read directions, I have to have hands on training for everything!!! Sooooooo, I'm trying to redeem myself here.

This was a very fun card to make, because I love doing Polished stone backgrounds. In fact, so does my daughter...about the only thing she'll do in *THE STAMP ROOM*. I used my Inkssetials Ink Blending Tool that I got at Rubbernecker to ink up my glossy CS. I only used three inks....Adirondack alcohol inks Red Pepper and Mushroom, and a touch of Ssukineko Ultimate Metallic gold ink (I've had this guy forever, don't know where or when I got him, so your best bet is to use a Adirondack gold mixative...I didn't have that) After loading the blending tool with ink, I randomly stamped all over the CS until I got the color and design I liked best. Now, here's the cool part.....Then I just let drops of Adirondack Alcohol Blending solution fall where they may on the inked up glossy. SO COOL!!!!! It softens the colors and gives it an awesome marbled look!! No two papers turn out the same...so try different pieces. It's so fun to see what new design you can come up with.

Next, I used my SU stamping buddy to make sure there was no static on my bg, and I stamped the Asian Stamp Oasis Image from Rubbernedker image with Ranger Black Soot Distress ink and embossed with black embossing powder. I then colored the bird, leaves, moon and mountain top with my Sakura Souffle pens...They are my ultimate favorite paint pens. They disperse ink evenly and don't clog!! Love 'em. That's it for the main image.

The bg was cuttlebugged with the stylized flowers embossing folder

All the edges are ink distressed with Ranger Tea Dye Distress Ink.

The flower by the bow was inspired by Jeanne S's card found here: Cheap
The card needed something, and I thought flowers. I had three down in the corner, but it was too much...it took away from the image. Then I put one in the corner, and it looked like it was just floating. So I ended up putting it under the ribbon. Woila...I loved the look. Then I had to remember where I'd seen it before. Thanks Jeanne for the inspiration. You saved my unbalanced card!!! *grin*


Supplies:
Stamps - Stamp Oasis by Rubbernecker
Paper - Bazzill and SU Glossy White, Black
Ink - Adirondack Alcohol inks: Red Pepper, Mushroom, Ranger Distress inks: Black Soot and Tea Dye, Tsukineko Gold metallic
Accessories - Alcohol Blending solution, Jo-Ann's Organdy Ribbon, Prima flower, Adornit gem, cuttlebug, sponge, scotch dimensional tape

Tuesday, January 15, 2008

Simply Said

It's just about Wed., and that means it's time for me to do one of Rox's sketch challenges on SCS. I loved the simplicity of this one, so I kept mine very simple. All the images are Hero Arts and can be found at Michelle's store Stampers Dreams.
The top panel bg is a gorgeous flourish!! And I mean gorgeous!!! It is so finely detailed it's amazing!!! I embossed it in white with SU white craft ink and white ep. I love the soft look of it! The sentiment and flower stamps are from Hero Arts Clear Design Thinking of you messages. What a fun variety!! Different fonts, shapes, frames, and flowers. I'll be using these a ton!!! I thought the sentiment fit that lone bird in the cage. You know, the one special bird that sings to you every morning....
Anyway, all the panels are lightly sponged with SU blush blossom, and the flowers are colored with a sakura souffle pen. These are my absolute favorite colored pens to use. They never clog up, and they disperse ink so evenly!! Love 'em!!

That's it....sweet and simple. Thanks for stopping by and have a great rest of the week!!


Supplies
Stamps: Hero Arts ( Stamper's Dream )
Paper: Bazzill, SU Blush Blossom, K and Company Wedding
Ink: Ranger Black Soot Distress ink, SU Blush Blossom
Accessories: K and Company Rhinestone stickers, sakura Souffle pens, nestabilities, offray ribbon, sponge

Monday, January 14, 2008

Bugs and Kisses!!


Before I get into the explanation of this card....I wanted to point you to Sherry's blog Walkin on the Bad Side. She's claimin' to have some Tawdry Treats and all you have to do is leave a comment to be entered in the blog candy drawing!!
Also, Dave at Rubbernecker is hosting another Treasure Hunt Tuesday. Sherry will have the clue on her blog Tues. morning which will tell you where to go on Rubbernecker's site!! You don't want to miss it. You get a free stamp with a purchase. And if you purchase $50 worth of stamps, you get a free image of your choice. So now you have two chances to get free stamps. What a deal!!!

Okay, now to the card. Aren't these bugs just the cutest? I can see that little caterpillar dreaming of turning into a butterfly so he can court that beauty. His eyes look so dreamy!! Now, the butterfly and can images were facing the right when stamped, so I just stamped them on acetate and rubbed the image on Papertrey white card stock to reverse the image. I filled in the areas that didn't transfer well with a black permanent marker. I also masked the can and stamped the caterpillar to look like he's crawling out. I then colored all the images and bg with copics and ink distressed with Ranger Antique Linen and Frayed burlap distress inks. The spots on the butterfly and caterpillar are coated with glitter. I used my one of my favorite tools, the Sakura Quickie Glue Pen to adhere the glitter. The can and butterfly are also coated with perfect pearls to give it a bit of shimmer. The butterfly is raised with scotch dimensional tape as is the sentiment and main panel.

All these images can be found at Rubbernecker!! Go take a look. He's got a huge variety of images, styles, and products!!

Supplies
Stamps - Rubbernecker
Paper - SU Barely banana, Wasabi Green Blue Bayou, Papertrey White
Ink - Ranger Black Soot, antique linen, and frayed burlap distress ink
Accessories: Making memories Brads, Sakura Quickie Glue Pen, Hero Arts Ultrafine Crystal glitter, sponge, SU oval punch, corner rounder, copics, perfect pearls

Sunday, January 13, 2008

Moonflower


My friend StampOwl helped me name this card. The reason for the name? Well, every Monday, a small group of friends from SCS and I do a challenge that is arranged a month ahead of time. Every Second Monday, we choose a unique SCS name, and make a card that represents that name, and then we mail it to that person. This week we chose............*Papermoon* (Shelly). For this card we could only use cardstock in the gray family. NO BLACK. White was allowed though. And there had to be a moon shape somewhere on the card. I have Half moons on the ends of the ribbon.

To make this 5" x 6" card, I did the following: Stamped the SU fabulous flower 3 times on bazzill gray CS, cut out three layers, edged the petals with gunmetal stickles, and layered with scotch dimensional tape. The center of the flower is Crystal Pearl Art Accentz beads. I attached them with crystal lacquer.

The background is a wonderful striped background stamp by Cornish Heritage Farms. I rounded the corners and sewed around it with white thread. I then added the ribbon, and half circles with a silver brad. After that I added the next panel and mounted the flower and adornit gems. Oops, forgot to add that I added the *friendship* sentiment by Lizzie Anne Designs.

All the edges are ink distressed with Stampin' Up Basic gray ink.

Supplies:
Stamps - SU Fabulous Flowers, CHF Stripe Backgrounder, Lizzie Anne Designs - friendship
Paper - SU Basic Gray, Bazzill
Ink - SU Basic Gray
Accessories - Adornit gem stickers, Art Accentz, Gunmetal Stickles, corner rounder punch, sewing machine, brads, hot glue, scotch dimensional tape


Treasure Hunt Tuesday at Rubbernecker
treasureDon't forget to check out the Rubbernecker website on Tuesday. A treasure awaits you. But first, check out Sherry's blog Walkin on the bad side, she has some awesome blog candy .

Who Stole my Mojo?!?!

Man, it's been one of those days, dropping things, failed techniques, colors not working, layouts not working!! I threw in the towel numerous times. I couldn't make anything work. Well, I finally finished this card for SCS's Featured Stamper, Veronica. Here's her card that I cased today: Scallop Sweet Pea
This is a very simple card....don't know why it took me all day to make!! The bg is DCWV All Dressed Up dp. Love it. I just stamped the heart shape with bees and sentiment on Papertrey White CS. Both are by Rubbernecker. The doodles around the heart have silver ice stickles on them, as do the bees. The heart at the end of the sentiment has crystal ice stickles on it. I just glued the flower and ribbon with hot glue, cut the scallops with a decorative scissors, and punched the holes with a punch. That's it! You can personalize this card simply by handwriting the name of your choice on the heart. Thanks for stopping by.

Supplies:
Stamps - Rubbernecker
Paper - DCWV, SU black, pale plum and bravo burgandy
Ink - Ranger Black Soot Distress Ink
Accessories - primas (from friend Cindy....don't know the maker), ribbon - WalMart, brads, stickles, pebble - the robin's nest, scallop scissors

Saturday, January 12, 2008

Sweet and Simple!!


I have two cards for you today, both using the Hero Arts Sweet and Simple Patterns stamps. And believe me, these cards are simple. They may look detailed, but I let the paper and the tools do all the work for me. *grin* Michelle, owner of Stamper's Dream Stamps, carries these stamps as well as much more Hero Arts and other stamping companies as well!! She has a fabulous collection!!

For this first one, the background piece is just a piece of DCWV All Dressed Up dp. I just cut around the swirls and framed with black cs. The turquoise piece is another in their 8 x 8 stack. Matted again with black. For the main image, I just stamped the Hero Arts *Thanks* frame on SU Gable Green Green cs, and framed it with black and SU Tempting Turquoise. I stamped it again on white, cut out the center, and mounted it in the center of the frame with scotch dimensional tape. To finish it off, I used the Tim Holtz Retractable Craft Pick to pierce around a portion of the swirls. That's it!! Simple as pie...oh and I added brads by piercing with the same pick.

Supplies:
Stamps - Hero Arts
Paper - SU Black, Green Gable, Tempting Turquoise, Papertrey White, DCWV All Dressed Up
Ink - Versafine Onyx Black
Accessories: brads, nestabilities scallop rectangle, brads, dimensional tape, Tim Holtz Retractable Craft Pick


Now, this next card was made with the Celebrate stamp from the Sweet and Simple patterns. And I made this for the Inspiration Challenge at SCS. This was the inspiring piece. I stamped the bg piece with it on SU Apricot Appeal, and then stamped it again on white and cut out the center for the tag of the bloom. The bloom was made with my circle nestablities, the SU 5-petal flower punch, and the EK success flower punch for the center. The decorative brad in the middle is by Making Memories. Each gray matted panel was run through the cuttlebug with the embossing swirl folder and then mounted with scotch dimensional tape. The orange embellishments in the corners are pebbles by the Robins Nest. To give the bloom and each panel a bit of dimension, I sponged it with SU basic gray. That's the whole story. Thanks for taking the time to stop by and visit my blog.

Supplies:
Stamps - Hero Arts Sweet and Simple Patterns
Paper - SU Basic Gray, Really Rust, More Mustard, Papertrey White
Ink - Versafine Onyx Black, SU Basic Gray
Accessories: decorative brad, nestabilities, su 5-petal punch, ek success small flower punch, the robins nest pebbles, sponge, scotch dimensional tape, cuttlebug swirl embossing folder

Friday, January 11, 2008

Limited Lovely Lavender


The reason for the title of my card.....well, I made it for the Limited Supplies Challenge on SCS!! Jen challenged us to make a card with a family of colors. Check out the LSC for specific instructions.I believe this is only the second time I've attempted this challenge. Mainly because I have such a hard time limiting myself...in anything. Whether it be on a card, sweets, bread.....well, you get the idea. Last night I had decided I wanted to make a monochromatic card, so todays challenge fit perfectly. So, now about the card. It's really very easy.

First, I cut my back two panels to the desired size. I always start out with the base size and either cut off 1/8" or 3"16 from the two sides. That way I have a perfect mat. In this case, I started with a square 5 1/4" x 5 1/4" card in SU elegant eggplant. The lighter bazzill paper is 1/8" smaller, the next layer is 1" smaller, and the next 1/8" inch smaller. I then designed my corner top piece. Very simple actually. I just cut a 3" square and a 4 7/8" square. I took two circle nestabilities circles...one and the next size up, and cut out the circle. Make sure you use the smaller circle for the eggplant piece, and the larger for the dp. There you have the mat. I trimmed off the corners of my main image so they wouldn't show.
The main image is just SU's garden silhouette inked up once, stamped randomly a few times, then inked up two more times to add the darker images toward the bottom. I then used my Sakura Quicke Glue pen (one of my all time favorite, have to have, tools)....to add some ultra fine glitter to the darker images. Popped up the lovely sentiment that I cut out with the SU word window punch, added the fibers by EK success and the charm. The charm and decorative brads are from my dear friend Cindy Haffner!! Awesome aren't they? Well, the brads are by Make it special Crafts, but I don't know who the charm is by. All the edges were sponged with elegant eggplant.

Supplies:
Stamps - Stampin' Up
Paper - DCWV Old World Textured Mat Stack, bazzill, SU elegant eggplant, Pale Plum
Ink - SU Elegant Eggplant
Supplies - Decorative Brads, Sakura Quickie Glue Pen, Hero Arts Ultrafine Crystal glitter, EK success fun fibers, heart charm, decorative brads, dimensional tape


Thanks for stopping by and taking the time to check out my blog!! I really appreciate it, and hope Ive inspired you to stamp away!! Happy weekend!!

Thursday, January 10, 2008

Stamper's Dream Stamps Design Team!!

clapping smilie

I am so excited!!!! I have the honor of being on the Stamper's Dream Stamps Design Team!!! If you haven't checked out Michelle's store before....oh my are you missing out!! She has everything!!! As soon as I get the stamps, I'll start posting some cards....but that doesn't mean you can't go see what stamps and supplies her store offers!!! Head on over....just click here: Stamper's Dream Stamps

The list of the rest of the team is to the right!! This is an awesome team!! The others will have some awesome stuff to show you in the near future too!! So remember to check out their blogs also!!!

Wednesday, January 9, 2008

Sunset Stroll

I've never made a kick stand card before...Hmmm, the jury is still out on what I feel about them too. SCS's sketch challenge today was to make one of these. I started out by creating my background. I used the Ranger ink blending tool and Adirondack inks: Pesto, Butterscotch, Cranberry, and wild plum. I started with the lightest and gradually added the others in a circular motion. I masked the panda and bamboo tree first, so as not to get the ink on them. I later touched them a bit with the pesto to soften the white. The images are stamped with Ranger Black Soot Distress Ink and embossed with Black embossing powder. That's what's so cool about the Distress Inks...they stay wet just long enough to emboss. I did the same with the grungeboard hinge. And because it's already textured, the ink didn't get in the grooves, giving it an aged distressed look.
The lattice is a cuttlebug diecut. To attach that, I first put red tape on black cardstock, then ran it through the cuttlebug. Then you have the stickiness just where you need it. The circles were cut with nestabilities. Most of the supplies and stamp images can be found at Rubbernecker Stamp Company
Stamps: Rubbernecker
Paper: Black, SU Glossy
Ink: Adirondack: Pesto, Butterscotch, Cranberry, Wild Plum
Ranger Black Soot Distress Ink
Accessories: Grungeboard hinge, ranger ink blending tool, brads, black ep, nestabilities, cuttlebug, red tape, dimensional tape

Monday, January 7, 2008

Treasure Hunt Tuesday!

TREASURE CHEST
There's a Treasure Hunt going on at Rubbernecker Tuesday Morning!!
You can hunt from 9:00 am PST to 8:00 pm PST
But before you start, you're going to need a clue!! Go visit Jeanne at her blog
Inky Paws for your first clue.

Sunday, January 6, 2008

Just Dropping By


Rubbernecker is going to be having a treasure hunt tomorrow, so be sure to stop by and check it out. You won't want to miss it!! Right now, Jeanne is offering some awesome Rubbernecker stamps as blog candy. So head on over to her blog Inky Paws!!!!

This card is kind of creepy. I don't normally go for spiders, but I thought it'd be kinda fun to make this guy dropping into a girl's tennis shoe. Thus the pink/black combo. I stamped the shoe on Papertrey White CS and colored with copics. I ink distressed it with Slate Adirondack Ink. The spider and sentiment are both stamped on a Bazzill gray of different hues. The eyes of the spider were cut out and flipped upside down, because the original stamp has the spider looking up. I wanted him to be looking toward the shoe. I then coated the eyes with a clear glaze. The web was hand drawn since I don't own a web stamp and wanted one in the corner. I then coated it and the spiders' legs with ultrafine clear glitter via the Sakura Quickie Glue Pen. The circles and scallops are cut out with Spellbinder Nestabilities, and all the edges are ink distressed with Slate Adirondack ink.
Check out the Rubbernecker website for all these images and products!!

Stamps: Rubbernecker
Paper: Stampin' Up - Positively Pink, Black, Bazzill
Ink: Tim Holtz Black Soot Distress Ink, Adirondack Slate
Accessories: Copics, Sakura Quickie Glue Pen, Ultrafine Glitter, Nestabilities, Corner Rounder, Distressing Tool, Sponge, Dimensional Tape, silver cord, clear lacquer

Bloomin' with Kraft


I made this card for a challenge that I do every Monday with some friends on SCS. Our challenge this week was to use pastels on Kraft cardstock. I love coloring images on kraft with pastels. It's a bit like working with watercolors...you can layer colors and shade. The difference is....if you make a mistake, you can erase the color with an eraser and start over. How cool is that?!?!

This card is 5 1/4" x 5 1/4". I started off by stamping this big bloom by Artful Inkables. This is an awesome flower that is so versatile. I debated whether or not to make it 3-D, but settled on the more flat image so it would fit in the frame better. I stamped the bloom on Kraft CS with Tim Holtz Black Soot Distress Ink, and colored the image with pastels. I then sprayed it with gloss clear acrylic sealer to set the chalk. Otherwise it will rub off. After that coat was dry (about a minute) I outlined the flower with Crystal Ice Stickles, and coated the center with Cinnamon Stickles. After the stickle dried, I sponged the edges with Tim Holtz Walnut Distress Ink...as I did with all the other panels also. The panel behind the flower, is the leaf that comes with this bloom. I stamped that with versamark directly on the really rust cs.
For the corners, I cut a 1" square of Choc. and subtracted the really rust by 3/16". I then took my 1" circle punch and punched out one of the corners of each piece. The sentiment tab is from SunSpirit Studio and can be found at Starving Artistamps. The rest is pretty self explanatory. The corners and bloom are raised with dimensional tape.

Stamps: Artful Inkables, SunSpirit Studio
Paper: Stampin' Up - Choc. Chip, Kraft, Really Rust
Ink: Tim Holtz Black Soot and Walnut Distress Ink, Versamark
Accessories: Decorative Brads, Stickle, 1" Circle Punch, Corner Rounder, sponge, dimensonal tape

Saturday, January 5, 2008

I've been Tagged!

Judy (StampingQueenJAR) tagged me, and the rules are as follows:

• Link to the person that tagged you and post the rules on your blog.
• Share 7 random and/or weird facts about yourself on your blog, as we all want to know them. (What?? lol)
• Tag 7 random people at the end of your post and include links to their blogs.
• Let each person know that they have been tagged by leaving a comment on their blog.

1. I tried out for Amazing Race with a girlfriend of mine 2 years ago. We didn't get picked though. =( We even made the craziest video....and I mean crazy. We dressed up like cows and everything. (we own a dairy, so it seemed logical at the time.)
2. We own only black pets: black Lab, black Shih Tzu, black Friesian Horse....we also have holsteins and angus...therefore, more black....well with some white too.
3. Although, I've been married to a Dairyman for over 18 years, I never milked a cow until 2 years ago....and that was to put in the video for amazing race. My DH says I still haven't milked a cow.....don't know what he means by that.
4. I've lived in 5 states: MI, IL, CO, IA, and CA
5. I collect outhouses (my guest bathroom is decorated with them, and our pool house is a fully functioning one.
6. My favorite season is fall....love the colors and the clean crisp air
7. I used to be a DJ

Now, to tag some others. I know you've all probably been tagged, but I'm new to this blogging scene, and I know so few bloggers.

1. Laurie (Lauraly)
2. Frances (StampOwl)
3. Dawn (DawnL)
4. Carolyn (Cammie)
5. Carole (TruCarMa)
6. Kittie (Kittie747)
7. Sherry (BadSherry)

You can find all the links to their blogs to the right!!
Happy Saturday everyone.
I'll be posting a Whimsical card later. It's finished, but I'm got some other things I need to do first!!

Wednesday, January 2, 2008

Thumping?


Have you ever thumped? If you haven't, you should!! And that's exactly what I did with this card! Thumping is one of the simplest techniques and it gives such depth to an image.
1. Ink entire image with Cranberry Crisp
2. Color stems with Always Artichoke marker
3. Color center of bloom with Choc. Chip marker
4. Randomly drop (thump) Choc. chip marker over image. I usually glide it along some of the edges too.
5. Spritz the stamp 2-3 times with a fine mist spritzer.
6. Stamp image on selected colored CS

I decided not to use any dp, or bg stamps with this card. I only ink distressed it with Tim Holtz's Frayed Burlap Distress Ink. The top left corner was created by cutting a 7/8" square of river rock, a 1" square of Cranberry Crisp, and a 1 3/16" square of Always Artichoke. I then used a 1" circle punch to make the curved center. I used Tim Holtz's Retractable Craft Pick for the piercing!! It's so cool, because you can make the piercer as long as you want to, and then retract it back inside. Love it!!
Ink, markers stamps and paper are Stampin' Up. The sentiment is by SunSpirit Studio that you can find at www.starvingartistamps.com

Supplies:
Stamps - Stampin' Up, SunSpirit Studio
Paper - Cranberry Crisp, Always Aritichoke, Chocolate Chip, River Rock, Very Vanilla
Ink - Cranberry Crisp, Always Artichoke, Chocolate Chip, Tim Holtz Frayed Burlap Distress Ink
Accessories - Tim Holtz Retractable Craft Pick, SU Mat Pack, 1" Circle punch, decorative brad, brads, SU Choc. Chip Grosgrain Ribbon, Sponge, Corner Rounder, SU slot punch, Dimensional Tape, Water Spritzer

Asian Themed Thank You


I made this card according to the sketch that you can find on Splitcoaststampers.
Rox does such an amazing job providing awesome sketches every Wednesday. If you haven't checked them out, you really should.

You're going to be seeing quite a bit of Asian cards, and whimsical bugs from me this month. Along with a variety of techniques. I'm sorry for the poor photo of this card. My lights are going out, and my Ott wasn't even enough to show the true color of the bg. It's really a soft bluish lavender. And it's not DP either. Let me explain.

I took Whisper white Cardstock and rubbed Tim Holtz's Milled Lavender Distress ink directly onto the paper. I then took a make-up sponge and ramdomly rubbed Weathered Wood over it. After that, I used one of Tim's techniques to spot it up. I sprayed water onto my hand and sprinkled it over the paper until I got the look I wanted, and then dried it with the heat tool. I stamped the image with Weathered wood, then colored the flowers, leaves, and branches with some light copics, dotted the middle of the flowers with my White Souffle pen, and woila.....a handmade DP!

The main image was done in a similar way. I just used a make-up sponge to rub Tim Holtz's Weathered wood and Broken China onto Whisper White CS, stamped the image with Black soot, and colored the birds and leaves with light copics. The moon is colored with a White Sakura Souffle Pen. Now in the photo below, you will see that the image is a lot longer than the one on my card. I just took a black marker, ran it across the top third of the image and cut it there to make it the size I wanted it to be.

That's it. Very, very simple, and it makes for a very soft, delicate bg.
The stamps and inks can be found at The Rubbernecker Stamp Company.
Here's a photo of the supplies I used.


Recipe:
Stamps - Rubbernecker
Paper - Whisper White, Blush Blossom, Buckaroo Blue - SU
Ink - Tim Holtz Distress Inks: Weathered Wood, Broken China, Antique Linen, Milled Lavender, Black Soot
Accessories - The Robin's Nest Pebbles, American elements ribbon, sponge, Sakura White Souffle Pen, copics, Dimensional tape.
Related Posts Plugin for WordPress, Blogger...
 
Site Design By Designer Blogs