Showing posts with label Lawn Fawn dies. Show all posts

Friday, September 14, 2018

Fortune's of Fall ~ Power Poppy


https://powerpoppy.com/products/fortunes-of-fall
Happy Friday y'all!!  Are you as ready for the weekend as I am?  I hope you've been enjoying all the Power Poppy Natural Wonders previews.  Don't you just love Marcella's creativity?  Each set is phenomenal, and today's is no exception.  We are featuring a charming set called Fortune's of Fall.  It includes 3 Fall images and 5 beautiful sentiments.  I chose to work with the Zinnias.  I had so much fun coloring the different vases and each unique zinnia!


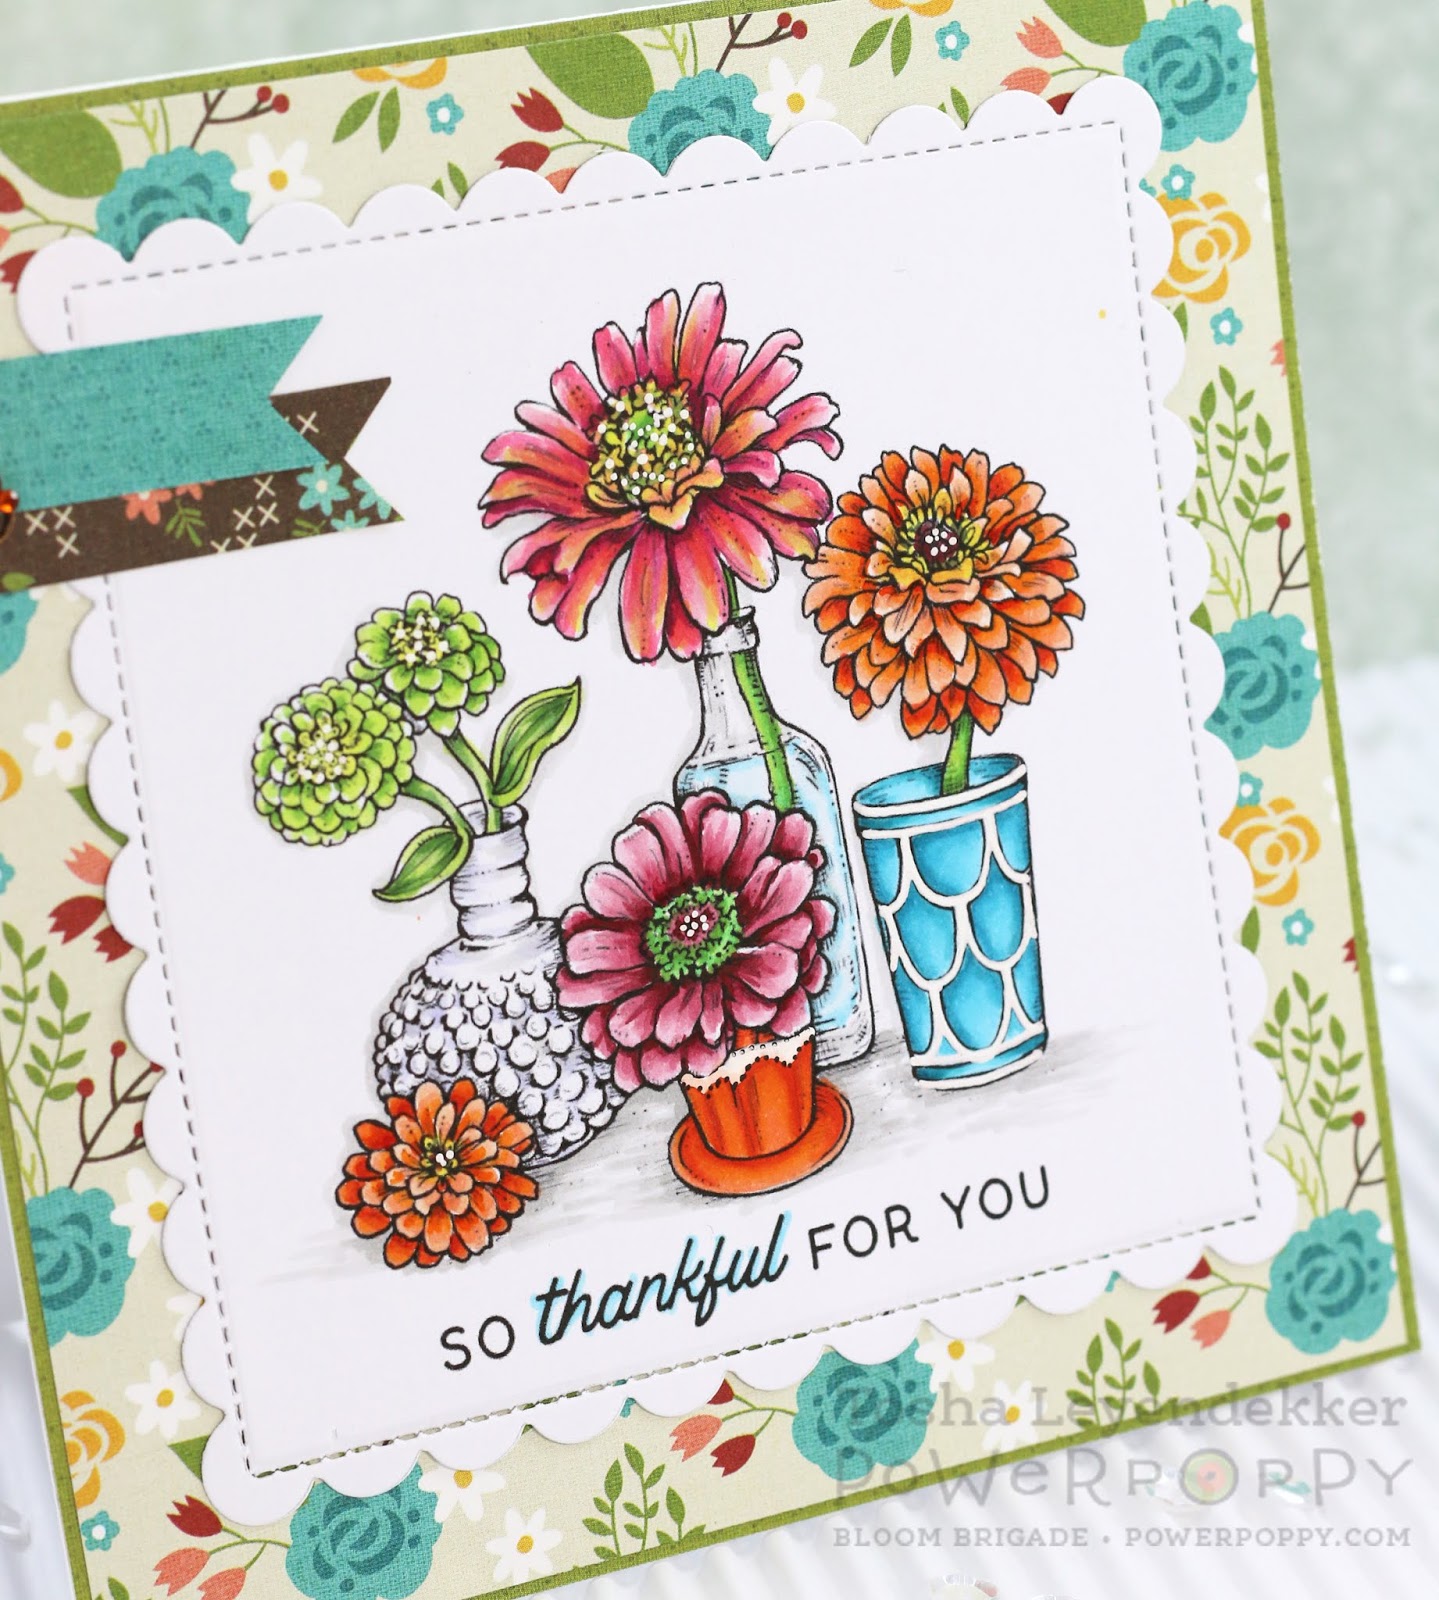
My card is pretty straight forward.  No unique techniques were used.  I just colored everything with Copics and framed them.  I did add some white highlights to the terra cotta pot and turquoise one by using a white gel pen.  That's it.

Now, check out what the following Bloom Brigaders have to share today:

Allison Cope
Christine Okken
Cindy Lawrence
Katie Sims
Stacy Morgan
Tosha Leyendekker---you are here

Thanks so much for visiting!!  Stop by tomorrow for our last preview, and then....you get to shop!!  Woo-Hoo!!!

Happy Stamping!!

____________________________________________________

StampsFortunes of Fall (Power Poppy)
Paper:  X-Press It, We are...Family (Simple Stories)
Ink:  Tuxedo Black (Memento)
Dies:  Outside In Stitched Scalloped Squarae Stackables (Lawn Cuts)
Copics: Vase ~ BG07, 07, 05, 02, 01 Coral Flowers ~ YR09, YR07, YR04, YR02, YR01, YR00, Y06, R59, R56 Lime Flowers ~ YG17, YG05, YG03, YG01 Leaves ~ YG67, YG63, YG61, YG03, YG01 Milk Glass Vase ~ BV31  Pink Flowers ~ RV17, RV14, RV13, RV11, RV19, RV69, YG17, YG09, YG07, YG06, Y06
Accessories:  Mini clip, Rhinestones (Pizzazz Aplenty)  

Friday, August 10, 2018

Gifts From The Sea ~ Power Poppy


http://powerpoppy.blogspot.com/search/label/Power%20%26%20Spark%20Challenge
Hello my creative friends!!  It's been awhile since I've posted here, and I'm excited to share a new project inspired by the new Power and Spark Challenge hosted by my dear friend Cindy Lawrence.  In fact, I do believe my card is heavily inspired by her card.  I didn't even think about it until I was photographing it.  What can I say...she's inspirational.

I used the new digital set called Gifts from the Sea because it fit so perfectly with the room I was inspired by.  I decorated my guest bathroom with plums and grays with some natural elements for decor.  The "vase" in the left corner of the vanity is actually a rock, with barnacles naturally attached to it, that I purchased as a souvenir from Tofino, Canada.   I added the silk accents later.


The shells in the bowl below were all collected from a beach in Sanibel Island, Florida.   You can see them in the mirror reflection.


Here's a close-up of the image.  I used a white gel pen to add some dots to the gray shell and Plumeria centers, as well as the word "ink".


That about sums up my project.  But you really must check out what the following Bloom Brigaders have created to inspire you today:

Christine Okken
Cindy Lawrence
Stacy Morgan
Tosha Leyendekker
---you are here

Thanks a bunch for visiting!  I hope you are enjoying your weekend.  

Happy Stamping!!

____________________________________________

StampsGifts from the Sea (Power Poppy Digital)
Paper:  X-Press It
Ink:  Printer
Dies:  Outside In Stitched Scalloped Rectangle Stackables (Lawn Fawn)
Accessories:  Copics 

Friday, May 18, 2018

Creative + Curious Bee Kind Toile ~ Power Poppy


http://powerpoppy.com/products/bee-kind-toile
Have you been enjoying the Power Poppy Creative + Curious Collection previews?  Marcy really pulled out all the stops this time.  Well, actually, she always does, but I get just as excited every time there's a new release.

Today I went a little crazy with the new Bee Kind Toile set.  I have two cards to share with you, and I actually made another one with this set too, but I'm saving that one for the 20th.  It might even be my fave.

There are limitless ways to use this set.  It's just full of little images that work beautifully together, or alone as on the inside of my card.  Toile is often monochromatic, so I used Peanut Brittle for outside and inside and just used a couple of dies to give it dimension.  So easy...no coloring involved at all.  The hardest part is deciding your pattern.


For my next card, I used a variety of techniques.  For the base, I just stamped a pattern with Smokey Gray Versafine using my Misti.  For the dark gray patterned piece, I stamped the pattern onto copy paper, copied it with my copier that has toner ink, and Minc'ed it with White Foil. For the honeycomb background, I inked it up with Peanut Brittle again, stamped it off, then added it to the tag for a distressed look.  I added a little bit of highlights to the bee skep with a 0.3 Sepia Copic Multiliner, and added a couple of mini-tags to the top. 


No coloring at all today.  That's rare for me, but this was so much fun!!!!

Check out what the following Bloom Brigaders have to share today:

Allison Cope
Christine Okken
Cindy Lawrence
Julie Koerber
Kathy Jones
Katie Sims
Stacy Morgan
Tosha Leyendekker
---you are here

Power Poppy 

Thanks for stopping by, and for all your encouraging comments.  They are treasured!!

Happy Stamping!

____________________________________________________

Orange Toile
StampsBee Kind Toile (Power Poppy)
Paper:  White (PTI)
Ink:  Peanut Brittle (Memento)
Dies:  Outside In Stitched Scalloped Square Stackables (Lawn Fawn), Scored and Pierced Ovals (Spellbinders)

Gray/White Toile
StampsBee Kind Toile (Power Poppy)
Paper:  White (PTI), Yellow and Gray (Bazzill)
Ink:  Peanut Brittle (Memento), Smokey Gray (Versafine)
Dies: Nested Tags (Scrapbook.com), Gift Tags (Paper Smooches), Scallop Borders (Pretty Pink Posh)
Accessories:  Twine, Minc Machine, Minc Foil, Dimensional Tape
 

Friday, March 9, 2018

Blossoming Cherry Shaker ~ Power Poppy


Happy Friday!!  It's been awhile since I've posted, and I am so glad to be back.  Sometimes life gets in the way of creative time, and when that happens, I get itchy to get back in my studio.

Today I used a Power Poppy digital image called Blossoming Cherry.  It's so soft and delicate and I just love this sentiment that comes with it.  Now, let me start by saying how much digital images used to intimidate me.  I used to avoid them at all costs.  Now, I love how versatile they are.  I can make them any size I want, and manipulate them to my hearts desire.  That's what I did with this Blossoming Cherry image.  I wanted a floral frame, so I just kept turning the image until I created the type of frame I was looking for.


I also wanted to make it a shaker card to amp up the "fun" and interactive aspects.  So here you have it.  My Blossoming Cherry Shaker card.  It's 5 1/4" x 5 1/4".  It's rather large.  For the background panel, I just cut it to size and scored every 1/4" both directions.


That's it for my project today.  For some more delicious Power Poppy inspiration, check out the following blogs:

Allison Cope
Cindy Lawrence
Kathy Jones
Tosha Leyendekker---you are here
 
Thanks so much for stopping by.  I hope you are enjoying a delightful weekend.
  Happy Stamping!
_______________________________________________________

Stamps:  Blossoming Cherry (Power Poppy)
Paper:  X-Press It, White (PTI), Acetate
Ink:  Printer
Dies:  Outside In Stitched Scalloped Square Stackables (Lawn Fawn)
CopicsBackground ~ B02, B01, B00, B000, C2, C1 Cherry Blossoms ~ RV17, RV13, RV10 Stems ~ YG67, YG17, YG11
Accessories:  Scor-Pal, Sequins (Pretty Pink Posh) 

Saturday, February 17, 2018

Minc'd Hearts Abloom ~ Power Poppy


Hello everyone!!  I have a quick little post to share with you today.  I decided to get my Minc Machine out today to Minc up these new Power Poppy digital beauties from the new Digital set called Heart Abloom!  Marcy always includes such delightful details to each of her images, that they hold up beautifully without even any color.  I LOVE black and white.  It's so crisp and clean.  So, I thought it would be fun to Minc these guys with white on black.

I printed them on Copy paper and then took a rectangle die and traced inside it (leaving some gaps in random places just for fun) to create a frame.  I used the 0.1 Black Copic Multi Liner for a small, clean line.  I then photocopied it to get the toner outline (my printer is an inkjet), and used Minc's White Foil in my Minc Machine.  I didn't add a sentiment to this first one, because shoot...I liked it all by itself, and feel I can write whatever I want on the inside.

Below is the Heart Abloom...isn't all that detail just amazing?!?!?!  And the foiling picks up every little dot and line.  LOVE it! If you click on the image and zoom in, you can see each sweet little dot and line.  It really is incredible!


That's it!!  Although I love, love LOVE coloring all Marcella's images, sometimes it's nice just to be able to showcase her drawing and let them shine all on their own.  Plus...this is waaaaaay faster since I'm an uber slow colorer.  ;)

Thanks for dropping by y'all!!  I hope you are enjoying a nice sweet weekend!!

  Happy Stamping!!

 ____________________________________________________

StampsHeart Abloom (Power Popppy Digital)
Paper:  Black (PTI)
Ink:  Printer and Photocopier (Toner)
Dies:  Outside In Stitched Scalloped Square and Rectangle Stackables (Lawn Cuts)
Accessories:  Minc Foil, Minc Machine, 0.1 Black Copic Multi Liner 

Friday, January 12, 2018

Blue/Silver Wedding Cake ~ Power Poppy


Happy Friday!!!  I don't know about you, but I've really been enjoying this month's Power and Spark Challenge to use the new Card Maps sketches by Page Maps!  I had a nephew get married right after Christmas and their colors were navy blue and silver.  I added a pop of red because...shoot...it was only a couple of days after Christmas.  I just had to.  ;)

http://www.pagemaps.com/cardmaps
Anyway, I used one of the Card Maps sketches, Power Poppy's Dream Wedding Clear stamp set, some beautiful Kaisercraft dp and my Copics to make this sweet wedding card.  I also added a bit of sparkle...I mean, it is for a celebration, so of course sparkle is a necessity.  

Copics:  C7, C5, C3, C1, C00, B97, B95, B93, B91, BG75, BG72, BG70, R39, R37, R35

That's it for my project today, for some more inspiration, check out the following blogs:
  1. Christine Okken
  2. Stacy Morgan
So glad you dropped by.  Hope you were inspired to try one of the Card Map Sketches.  If you do, link your creation up HERE . If you play along, you'll be in the running to win a $50 Shopping Spree to the Power Poppy Shop!  The Pagemaps contest closes January 22nd, so hop on over soon! We can't wait to see what you create.

Happy Stamping!
____________________________________________________________________

StampsDream Wedding (Power Poppy)
Paper:  X-Press It, Indigo Skies (Kaisercraft), Gray (Bazzill)
Ink:  Tuxedo Black (Memento), Versamark
Dies:  Stitched Fishtail Flag (Die-namics), Stitched Rectangle (Waltzingmouse), Outside-In Stitched Scalloped Rectangle Stackable (Lawn Cuts)
Accessories: Copics, Dazzling Diamonds Glitter (SU!), Silver Embossing Powder (Ranger), Quickie Glue Pen 

Friday, September 15, 2017

Merriest Berries in Pink ~ Power Poppy


Happy Friday!!!  I have a Blingy Power Poppy card to share with you today!  Boy did I go all glitter crazy!!!  I have a lot of vintage ornaments and many of them are pretty sparkly.  And pink is quite a Shabby Chic Christmas color.  So I thought, why not color up Power Poppy's new Merriest Berries digital image in pink?  Oh, yeah!!  I kind of wish I would have left the ribbon white.  I was going for a silver feel, but I went too dark.  *sigh*... but I colored it last, with this being my second attempt, and so...I left it as is.

I added Glossy Accents (Ranger) to the candy cane, and then added some Dazzling Diamonds glitter (SU!) to the ribbon, berries and mistletoe leaves while the candy cane was still wet so the glitter would adhere a bit to it too.  Lastly, I wanted the large holly leaves to be extra dramatic, so I added some glass glitter to them to really make them stand out.  I also added some glass glitter, randomly, to the scroll frame in the background.  

Here's a close-up so you can REALLY see all the sparkle.  I know...I got a bit carried away. But it's super fun irl! 


Copics: RV17, RV14, RV13, RV11, RV10, RV000, C5, C3, C1, C00

That about sums up my card for today!!  Be sure to stop by the following Bloom Brigade blogs for some more inspiration!!

Allison Cope
Christine Okken
Cindy Lawrence
Julie Koerber
Katie Sims
Stacy Morgan
Tosha Leyendekker---you are here

So glad you dropped by!!  I hope you have a delightful weekend!!

Happy Stamping!
_____________________________________________________________

StampsMerriest Berries (Power Poppy Digital)
Paper:  Maja Design, X-Press It
Ink:  Printer
Dies:  Fleur De Square (Spellbinders), Outside In Stitched Scalloped Square Stackables (Lawn Fawn)
Accessories:  Copics, Ribbon, Rhinestones (Pizzazz Aplenty), Dazzling Diamonds Glitter (SU!), Quickie Glue Pen, Glass Glitter 
Related Posts Plugin for WordPress, Blogger...
 
Site Design By Designer Blogs