Showing posts with label Embossed vellum. Show all posts

Saturday, November 1, 2014

Power Poppy November Release ~ Oh Holy Night


 http://powerpoppy.com/collections/happiest-holiday-collection


Power Poppy's November release is now available for purchase!!!  Woo-Hoo!!  It's actually the second of two Holiday Releases.  You can find them both HERE.  I used the new Oh Holy Night set for today's card.  I just embossed it with Silver Embossing Powder onto Vellum, adhered it to some silver cardstock, and added an embellished bow.  The frame was embossed with Shabby White Embossing Enamel.


That's it for me.  Be sure to check out what the rest of the Bloom Brigade has to share for inspiration!!
Be sure to stop by Power Poppy for this month's release.

    Happy Stamping!
_____________________________________________________________

StampsOh Holy Night (Power Poppy)
Paper:  Vintage Cream and Vellum (PTI), Silver
Ink:  Versamark
Accessories:  A2 Devine Eloquence die (Spellbinders), Silver Embossing Powder (Sweet Stamps), Shabby White Embossing Enamel (Stampendous), Ribbon (Stamp Simply Ribbon Store), Decorative Stick Pins (Crafting with Darcie and Pizzazz Aplenty), Border Punch (Martha Stewart), Cream Pearl Pen (Viva Decor) 

Saturday, May 31, 2014

Power Poppy June Release Previews ~ Day 4


 Welcome to Day 4 of Power Poppy's Release Previews.  I have to make this post quick.  I finished this card just in time to take it with us for our niece's wedding.  You've seen this image before...in digital format.  Now, you can have the peonies and tulips in a stamp set with some absolutely exquisite sentiments!  It's called Dynamic Duos: Peonies and Tulips... LOVE it!!  I stamped the Peony image onto Linen Vellum (PTI) with Versamark, and embossed it with white ep.  I then framed it with the Heirloom Legacy Heritage die (Spellbinders) after adding some Gesso to the edges.  I handmade the paper Peony using the Grand Peony die (Spellbinders), and Spun Sugar Ranger Distress Ink.  The leaves were die-cut also using Foliage 2 dies (Spellbinders)


Here's a close up of the embossed Vellum background.  The Peonies are so beautifully detailed!


For the banner flags, I stamped one of the sentiments included in the Dynamic Duos: Peonies and Tulips set, and used a scrap piece of the white embossed vellum I made earlier.

That's it today folks.  You can see what the rest of the Bloom Brigade has to share by following the links below.
________________________________________________________________________

Stamps:  Dynamic Duos: Peonies and Tulips (Power Poppy)
Paper:  Kraft, White and Linen Vellum (PTI)
Ink:  Versamark, Spun Sugar (Ranger Distress)
Accessories:  Heirloom Legacy Heritage, Foliage 2 and Grand Peonies dies (Spellbinders), White Embossing Powder, Gesso

Saturday, May 3, 2014

Waltzingmouse May Release Hop

Hello Waltzingmouse Fans! It's Saturday, and that means we've finally arrived to Release Day!! And...you have a chance to win some awesome Waltzingmouse goodies too!! All you have to do is leave comments on each post along the hop, and you will be eligible to win a gift certificate that is equal to the amount of a large Waltzingmouse Stamp set.   You have until midnight on Monday to do so.  Claire will announce the winner on Tues., May 6.   So, don't forget to spread the love!!

If you've arrived here from Teresa's blog, you are on the right track. If not, you might want to visit the Waltzingmouse Makes Blog so you don't miss a stop.


I have a niece getting married this month, and I thought it would be a perfect time to make a card for her using one of the tags from the Folding Tag die set.  I diecut the tag and then embossed the "Mr. and Mrs." sentiment, from the My Heart set, onto it.  After that, I dry embossed each end of the tag using a horizontal embossing folder, and scored above and beneath the sentiment.  I attached it to my card along with some feathers that I die cut using the WMS Fine Feathers die set.  I had stamped the Fine Feathers with Versamark onto Vellum before die cutting.  Lastly, I added an intricate die cut to the background, some Shabby Chic Flowers I made using ribbon and felt, some sheer flowers, rhinestones, and a beaded pick.


Here's a close-up of the tag so you can see the embossing detail.


I absolutely LOVE the feathers from the Fine Feathers set.  They are so intricately detailed, and emboss beautifully!  I also love how close the die cutting is.  It really helps make the feathers stand out.

That's it for me today.  Next up on the hop, is the super sweet and uber talented Kelly!!

     Happy Stamping my friends!!


___________________________________________________________________

Stamps:  Fine Feathers, My Heart (Waltzingmouse)
Paper:  Irresistible (Authentique), Vellum, Vintage Cream and Smokey Shadow (PTI) 
Ink:  Versamark
Accessories:  Folding Tag and Fine Feathers dies (Waltzingmouse), Double Delights Adore die (Tattered Lace), Bitty Blossoms die (Spellbinders), Beaded Pick (Prima), Sheer Flowers (Maya Road), Felt, Fabric, Stardust Stickles, Rhinestones (Zva Creative), Embossing Folder (Sizzix), White Embossing Powder (Ranger)

Wednesday, May 15, 2013

Kreat-a-Lope Product Review


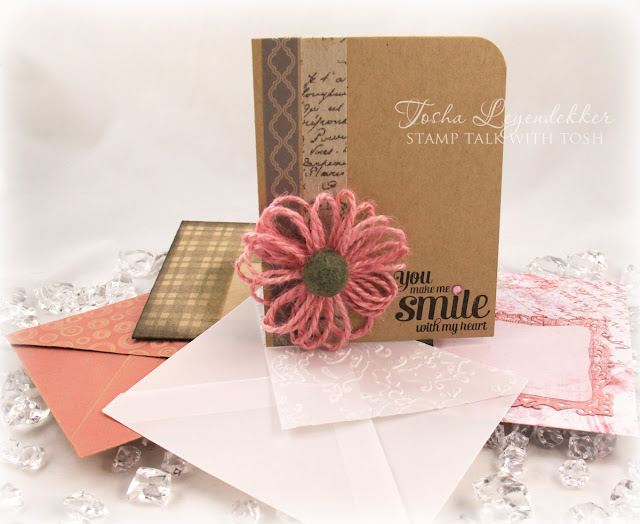
I am so excited to share a fabulous product with you today.  A few weeks ago, Nick Romer emailed me asking if I would do a Product review on an envelope template, that he has patented, called the Kreate-a-Lope.  Now, I can count on one hand how many times I've made coordinating envelopes for my cards because I'm too impatient to measure and line things up.  So, I thought why not.  If this template would make things easier, how much fun would it be to make envelopes that matched my cards.  

Well, let me tell you this....I highly recommend the Kreate-a-Lope!!  I made 4 envelopes in no time at all, and they're perfect.  The Kreate-a-Lope is super fun, easy, and a new "go-to" tool of mine.  Click on the Kreate-a-Lope badge to the left, at the bottom of this post, or on my sidebar, to see a demonstration of how easy it is to use.  There are currently two sizes: A2 and A7, and I'll show you envelopes I made using each.


I made my envelopes really simple this time, but promise to share some more with stamping on them in the near future.  For this envelope I used Kraft- Core cardstock.  I embossed the top flap, and sanded the raised surface and the envelope edges.  I LOVE the look it gives and I think it goes beautifully with my card.

By the way, I made the card using the Waltzingmouse stamp set Compact Sentiments Part Two.  The flower was made with Pink Jute String (Really Reasonable Ribbon), that has a felted wool pom-pom cut in half for the center.  The vertical stripes are Washi Tape.


I made this envelope using the Vintage Shabby Paper Stack by Tim Holtz, and the label was created using the Decorative Labels Eight die by Spellbinders.  This envelope is an A7 size and measures 5" x 7 1/8".


Okay, I hand deliver a lot of my cards, and thought it would be fun to make a vellum envelope so you can get a hint of what's inside.  Again, I just embossed the top flap because I wanted to make sure the front of the card is showing through the front of the envelope.


For my last envelope, I created a masculine A2 size using the Waltzingmouse Stamps image Cabin Plaid Backgrounder.  The stamp image fit perfectly inside the envelope template window.  I just cut out a rectangle of cardstock (for the label space), laid it over the stamp and inked it all up.  I then removed the rectangle piece of cardstock and stamped the envelope using the window of the template as my guideline.  SO EASY!!  I then ink distressed the edges using some Black Soot (Ranger Distress Ink)


Here's a look at all 4 envelopes that I made "lickety-split".  
I highly recommend this template!!  I can assure you I will be using it often.
Click on the badge below for more information!!


Thanks so much for dropping by!
Happy creating!!

_____________________________________________________________

Stamps:  Compact Sentiments Part Two, Cabin Plaid Backgrounder (Waltzingmouse Stamps)
Paper:  Kraft-Core (Core'dinations), Vintage Shabby (Tim Holtz), Kraft (PTI), Vellum (SU!)
Ink:  Smokey Gray and Onyx Black (Versafine), Black Soot (Ranger Distress)
Accessories:  Kreate-a-Lope, Pink Jute String (Really Reasonable Ribbon), Rhinesone (Pizzazz Aplenty), Embossing Folders (Sizzix and Cuttlebug), Decorative Labels 8 die (Spellbinders)   

Thursday, June 30, 2011

Waltzingmouse July Release ~ Day 3

Have you been enjoying the Waltzingmouse Sneak Peeks? I am so in love with all of these sets. Claire has really outdone herself. If that's possible. Today I'm peeking two sets: You're Lovely, which has a beautiful gown, a couture dress form, and accessories as well as some wonderful sentiments. The second set I've included on this card is Flourishes~Scallops~ dots which has gorgeous flourishes in a variety of sizes....*sigh*...be still my heart.

Now, for my card, I started by stamping the gown, with Versamark, onto some Gabrielle Collection (BoBunny) dp, and Vellum and embossing them with white ep. I then added the dotted bustier image to the vellum piece. After that I added some Viva Decor Opaq White dots with glitter. I wanted to add some design to the lower half of the gown, so I embossed it with the Cuttlebug Swiss Dots Embossing folder. (hint: Do this before attaching dress. I decided to do this after I was finished, so I stamped the dress onto vellum again and repeated the embossing and cut off the bottom half.) The dress and sentiment are mounted onto a Layer I made by diecutting some dp with the Labels 4 die by Spellbinders.

The panel trio in the background consists of three layers: White cs, then the Gabrielle Collection dp, and another layer of vellum with the Flourishes embossed in White. I also embossed the sentiment directly onto the dp and cut it out freehand.

Lastly, I added some Seam Binding Ribbon, a button, some silver cording, and some I-Roc Rhinestones. I used a Tim Holtz Mini Heart diecut for the heart and added some Melissa Frances Glass Glitter to it.

eta: To get the glass glitter to stick to the heart without some flaking off, I just put a square of cs, large enough for the heart, onto some Scor-Tape (double stick tape) and diecut it together. I then just peel off the one layer, sprinkle on the Glass Glitter and burnish it with my fingertip. Now, even if I rub it with my fingers, nothing flakes off.

Whew...that was a lot of details to include for just one card. Hope you were able to bear with me. Now, I was the last member of the hop. I hope you've enjoyed all the inspiration. Tomorrow's the release, and there are prizes to be had, so be sure to stop by again.

Since it's Thursday, it's also time for a CCEE Stamper's Challenge, and Frances is challenging everyone to use electronic cutters if you have them. I don't own one, so I just used my trusty Cuttlebug to cut out my Labels 4 and heart die. Be sure to check out what the other gals have come up with over at the CCEE Stamper's Blog.

Now, here's the WMS hop list in case you've missed some along the way:

Anya Shrier
Belinda Chang Langner
Bonnie Sharp
Claire Brennan
Jennifer Holmes
Julia Aston
Kate Whelan
Laurie Schmidlin
Lynn Mercurio
Mona Pendleton
Niki Estes
Sandie Dunne
Sarah Martina Parker
____________________________________________________

Card Supplies:
Stamps: You're Lovely and Flourishes~Scallops~Dots (Waltzingmouse)
Paper: Vellum, Gabrielle Collection (BoBunny), White (PTI)
Ink: Versamark
Accessories: Labels 4 (Spellbinders), Diecut Heart (Tim Holtz~Sizzix), Glass Glitter (Melissa Frances), Seam Binding Ribbon (MamrieMare), Button (PTI), Rhinestones (I-Roc), Silver Cording and Sewing Machine, White acrylic paint, White ep, Swiss Dots Embossing Folder (Cuttlebug)
Related Posts Plugin for WordPress, Blogger...
 
Site Design By Designer Blogs