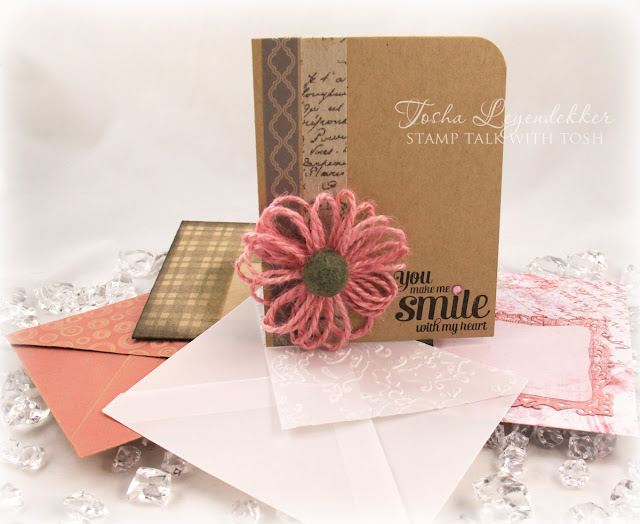
 I am so excited to share a fabulous product with you today. A few weeks ago, Nick Romer emailed me asking if I would do a Product review on an envelope template, that he has patented, called the Kreate-a-Lope. Now, I can count on one hand how many times I've made coordinating envelopes for my cards because I'm too impatient to measure and line things up. So, I thought why not. If this template would make things easier, how much fun would it be to make envelopes that matched my cards.
Well, let me tell you this....I highly recommend the Kreate-a-Lope!! I made 4 envelopes in no time at all, and they're perfect. The Kreate-a-Lope is super fun, easy, and a new "go-to" tool of mine. Click on the Kreate-a-Lope badge to the left, at the bottom of this post, or on my sidebar, to see a demonstration of how easy it is to use. There are currently two sizes: A2 and A7, and I'll show you envelopes I made using each.
I made my envelopes really simple this time, but promise to share some more with stamping on them in the near future. For this envelope I used Kraft- Core cardstock. I embossed the top flap, and sanded the raised surface and the envelope edges. I LOVE the look it gives and I think it goes beautifully with my card.
By the way, I made the card using the Waltzingmouse stamp set Compact Sentiments Part Two. The flower was made with Pink Jute String (Really Reasonable Ribbon), that has a felted wool pom-pom cut in half for the center. The vertical stripes are Washi Tape.
I made this envelope using the Vintage Shabby Paper Stack by Tim Holtz, and the label was created using the Decorative Labels Eight die by Spellbinders. This envelope is an A7 size and measures 5" x 7 1/8".
Okay, I hand deliver a lot of my cards, and thought it would be fun to make a vellum envelope so you can get a hint of what's inside. Again, I just embossed the top flap because I wanted to make sure the front of the card is showing through the front of the envelope.
For my last envelope, I created a masculine A2 size using the Waltzingmouse Stamps image Cabin Plaid Backgrounder. The stamp image fit perfectly inside the envelope template window. I just cut out a rectangle of cardstock (for the label space), laid it over the stamp and inked it all up. I then removed the rectangle piece of cardstock and stamped the envelope using the window of the template as my guideline. SO EASY!! I then ink distressed the edges using some Black Soot (Ranger Distress Ink)
Here's a look at all 4 envelopes that I made "lickety-split".
I highly recommend this template!! I can assure you I will be using it often.
Click on the badge below for more information!!

Thanks so much for dropping by!
Happy creating!!
_____________________________________________________________
Stamps: Compact Sentiments Part Two, Cabin Plaid Backgrounder (Waltzingmouse Stamps)
Paper: Kraft-Core (Core'dinations), Vintage Shabby (Tim Holtz), Kraft (PTI), Vellum (SU!)
Ink: Smokey Gray and Onyx Black (Versafine), Black Soot (Ranger Distress)
Accessories: Kreate-a-Lope, Pink Jute String (Really Reasonable Ribbon), Rhinesone (Pizzazz Aplenty), Embossing Folders (Sizzix and Cuttlebug), Decorative Labels 8 die (Spellbinders)


7 comments:
Hmmmmmm. Are they redoing them??i had mine for about 6 or 7 years. Andmyes I love them. But I also have more than 2' sizes. Very strange
Hi frim Colorafo
Dagmar
Love the yarn flower adn the embossed envelope back!!
Tosh, you always have so many wonderfully unique things to share. LOVE these envies you made with the new tool from the funky to cute to elegant and masculine - all of them look amazing. Thank you for sharing the lo-down! hugs, de
Great display of envelopes Tosh...I have a few of their templates and yes, they are easy to use!!!
Your card is fantastic, love the loop flower and the colors are my favorite.
I received my Kreate a Lope about a week ago and have just had a grand time making envelopes, and like you mentioned we don't always want to take the time to measure etc, with this tool you can create in just a few minutes and then have more time for crafting. And that I like..
Always love your work. I credited you in my current blog post (http://becca-expressions.blogspot.com/2013/05/blooming-beautiful.html) for how to make the pom-pom flower. Thanks for the inspiration!
I have used this product for many years and just love it, I use alot of my 12x12 papers that come in a pack that I am not sure I would ever use for making cards and I use them for my envelopes, that way I use every bit of a paper pack :)
Post a Comment