Showing posts with label Gift Box. Show all posts

Tuesday, March 3, 2015

Waltzingmouse February Release Hop


Hello my creative friends!!  Welcome to the Waltzingmouse Blog Hop.  I back today to share my last project for this preview.  If you arrived here from Jeanne's blog you are right on track.

I love the classy elegance of this Special Lady image and thought she would look lovely on the top of a gift drawer box.  I used the tutorial HERE because all the measurements were already laid out and I didn't have to take the time to figure it out.  Papercraft Button does a great job of explaining each part to the drawer and how to make the easel.

Next up on the hop is the lovely and super creative Becca.

   Happy Stamping!
____________________________________________________________________

StampsSpecial Lady (Waltzingmouse)
Paper:  Crowded Attic (Tim Holtz), Kraft (PTI), Bazzill
Ink:  Perfect Plumeria (VersaMagic), Vintage Photo and Walnut Stain (Ranger Distress)
Accessories:  Hitch Fasteners (Tim Holtz), Metal Brad 

Friday, November 14, 2014

Waltzingmouse Pajama Party

For my Power Poppy post, click HERE.

It's the 14th, and that means it's time for another Pajama Party over at Waltzingmouse Stamps.  For all the party details, or to enter your project, click HERE.

I made two projects today.  The first is for the "Wrap it up warm" challenge.  I made a box out of Kraft cardstock, scored at 1/4' intervals, and ink distressed it with Vintage Photo Distress Ink (Ranger).  I made a bow out of burlap ribbon, and some fancy trim, and added a stamped tag, because a gift is not complete without a tag right?  I used three WMS sets on this tag:  Festive Foliage, Warm Fuzzies, and Elf Made.  The tag was made with a WMS die called Stitched Tags.  My flakes are a little goopy, but I liked them that way.  They stamp clear and beautiful if you use Versamark ink and embossing powder.  I used a thick white, wet pigment ink, and was stamping them while the paper was still in the die.  That made the lines less defined because of the pressure required to stamp over the die. 


The "Helicopter pods" (that's what we called them as kids.  I have no idea what their technical name is.) were "Rock-n-Rolled with Olive Grove and Rich Cocoa Memento Inks.  The berries were colored with Copics.


My next project is for the "Old Pajamas" challenge to use Candy Jar Christmas sets.  I tell ya, Mrs. Claus can be a difficult lady.  I couldn't get the framing right.  Ovals, embossing powders, white on black, or black on white.  We finally both agreed this was good.  I thought she looked very authoritative in this silhouette, so the Candy Jar sentiment "Been Good?" seemed appropriate.  :)

That's it for today's projects.  I hope you have entered some projects for the challenges.  The more you enter, the better chance you have of winning some Waltzingmouse Store credit! 

Thanks for visiting!!

  Happy Stamping!

___________________________________________________________

Gift Box
StampsFestive Foliage, Warm Fuzzies, Elf Made (Waltzingmouse)
Paper:  Kraft and Vintage Cream (PTI)
Ink:  Olive Grove and Rich Cocoa (Memento), Whisper White (SU!), Vintage Photo Distress (Ranger)
Accessories:  Stitched Tags die (Waltzingmouse), Copics, Scor-Pal, White Embossing Powder (Ranger), Burlap Ribbon, Vintage Lace Trim, Vintage Button, Burlap String, Green Stripe Grossgrain Ribbon

Mrs. Claus Silhouette Card
StampsCandy Jar Christmas (Waltzingmouse)
Paper:  Santa's List (Teresa Collins), Black and White (PTI)
Ink:  Onyx Black (Versafine)
Accessories:  Labels 41 Decorative Accents dies (Spellbinders), Pearls (MME), Sewing Machine

Tuesday, August 26, 2014

Waltzingmouse Stamps August Release Previews ~ Day 3

I can't believe it's Day 3 of the WMS August Release Previews already!!  Today I'm excited to share Halloween themed projects.  Claire, in my opinion, has the most creative and gorgeous Halloween images out there, and they're always fun to work with.   Today we're featuring 3 sets:  Great Big Owl, Boo and Friends and Peek-a-Boo Sentiments


Okay, I have to tell you, the moment I layed eyes on this Great Big Owl, I fell in love.  And Claire has included two different versions of this guy.  I wanted to color mine with Copics so I chose the outlined one, but the other would be great for making gift bags or boxes because it has an open window instead of that middle panel.  But isn't he stunning?!?!?!  I went out of the "Halloween Box" a bit and colored him blue and gray.  I think it makes him dark and mysterious.  I colored his eyes with a flourescent yellow to really make them pop!


Now, I wanted the owl to be the centerpiece of my card, so I included one of the sentiments on the inside!!   I have an admission to make too....can you see the smudge in the middle of the sentiment?  It's more prominent in-real-life.  Normally, being the perfectionist that I am, I would have started all over.  But, I thought the smear was kind of creepy and fitting, so left it.  To make the inside panel, I diecut the shape using Labels 28 (Spellbinders), and copy paper.  I laid the opening over my panel and sponged Pumice Stone (Ranger Distress Ink) along the inside.  I then stamped the sentiment over it.  The circle images are all included in the set too, and I added those by laying the diecut piece over my sponged area and stamped them and colored them with coordinating Copics.  The border was created using the splatter stamp from the Splat That set.

Copics:  B04, B02, B00, T5, T3, T0, FYG1

Now for a little whimsical turn.


Isn't this little ghost witch just adorable?  She's included in the Boo and Friends set.  I stamped her with Versamark onto Vellum, and embossed her with Black Sparkle embossing powder (Ranger).  I then colored the back with Copics, and mounted her directly onto the decorative paper, because I thought it was super fun to be able to see the Halloween print through her.  The tag was made using the largest tag die from the Waltzingmouse die set Stitched Tags, and the sentiment along the bottom is from one of the new sets (which I feature in the next project), Peek-a-Boo Sentiments.


Here's a close-up peek so you can see through the little ghost witch.  Isn't she just super fun!!!

Copics:  FV2, Y08, E99, 100


Now, there's a short story about how the inside sentiment came about.  I just fell in love with the little sentiment conversation bubbles and wanted to use one, but I already had a fairly busy "front".  My daughter said, "Why not add it to the inside?  Ghosts are invisible after all."  Perfect.  In our little imaginative heads, this little ghost witch disappears while eating candy.  I know...corny right?  But I still like it.  ;)

Now for my easy-peasy little Halloween treat bags, using the Peek-a-Boo Sentiments....


I thought it would be fun to add the sentiments to the littlest die from the Waltzingmouse Stitched Tags dies.  I then added them to little diecut bags that I made using a Papertrey Gift Bag die.  Aren't they cute?  And they are uber easy!!


I just added the "Boo" sentiment to the first tag, along with a spider sticker.


I LOVE the sentiment "jeepers creepers", and thought it fit beautifully with this spider dp!!


And for the last one, I just added the sentiment "Spooky", along with a boo sticker.


See the inside?  It fit 3 little sample size Ghiradelli chocolates inside.  Now that's a special treat!

So, did ya stick with me through this whole post?  It was a long one!!  Sorry, I had a lot to share!!

Now, if you haven't seen what the rest of the team has to share, you better head on over and check their blogs out for some "thrilling" inspiration!!


Thanks for stopping by!!  Be sure to stop by again tomorrow for the WMS Hop.  The team has pulled out all the stops!!

Happy Stamping!
 
______________________________________________________________________

Great Big Owl Card
StampsGreat Big Owl, Splat That and Fine Feathers (Waltzingmouse Stamps)
Paper:  Frightful (MME), White and Black (PTI) 
Ink:  Tuxedo Black (Memento), Black Soot and Pumice Stone (Ranger Distress), Teal Zeal (Memento)
Accessories:  Copics, Labels and Decorative Labels 28 dies (Spellbinders), Sewing Machine, Dimensional Tape

Ghost Witch Card
StampsBoo and Friends and Peek-a-Boo Sentiments (Waltzingmouse Stamps)
Paper:  Masquerade Party (Teresa Collins), Black and White (PTI), Vellum
Ink:  Versamark and Onyx Black (Versafine)
Accessories:  Copics, Stitched Tags dies (Waltzingmouse), Brad (Teresa Collins), Seam Binding, Twine, Sequins (Teresa Collins)

Halloween Treat Bags
StampsPeek-a-Boo Sentiments (Waltzingmouse)
Paper:  Spooky (Carta Bella), White and Black (PTI)
Ink:  Onyx Black (Versafine), Black Soot (Ranger Distress Ink)
AccessoriesStitched Tags dies (Waltzingmouse), Favor-it Box 1 die (PTI), Mini-Clothes Pins (Funky Junky), Twine

Thursday, October 17, 2013

Flourishes Free for all Friday


The Senior Design Team is back today with another round of beauties created with our October Release Stamp sets. It's our chance to show them off some more while you can still purchase the October Stamp Bundle at a discount! Today is the last day the dscount is available and we don't want you to miss out!

I decided to use the Handmade Snowflake set today because...well, just because I LOVE snowflakes and I love winter.  I stamped the flakes with Cloud White VersaMagic ink onto Flourishes Classic Kraft Cardstock.  I then designed a long box, 1 1/4" x 3/4" x 8", to fit some Cow Tales (the spelling is correct) inside for a sweet little precocious friend of mine.  Now before you freak out, Cow Tales are a caramel candy stick with vanilla cream inside, and they are delicious.  Being dairy farmers, I think it's fun to share this sweet treat with others.  I used two new Spellbinders Snowflake dies to accent the pieces.  They work beautifully with the Flourishes Handmade Snowflake images.


I usually hide my staples by stapling the background piece to the cellophane bag first and adding the top panel afterwards, but I forgot to, and I wanted to get this in the mail yesterday, so there you have it...you can see my staples... :(


I wanted to have some embellishments hanging from the snowflake, so I used one of the Tailor-Made Classic Tags Template dies.  I stamped the "My Friend" sentiment (from the Passion Flower Flourishes set) with Versamark, and embossed it with silver embossing powder.

That's it for my project today.  Now hop on over to see what lovely creations everyone else has in store for you today:


Thanks so very much for dropping by.  I hope you have a blessed weekend!
Happy Stamping!

________________________________________________________

Stamps:  Handmade Snowflakes and Passion Flower (Flourishes)
Paper:  Classic Kraft and Classic White (Flourishes)
Ink:  Cloud White (VersaMagic), Smokey Gray (Versafine), Versamark
Accessories:  Tailor-Made Classic Tags Template Dies (Flourishes), Create-a-Flake 5, 2013 Snowflake Pendant, Curved Borders Two, and Timeless Rectangle dies (Spellbinders), Silver Embossing Powder, White/Silver Cording (Darcies), Silver String (Flourishes), Sparklets (Kaisercraft), Staples, Cellophane bag, Scor-Pal, Rhinestones (Pizzazz Aplenty), Cow Tales

Saturday, September 28, 2013

Crazy for bows!


 Hello my friends!!  It's Saturday, and that means it's time for another Crazy 4 Challenges challenge.  The challenge this week is to use bows.  Well I've got that covered.  It just so happens that Flourishes just released a charming new stamp set, called That's a Wrap, that has a large bow stamp along with some embellishment and sentiment images!  Perfect!!


I stamped my bow onto Cryogen White cardstock twice, colored each with the W1 Copic, cut them out and layered them.  I wanted the bow to be a warm neutral color.  I then colored the holly and tag and added them.  I should also add that I burnished the backs of each image to give them depth.  I have a tutorial HERE.  

The box is just a standard box.  I made it 3" x 3", and decorated the sides with It's Christmas Time dp (Maja Design) that I purchased from The Funky Junkie.  I think this is my favorite Christmas dp this year.  Going along with the rustic feel of this box, I added a bit of Gesso to the paper and box.

Here's a close up of the top. 


Here are the links to the Copics I used.


Well, this is my last week as a guest designer with the Crazy 4 Challenges group.  They're a warm and talented bunch, and it's been an honor to accept their challenges for the month of September.  Thanks gals for letting me play along.

Thanks for visiting my friends!!
Happy Stamping!!

___________________________________________________________

Stamps:  That's a Wrap (Flourishes)
Paper:  It's Christmas Time (Maja Design), Kraft (Flourishes), Cryogen White
Ink:  Tuxedo Black (Memento)
Accessories:  Copics, Gesso, Scor-Buddy

Thursday, September 5, 2013

Flourishes Get In Shape Challenge


ImageWe hope you've had a great summer Flourishes Fans! Now as we see the days turn the corner into deep blue skies, colorful leaves and cooler nights we see that Autumn is nearing! Many of us get back into "stamping shape" in the fall and this is the perfect challenge for you, turning your fingers to some paper crafting fun! In just a few short days we'll be unveiling our beautiful September Release of FIVE sets, and playing in this challenge is your chance to win our whole September Release! Want to know how? All you need to do is create a Shaped Card OR a 3D Item. You can either create a card using any non-standard shape (we encourage you to think creatively), or a lovely box, ornament, home decor item, or anything 3D....it's all up to you! Your keyword for entering into online galleries is FLLCSEP13. THE OFFICIAL RULES:
  • Simply create a shaped card (not a standard rectangle) OR 3D object.
  • Entries need to be in by Friday September at 13th at 5 PM EST
  • Those entries using Flourishes Stamps will be counted twice
  • You must link your creation on our InLinkz Widgit to be counted
  • You must have a link to our challenge in your blog post or gallery post
  • Please DO NOT combine challenges. Only those entries that don’t combine will be in the running
  • If you upload to SCS please use the keyword FLLCSEPT13
  • We’ll announce the winners on Saturday in our Winner’s Circle Post here on the blog on Saturday September 14th , so check back then to find out if you are a winner!

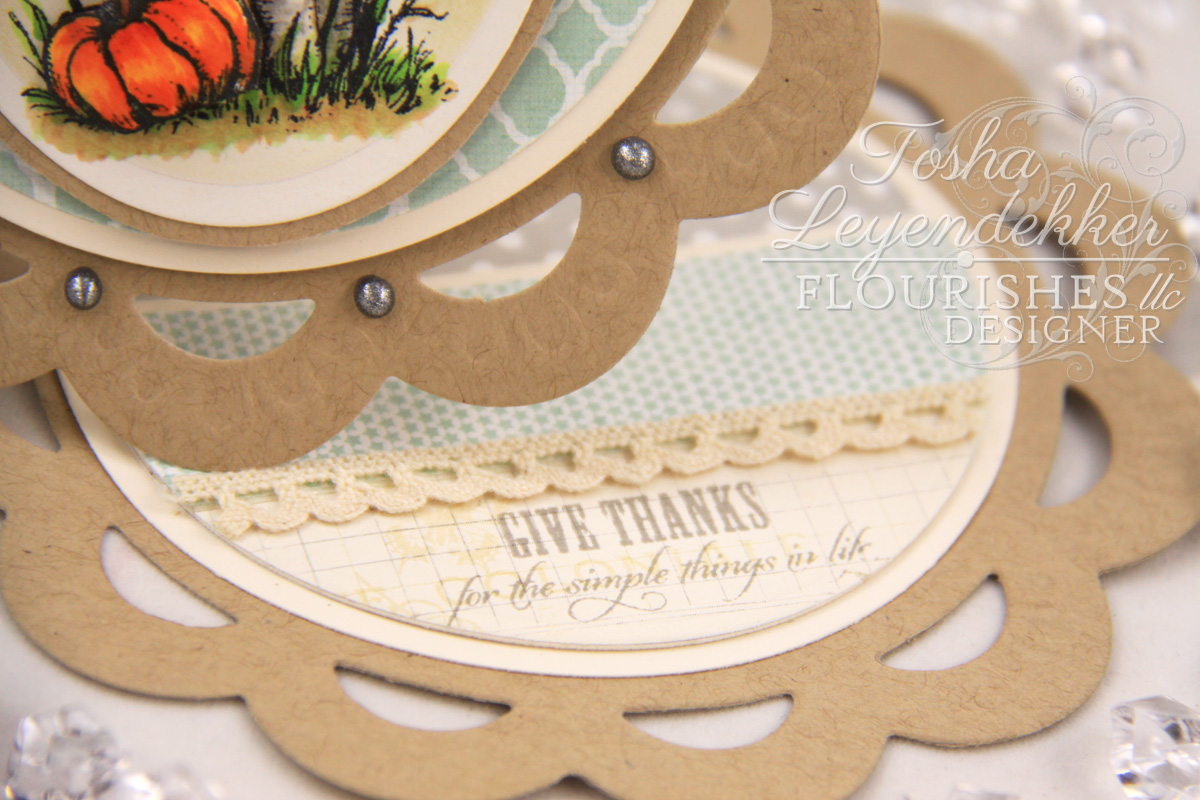
Boy did I have a blast with this week's challenge!  I haven't made a shaped card for quite some time and thought it would be fun to try my hand at a Twisted Circle Easel Card.  I knew if I went to Splitcoaststampers I'd be able to find the tutorial by Beate.  She's provided video for many, many fabulous creative tutorials.  For my main image, I chose to use the milk can scene from the Autumn Blessings set.  This set has jumped to the top of my favorites.  Now, it might be because Fall is my favorite season, or that we're dairy farmers, or that I collect pumpkins...who knows.  All I know is that I LOVE the images, and I LOVE the variety of sentiments.


I made this little basket with a Silhouette cut file and added the sentiment with the smallest Perfectly Pierced Classic Hourglass Template die.  I stamped the little wheat image, with Soft Sand (Hero Arts Shadow Ink), in the background.


 Isn't this a beautiful sentiment?  "Give Thanks for the simple things in life."  I think with life being so hectic and society focusing on "bigger and better", we can forget about the sweet little things that are such blessings!!  I love how this sentiment reminds us about the "simple things"!!

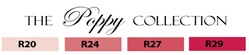
I also want to take a moment to reiterate what I've said before when I first joined the Flourishes DT.  I love coloring with Copics.  And the Copic Marker Collections they've put together makes it oh, so easy!!  Seriously!!  I'm not a pro like so many on this DT.  I totally do not get the whole "light source" thing.  And shadowing can even be a challenge.  But the collections make it a whole lot easier.  Of course, the beautifully designed images with the shading included helps a ton too!!  :)

Okay...enough about my coloring.
Thanks for stopping by today and we look forward to seeing what you create! We’ll see you here on Monday September 9th when our FIVE wonderful September Sneak Peeks start! Enjoy getting back into stamping SHAPE! And now for some wonderful shaped inspiration, our Design Team has pulled out all the stops to get your creativity jump-started:


Here are the links to the Copics I used for today's project:


_____________________________________________________

Stamps:  Autumn Blessings (Flourishes)
Paper:  Follow Your Heart (MME), Classic Ivory and Kraft (Flourishes)
Ink:  Tuxedo Black (Memento), Soft Sand (Hero Arts Shadow Ink), Smokey Gray (Versafine)
Accessories:  Copics, Perfectly Pierced Classic Hourglass Template Die (Flourishes), Circle Frame & Elements Die (Marianne Design), Circle and Oval dies (Spellbinders), Natural Burlap String, Button, Chrome Silver Pearl Pen (Viva Decor), Lace, Silhouette, Brad, Clear Bag
Related Posts Plugin for WordPress, Blogger...
 
Site Design By Designer Blogs