Hello friends!! I have been enabled!! Becca Feeken posted a video tutorial a little while back, on how to use the Minc machine by Heidi Swapp found HERE. She demonstrates on how to add the foil to diecuts. Now I need another machine like a hole in the head, but oh my, this machine is a gem!! It's super easy to use (I am not tech savvy), and the effect is STUNNING!!! Please, don't judge the product by my poor photography skills though, because in real life, these babies S-H-I-N-E!!!
Let me give you little background before I get to my cards. The Minc Machine adds foil to images that were made using toner from a laser printer or copier (not an inkjet). I have a photo copier that uses toner, so I just used that. When I watched Becca's video, I thought, why can't I take some Power Poppy images, stamp them and then photo copy them. So, I did just that. After photo copying some diecuts and the stamped images, I laid the foil on top of the copied images and ran it through the Minc machine. Perfect every time. No matter how detailed!! Pure gorgeousness, let me tell you!!! I even used the negative pieces by applying Multi-Medium Matte to some cardstock, laying the negative piece on top and diecutting it. You'll see those a bit later.
For my first card, I used one of the Power Poppy images from the set Spice It Up. I stamped it onto white paper and photocopied it with the Decorative Labels 28 (Spellbinders) die framing it so I could diecut it and have the image framed already. The foil embosses beautifully and perfectly. It's absolutely stunning in person!! I also photocopied an A2 Scalloped Borders Two die (Spellbinders) to add as a border to my card.
For my next card, I stamped the tree from the Botanical Tree Power Poppy set, and photocopied it with a Stitched Rectangle die (Waltzingmouse) framing it. Again, so the border is already there when diecutting. When you photo copy the die, you get a wider shape because it includes the entire metal piece. So when you use the same die to diecut it, you have a frame, and a negative piece to use. I never ended up using my negative frames, but I saved them for a future project.
Sorry for the weird angle on this next card. I had a hard time getting the gold to show properly, as I did with the silver above.

Here's another angle showing the Botanical Tree.
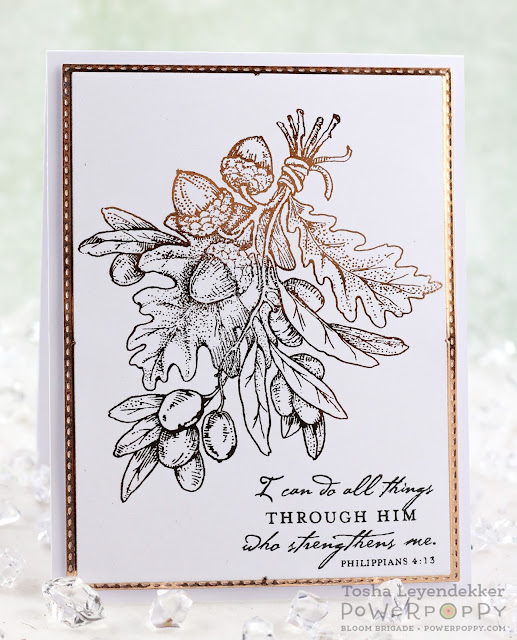
For my next card, I used Copper Foil with an image from the Olive and Oak Power Poppy set. I added a sentiment from the set using Onyx Black Versafine.
Here's another angle showing the Olive and Oak card.
For this Olive and Oak card, I used the negative left over piece. I LOVE how it has an etched feel to it.
For my final card, once again I used the negative piece from the Spice It Up image I used earlier. This image was photocopied onto textured cardstock giving the frame a distressed feel I love how it turned out, although I have a terribly hard time photographing silver. *sigh*
Here's the same card from a different angle so you can see the shine a bit better.

I encourage you to watch Becca's videos. They really show the beauty of the foils.
That's finally it for me today. I hope you've enjoyed seeing Marcella's images used in a different way.
If you haven't already, be sure to stop by the following Bloom Brigaders' blogs for some more inspiration!
- Christine Okken
- Cindy Lawrence
- Julie Koerber
- Katie Sims
- Stacy Morgan
- Tosha Leyendekker---you are here
- Power Poppy
___________________________________________________________________
Stamps: Spice It Up, Botanical Tree, Olive and Oak (Power Poppy)
Paper: X-Press It, White (PTI), Hello Winter (EP)
Ink: Photo Copier, Onyx Black (Versafine)
Dies: Decorative Labels Twenty-Eight and A2 Scalloped Borders Two(Spellbinders), Stitched Rectangles (Waltzingmouse)
Accessories: Minc Machine (Heidi Swapp), Foil, Photo Copier (with toner), Ribbon (Paper Source), Rhinestones (Pizzazz Aplenty), Embossing Folder


5 comments:
Wow these are amazing!!
Oh my gosh, you went to town!! These are exquisite in the grandest sense of the word! Oh heavens, stamping and mincing will never quite be the same due to your sweet creativity!!
Oh my, Tosh! My jaw has dropped as I scrolled to see the cards and how absolutely gorgeous they are! And thanks for showing us the different photos to show the shine! What an amazing machine and results! I watched both videos by Becca (who truly is an amazing gal and makes some of THE most elegant cards and is so precious), and it's a great machine. I wish I had a laser printer. Hehe! I love these cards, and thanks for sharing this Minc machine with us! Wow! Hugs!
These are gorgeous cards! I wish I had a laser printer and this machine - and the ability to make cards like this, you always do such beautiful work!
I’m sorry it’s taken me so long to pop by...these are just AMAZING! What a spectacular effect lady!
Post a Comment