Showing posts with label Baby. Show all posts

Friday, March 15, 2019

Yay!! Precious Baby ~ Power Poppy


Happy, Happy Friday!!!  I am so ready for the weekend, and I'm super excited to share today's card with you.  It has been a LONG time since I went full blown "distress mode" on a card.  Years I think.  And it was so much fun!!!  I have a baby shower to attend for one of my nieces this weekend, and she's from an antique loving family.  Her colors were navy and gray, so I thought I'd lean towards grays for this baby card.  I added some yellows to make it a little more happy.

I used Power Poppy's Precious Baby stamp set.  This image includes a set of baby blocks, but I didn't think they fit well proportionally on the card, so I just cut them off.  Easy peasy.  Below is a close up of the image.


For the inside, I used another of the sentiments included in this set.


That's it for today's project.  I hope you'll check out what the following Bloom Brigaders have to share today:
Thanks for visiting!!  I hope you have an awesome weekend filled with creative ideas!!

Happy Stamping! 
___________________________________________________

StampsPrecious Baby (Power Poppy)
Paper:  X-Press It, Captured Adventures (49 Market), Gina K
Ink:  Versamark, Hickory Smoke (Distress Oxide), Black Soot (Distress Ink), Whisper White (SU!)
Dies:  Hanging Sign (Tim Holtz Alterations Sizzix), Heirloom Rectangle, Classic Circles Scalloped, Standard Circles (Spellbinders), Mini Daisy (Sizzix)
Accessories:  Copics, White Embossing Powder (SU!), Black Fun Flock, White Gel Pen 10, Sequins (Pizzazz Aplenty), Silk Ribbon, Distrezz-it-All (Zutter) 

Friday, May 26, 2017

...room in my heart ~ Unity/Misti Blog Hop


Hello creative friends!!  Unity Stamps is doing a joint blog hop with My Sweet Petunia, and I am so honored to have the privilege  of joining these talented paper artists!  I have two cards, to share with you today, that I made using some charming Unity Stamps along with the "must have" Misti!!!  Seriously!!  I could not have made my second card without it!!

First of all, I'd like to share a sweet little watercolor card I made using Unity's "...room in my heart" stamp set.  Isn't this young woman and her baby just precious?!?!   

I started by laying a 4'x5" piece of watercolor paper in my Misti, lined up the image where I wanted and stamped it using Onxy Black Versafine Ink.  I left the stamp adhered to the Misti and left the stamped paper in place while watercoloring the image using Gansai Tambi Watercolors.  I then reinked the image and stamped over the colored image to make the lines bolder.  I can honestly say, that without the Misti, I would never be able to line up the image perfectly a second time.


I added a sweet little sentiment, that comes with this set, to the inside.


Now, for my second card.  I really had some fun with this one.  And once again, the Misti was a lifesaver!!    Let me tell you, Unity Red Rubber Stamps and the Misti are a dream team!!

I started by stamping this darling snail/mushroom image, from Unity's Happy Snail Mail set, 6 times onto X-Press It cardstock.  I colored the portions of the image that were going to be visible and started cutting out the layers so I could pop up each one for dimension.


Even a few of the stitched clouds (die by Lawn Fawn) are cut out and burnished to give them some extra depth too.


Below you can really see the dimension.


Now, the sentiment flag was a little tricky.  I wanted to use a new stitched label die I had just purchased from Pretty Pink Posh, but it was solid.  Unity Stamps are Red Rubber, so therefore not see-through, making it a challenge to line up perfectly.  Not with the Misti though.  They work together like they were just meant to be.  Let me explain how:

I started by diecutting the flag banner out of a piece of copy paper.  I laid it in my Misti just like you see below.


I then took the "...happy snail mail" sentiment "Just a Note" and laid it exactly where I wanted it to be, in the flag, and closed the lid, therefore adhering it to the other side. (oh....don't forget to take the foam mat out of the Misti when working with your Unity stamps.  They already are mounted onto foam, so the Misti won't close properly if you leave it inside.


I then diecut the flag out of a piece of cardstock and laid it in the negative space of the copy paper.


Lastly, I inked up the sentiment, closed the Misti and voila...a perfectly lined up sentiment!!  It couldn't work any more smoothly!!!


Would you like to win one of 3 Unity Prize packs and winner's choice of an Original or Mini Misti? All you have to do is leave a comment on each blog and you will be entered into the drawing.  You have until noon (central time) on May 30 to comment, and the winners will be posted on both the Unity Blog and the My Sweet Petunia blog on May 31st.

That's it for my projects today.  But don't stop here.  There is a ton of more inspiration to be seen.    Next on the hop is Kris Lancaster.  I've also included a complete list of all the hoppers today:


CopicsMushroom ~ BG07, BG05, BG02, BG01, YG11, YG09, YG06 Snail ~ R08, R05, R22, R21, R11, R00, YR68, YR65, YR61, Y38, Y17, Y15, Y13, Y11 Heart ~ R08, R05, R22

Thanks a bunch for dropping by!!  Enjoy the hop!
  Happy Stamping!


_______________________________________________________________

Mother and Baby
Stamps:  ...room in my heart (Unity)
Paper: Watercolor
Ink:  Onyx Black (Versafine)
Accessories:  Gansai Tambi Watercolors, Misti

Just a Note
Stamps ...happy snail mail (Unity)
Paper:  X-Press It, Black (PTI)
Ink:  Tuxedo Black (Memento)
Dies:  Stitched Labels (Pretty Pink Posh), Stitched Cloud Backdrop (Lawn Fawn), Stitched Rounded Rectangles (Die-Namics MFT)
AccessoriesMisti, Copics, Scor-Pal, White Pearl Pen (Kirarina Wink), Dimensional Tape 

Tuesday, April 14, 2015

Waltzingmouse Pajama Party


http://waltzingmouse.blogspot.com/
We're having a Waltzingmouse Pajama Party, and there are 4 fantastic inspirational challenges to get your creative juices flowing!  Check out the Waltzingmouse Blog for all the details on how you can participate.

I think today's card fits under two challenge categories:  Shower with Gifts and Gift Card it.
I put my tag on the card instead of leaving it separate, and used a variety of stamp sets along with the Stitched Tag die (Waltzingmouse): Little Darlings Images, Little Darlings Sentiments, Pinstripe and Zig Zag Backgrounders

I added the sweet little sentiment along the top to finish it off.  It's a horizontal sentiment from the Little Darlings Images set.  I just used some Ink Isolation (Tutorial) to put the words on top of each other.

I made my second card for the Bedtime Story sketch challenge and Old Pajamas using the nestie Very Vintage Labels No. 25.  I included images from two other WMS sets too:  You're Lovely and Big Day Additions for the sentiment.


Everything was stamped with Silvery Shimmer Delicata and embossed with Silver ep (Ranger).  The banner was made with tassels that I diecut using Banner Basics 2 (Spellbinders).


That about sums up today's projects.  Thank you so much for stopping by.

    
   Happy Stamping!

_______________________________________________________________

Twins Tag Card
Stamps:    Little Darlings Images, Little Darlings Sentiments, Pinstripe and Zig Zag Backgrounders (Waltzingmouse)
Paper:  White (PTI)
Ink:  Smokey Gray (Versafine), Mango Madness, Turquoise Gem (VersaMagic)
Dies:  Stitched Tag (Waltzingmouse)
Accessories:  Summer Sunrise Grossgrain Ribbon (PTI), White Button (PTI), Twine (Twinery), Sequins (Pretty Pink Posh), Rhinestones (Pizzazz Aplenty), Border Punches (EK Success)

You're Lovely Bridal Shower
Paper:  Project Life (American Crafts), White (PTI)
Ink:  Silvery Shimmer (Delicata), Tattered Rose (Ranger)
Dies:  Labels Twenty-Five and Banner Basics 2 (Spellbinders)
Accessories:  Silver Ribbon (Paper Source), Lace (Wild Orchid Crafts), Pearls (Kaisercraft), Silver String, Silver Embossing Powder (Ranger), Sewing Machine

Saturday, April 20, 2013

Grosgrain Fringe Tutorial


I'm excited to share my Grosgrain Fringe Tutorial with you today.  I guest Blogging over at the  Really Reasonable Ribbon's Ramblings BlogAnd I have card to share with you over there to.  So if you haven't been there yet, be sure to check it out.

Now for the Fringe Tutorial.   All you need is 2' of Grosgrain ribbon any width.  I used 5/8" White and Black Grosgrain, but you could use any color or width, depending on how long you want your fringe.  Even if you use the 1 1/2", you could always cut the fringe to the length you want.  And if you only have white, you could color it with Distress Inks or any Mister.  Grosgrain ribbon takes color really well.  You could even color it with Copics.
 

 Grosgrain ribbon is sealed on both edges.  So to start, you have to trim off one of the edges.  It doesn't have to be perfect because you won't even notice the varying lengths of the fringe once you finish it.  Just try to stay as uniform as you can.


Then, while holding the ribbon taut between two fingers (very important otherwise the ribbon will gather making it harder to remove the strands.), using your fingernail, try to separate 6-8 strands from the bottom of the ribbon and pull out and up.  It's important to pull away from the strip as you pull up to make it come apart easier.  I do this until there's about 1/8" left of the weaved part of the ribbon.  It's up to you how much of a base you want to work with.


Here's what the fringe looks like.  I wanted you to see that you don't notice a difference in lengths of fringe, even though my cuts weren't perfect.


Then I just use a heat gun and roll it up on itself.

Now, to make a flower using this fringe, you'll need 2' of 1 1/2 " wired ribbon and a 1 3/4" felt Circle.


For the flower base (this is Wired Faux Burlap Antique Gold...I used Natural Burlap with Wired Edge Silver/White for my actual flower), I pulled the two edge wires out from one side of the ribbon and tied them together.  I then pulled the two wires from the other side and gathered the ribbon, tying those ends off too when I had the gathers where I wanted them.


I then glued the two wired edges together every inch or two and hot glued them to the 1 3/4" felt circle.


Then just add some hot glue to the center and place your fringed piece in the center smooshing it down really good.  Don't worry about being gentle.  You want it to move out a bit, so scrunch it good.


You can spread out the fringe a bit and add an embellishment to the center, or leave it as is.  It's up to you which you prefer.  For this flower I used the fabulously fun 1 1/2" Black Houndstooth Ribbon.

That's it for my tutorial.  Now head on over to the Really Reasonable Ribbon's Ramblings Blog to see the card I made using this fringe.  This stuff is way too fun, and oh so easy!!

 Thank you so much for stopping by!
Happy Creating!!


___________________________________________________________________

Tuesday, April 16, 2013

Waltzingmouse April Release Previews ~ Day 2


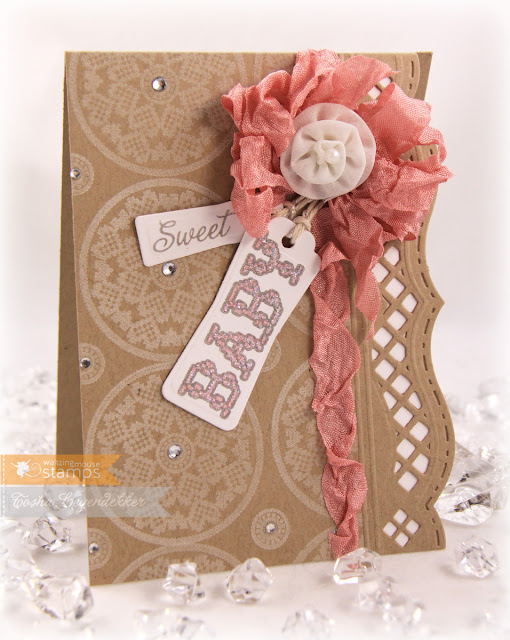
Welcome to Day 2 of the WMS Release previews!  Today we're showcasing a sweet little set called Nordic Baby.  It includes a pair of darling little booties, a beautiful medallion and some "sweet" sentiments.
I used the medallion as a scalloped border on this first card, and added some glitter to the booties and baby sentiment.


 Here's a close up of the sparkly booties. I also added a pearl to each little strap.


I'm a huge fan of white on kraft, and I just got some new border diecuts.  Of course I had to combine the two using the Nordic Baby medallion and darling sentiments!

Once again, that's it for me.  Here's the hop list in case you've missed some stops along the way.


___________________________________________________________________

Sweet Baby Booties
Stamps:  Nordic Baby (Waltzingmouse Stamps)
Paper:  New Beginnings (Webster's Pages), White (PTI)
Ink:  Spring Pansy (VersaMagic), Versamark, Smokey Gray (Versafine)
Accessories:  Tea Time Doily die (Cottage Cutz), Circle Die (Spellbinders), Copics, Sculpture Flowers (Prima), Wrinkled Ribbon (PrairieBirdBoutique), Button (PTI), Pearl, White Embossing Powder, Quickie Glue Pen, Glitter (Judikins)

Sweet Baby Medallion
Stamps: Nordic Baby (Waltzingmouse Stamps)
Paper:  Kraft and White (PTI)
Ink:  Cloud White (VersaMagic), Smokey Gray (Versafine)
Accessories:  A2Bracket Borders One and Framed Tags One dies (Spellbinders), Copics, Quickie Glue Pen, Glitter, Wrinkled Ribbon (PrairieBirdBoutique), Trixie White Flower (Prima), Rhinestones (Pizzazz Aplenty)
 

Monday, February 20, 2012

Mojo Monday Surprise Blog Hop for Julee

Twins!! How exciting!! We're having a Mojo Monday blog hop shower of sorts for Julee and Mark (owners of Verve Stamps). They're expecting twins in a few short weeks!!

If you've arrived here from Janelle's blog, you're on the right track. Otherwise, you might want to start at Julee's blog and wish her congratulaions.

I thought it would be fun to use the giraffe from the To the Moon set and frame it with the star frame from the set American Hero. The star at the end of the sentiment tag is from that set also. I also added an "s" to the "precious little one" sentiment.

That's it for my card. Next up on the hop is the sweet and talented Jackie.

post signature

_____________________________________________________

Stamps: To the Moon and American Hero
Paper: Genuine (Authentique), White (PTI)
Ink: Tuxedo Black (Memento), Black Soot (Ranger Distress)
Accessories: Copics, Pearl Pen, Button (PTI), Twine (Olive Manna)

Wednesday, June 1, 2011

Waltzingmouse's June Soap ~ Day 1


June is a WMS SOAP (Stamp of Approval Parade) month, so the Waltzingmouse DT will be having a parade of samples they created with the images from last month's release for the next 3 days, along with featuring a previously released set on the 4th day. I chose to make a Flap Trifold baby card using a Splitcoaststamper's Tutorial by Rose Ann Reynolds found HERE. I stamped the half doily image, from the WMS set Dainty Doilies 2 Small, with Versamark onto some pink cs, embossed it with White ep, and diecut it with Spellbinders' Petite Circle Scallops. The "baby" sentiment is from the Say it Loud set and is also embossed with White ep directly onto Sparkling Spring Prima dp. I added a little tag, (the sentiment is also from Say it Loud) that I made with Verve's Charming Banner die, with some white ribbon, silver cording and a sweet little button. When it's folded, it measures 3 1/2" x 4".

That's it for my card for today.
I'm the end of the hop. I've included a list of all those participating today just in case you missed one.

Anya Schrier
Belinda Chang Langner
Bonnie Sharp
Carly Robertson
Jennifer Holmes
Julia Aston
Kate Whelan
Laurie Schmidlin
Lynn Mercurio
Mona Pendleton
Niki Estes
Sandie Dunne
Sarah Martina Parker
Tosha Leyendekker <---you are here!

Thanks so much for stopping by. I hope you are having a fabulous week!!
Happy Stamping!
Tosh

Thursday, May 20, 2010

CCEE Baby


Whew...it's been awhile. We've been busy getting things ready for our son to come home from college. He brought a couple of friends back with him, one of which is staying to work for us over the summer. Have you ever gone from feeding three (small meals) to 6 with 3 very big boys? Holy cow!! What an adjustment. But I love it!!

Anyway, since it's Thursday, I have a CCEE Stamper's challenge card to share with you. This week Frances challenged us to make a baby card. I used this weeks Mojo Monday sketch found Here, and used this darling little elephant image from the JustRite set called Let's Celebrate. There's also a sweet little lion, monkey, and birthday wishes sentiment.

It's stamped with Tuxedo Black (Memento) and colored with copics. The edges are all distressed with a "new to me" electric distressing tool by Zutter. What I used to do with my fingernails, and a Tim Holtz tool, is now done in less than a minute!! LOVE it.

I also used some new Cabbage Rose ribbon. Awesome stuff, I tell ya!!!! And the little epoxy pebble is by Prima. I used dp called Paper Girl by The girls' paperie, and Pumice Stone Ranger Distress Ink around all the edges. Last, but not least, I used a new EK Success border for the bottom edge, and Square Nestabilities (Spellbinders) to frame my image.

That sums up todays project. We'd love to see some baby cards by you also. Just head on over to the CCEE Stamper's blog for all the details, and to see what the other gals have come up with.

Happy Stamping my friends!!
Tosh
Related Posts Plugin for WordPress, Blogger...
 
Site Design By Designer Blogs