Monday, December 31, 2007
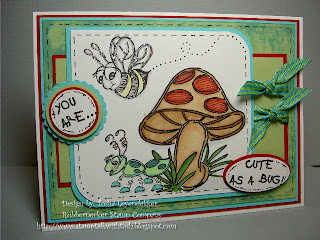
Cute as a Bug!
The color challenge on SCS was posted early!! Yippee!! I didn't have Taken with teal. In fact, I just placed an order for it yesterday because I was going to use a similar color combination for a future card...minus the red. Well, I thought these bright cheery colors would fit well with these cute bug stamps by Rubbernecker Stamp Company. The background piece was simple as pie to make! I just took the Broken China Tim Holtz Distress ink pad and rubbed it over my certainly celery piece. That's it. The Distress ink works a bit like a stain, so it soaks in little giving it a more blended look!! I love it!! The main image was colored with copics, and the wings and antennae were glittered with crystal glitter, and my favorite Sakura Quickie Glue Pen./ Cute as a bug was punched out with the largest SU punch, and *you are* was punched with the 1", 1 1/4", and yellow marvy scallop punch. The red circle was hand cut. The main image panel and the sentiments are also popped up a bit with dimensional tape! I'll post my MFT sketch card tomorrow. Thanks for visiting!!
Labels:
Rubbernecker,
Tim Holtz Distress Ink
Golden Panda with twist
The technique challenge on SCS today was to use a split negative. There was a catch though. You couldn't use black/white. I used black/gold....hope that was okay. These two colors fit best with the image I wanted to use by Rubbernecker. I embossed the square panda image gold on black, black on gold, and gold on white. The whole square is one image. I then cut out the black circle and gold circle, cut them in half and glued them together inside the white frame. The black was too flat for me, so I clear embossed the whole black panel before gluing it with the gold. I then wrapped the gold cord around the card and tied with a bow. The main panel and sentiment panel are raised with dimensional tape. This was a fun and easy technique!! If you've never tried this before, ya hafta!! You can use virtually any color combo and stamped image....although I feel a larger one works better so you can see the split better.
BTW....this card is rather large!! 5 1/4 x 7 1/4
Recipe
Stamps: Rubbernecker
Paper: Whisper White, Bazzill green, black
Ink: Versamark gold and watermark
Accessories: crop-a-dile, gold eyelets, gold cord, embossing powders: gold, black, clear, embossing buddy by Stampin' Up, dimensional tape
Sunday, December 30, 2007
I have returned!!
Oh My!!! It's been so long since I've uploaded a card, I've almost forgotten how!! We went camping over Christmas this year for the first time, and loved it!! I know, most of you are saying WHAT? Camping in the winter? Well we went towards the coast, and the lows were only in the 40's and the highs were in the low 60's. I love the cold, so I was quite happy. Plus there is an abundance of wildlife where we camp...deer, wild turkey, and little bandits, otherwise known as raccoons. Did you know they work in teams of three? Yep. Two are the decoys, while the other steals whatever you turned your back on. In our case, it was a bag of marshmellows. We were watching two little critters at the next campsite, turned around and there, on our picnic table was the little thief!! Good thing he was sooooo cute, and that we had plenty of other supplies!! *grin*
Anyway....to my card. This is for this weeks Featured Stamper at SCS. dlounds (Danielle) has a precious gallery!! I loved looking at her awesome cards. And she's only been uploading for a few months to SCS. Check out the card I cased.
Chirp Chirp I didn't make too many changes.
1.Colors
2.Stamp images
3.Ribbon
4.Added the boots
5.Dirtied it up a bit....sorry, couldn't help myself
Recipe:
Stamps: Hanna Stamps (Got for Christmas from StampOwl...thanks my friend...paper too)
Paper: Blush Basicgrey, SU Pretty in Pink, Close to Cocoa
Ink: Tim Holtz Black Soot and Frayed Burlap Distress Ink
Accessories: Copics, Retractable craft pick,brads, twine, dimensional tape
It's great to be back in the saddle again!! I hope to post more frequently now. MFT does a sketch challenge tomorrow hosted by Cindy Haffner!! Can't wait to try that.
Tuesday, December 18, 2007
Chillin' Penguins
Oh was this a fun card to make!! I used stamps and products from a variety of companies!! I love mixing it up!! I made this for the sketch challenge on SCS found here: Sketch
The background stamp can be found at the Rubbernecker Stamp Company!! Love, love, love this bg!! I've used it a lot!! I did something differently this time though!! I inked it up with versamark...okay, nothing new....but then I embossed it with scented embossing powder from Cornish Heritage Farms!! Oh my goodness!! Do not do this at night!! Talk about craving coffee....oh, forgot to mention the scent *coffee and cream*! NUM!!! But I've got super willpower!! Not!! I just don't want to be up all night. *grin*
Okay, movin' on!! I stamped the dotted bg with another Rubbernecker bg!! Love those dots!!
The snowflakes By Papertrey, were stamped with Stampin' Up bashful blue on bashful blue, and then coated with ultrafine crystal glitter and my Sakura Quickie Glue Pen!
The penguins were colored with copics after being stamped with Tim Holtz Black Soot Distress Ink. and are from Denami
Chillin' was stamped with Tim Holtz Walnut Stain Distress Ink, and all the panels were sponged with Tim Holtz Tea Dye and Walnut Stain Distress Ink!
The ribbon is from my dear friend Frances Byrne (StampOwl) I think she got it from Hanna Stamps. I sure love it.
Sunday, December 16, 2007
ccee Commercial
Okay!!! It's Monday, and time for another challenge that I do with a small group of goofy SCS friends. This week we were to make a card inspired by a commercial. I'm hoping you can guess the commercial by just looking at it, but in case you can't, it's the cingular (now bought out by ATT) *bars* commecial.
The only stamping I did was the sentiment, and that stamp is from From the Heart Greetings by Hero Arts. The rhinestone stickers are also from Hero Arts and the ghost flake is by Heidi swap. The dp is all Figgy by Basicgrey.
Stamps: Hero Arts
Paper: Chocolate Chip, Cool Caribbean, Very Vanilla, Basicgrey Figgy
Ink: Tim Holtz Walnut Distress Ink
Accessories: Two scallop scissors sizes, cuttlebug diecut (lattice), Rhinestone stickers, ghost flake, piercing tool, mat pack (su), grosgrain ribbon, corner rounder, dimensional tape.
Chillin'
Every Sunday, Splitcoast Stampers features a new stamper for anyone who would like to CASE one of their cards. The only requirement is that you change at least two things. This week, the FS is LZappa. And I chose to case this adorable card of hers. LZappa
I love Whipper Snapper!! Especially their snowmen and penguins, so I used this stamp "think snow". I stamped it with Tim Holtz Black Soot distress ink.....fabulous ink to use with copics...NO SMUDGES!!! You can find this ink at Rubbernecker Stamp Company I colored the image with copics and coated the snow with crystal ice stickles. The flakes above were coated with ultra fine glitter and a Sakura Quickie Glue Pen. The snowflake brads have grape ice stickles in their centers, and the medallion was punched with scallop and circle punches. The center of the medallion has the MFT stamps *chillin* and snowflake stamped with bashful blue and night of navy. I used a sakura white souffle pen for the dots around the scallop! Another favorite tool of mine. It never clogs and always disperses ink. LOVE IT!!
Stamps: Whipper Snapper, MFT
Paper: Memory Box DP, Night of Navy SU and Papertrey White (awesome paper to use with copics)
Ink: Tim Holtz Black Soot Distress Ink, Night of Navy
Accessories: blue Marvy oval sallop punch, Nestabilities circles, snowflake brads, stickles, Quickie glue pen, ultrafine crystal glitter, su grossgrain ribbon (navy and elegant eggplant), Michaels Ribbon, dimensional tape
Labels:
MFT,
Whipper Snapper
Saturday, December 15, 2007
Navigating
I'm finally getting to my second post. It was super crazy on my part to start a blog, then change all my stuff over from a windows based computer to a mac!!! Yikes!! For someone as computer illiterate as I am, I've been struggling all morning with uploading my card pictures....finding where they were uploaded...trying to edit them, and then figure out how to find all *my favorites* that I had stored on my other computer. I never did find my favorites. =( Then my satellite server wouldn't let me upload. Apparently...according to the company, I had used up all my "allotted" time. So, I'm finally here!! Woot!
Well, while I was having all my information transferred to my new mac, I made a couple of cards. One, I'm a little happy with, the other....well, lets just say it's done. I wanted to show you two different ways to use Rubbernecker's snowflake background.
I created the bg by inking up a cottonball with about 8 drops of Slate Adirondack alcohol ink and 3 drops of blending solution. I then tapped it randomly all over the glossy white cardstock. Then I used white craft ink and white embossing powder to stamp the snowflake bg.
I stamped the tree image with Tim Holtz Black Soot distress ink and embossed it with black embossing powder!! I'm a huge fan of these distress inks because there's a couple minute window that it remains wet enough to emboss. Awesome stuff!! For the tree I used my Sakura Quickie Glue Pen. Another favorite tool of mine. It looks like a regular pen, and doesn't clog!! Ever!!! Not only that, but it's a light blue when wet, so you can see in the pen how much further you have to go until empty!! And believe me....they go far. Also...you get the finest detailed lines!! You can outline letters perfectly, or color in an image like the tree. And the absolute best part......................it has a huge window of use. I colored in the whole tree before putting the glitter on. It will look dry....but it's not. You can color your whole image before glittering. How cool is that?!?!
The black piece is a nestablitiy square scallop that I ran through my cuttlebug!! Love both!!
Stamps: Rubbernecker
Paper: Black, white glossy, bazzill gray
Ink: Tim Holtz Black Soot Distress Ink
Accessories: Quickie Glue pen, heat tool, black embossing powder, white embossing powder, brads, nestabilities, twill ribbon, corner ticket punch, slate Adirondack Alcohol ink, Adirondack blending solution, Art Institute glitter: tang, spruce and crystal
For this card, I stamped the snowflake bg with The essential Glue Pad, then sprinkled ultrafine crystal glitter over it. How easy is that?!?! I wish I would have stamped the peace on white instead of silver....a lesson learned. It was also stamped with the Essential Glue Pad and sprinkled with Christmas Red Art Institute Glitter. The holly was freehanded with Lime Ice and Christmas Ice stickles. And the middle bg was run through the cuttlebug with the swirl folder. I used the nestability scallop oval and dotted each scallop with a silver zig pen. There ya have it.
Stamps: Rubbernecker
Paper: Real Red, black, silver
Ink: The essential glue pad
Accessories: Art Institute Christmas Red, Stickles, nestabilities, cuttlebug, corner ticket punch, zig pen, ribbon, dimensional tape
Labels:
christmas,
polished stone,
Rubbernecker
Thursday, December 13, 2007
It's official!!
Well, it's official now. I'm a blogger. I didn't ever plan on starting a blog, but there are some awesome tools and techniques that I'd like to share with you. So.....here it is....my first blog home!! I'm still learning the ropes, so please be patient.
I'd like to start by sharing a card I made recently with Rubbernecker Stamps.
All the supplies you need to make this card can be found here:
Rubbernecker Stamp Company
The card is 5 1/4 x 5 1/4; one of my favorite sizes to work with. I cut the base to shape and added the other layers as follows: Purely Pomegranate 5 x5, Certainly celery 4 3/4 x 4 3/4, then glossy 4 5/8 x 4 5/8.
I used the polished stone technique on the glossy with Adirondack alcohol inks: oregano and copper. I also used the blending solution.
All you do is take a cotton ball, put about 5 drops of the oregano on it and 1 drop of the copper. I added about 1 -2 drops of the blending solution to lighten it up and help it spread better on the glossy paper. Then just tap around the glossy until you get the look you want. You might have to add more ink and solution depending on the size of the space you are trying to cover. Rubbernecker carries an ink blending tool that makes this much easier, but I don't have that yet.
The hinges are covered with the same inks, and attached them both with hot glue. I distressed the brads by rubbing sandpaper over them. The binding is
1 1/2 x 1 1/2 and is wrapped around the edge of the card to give it a "book" look. I need to take this time to tell you about these awesome hinges!! They're grungeboard. You can bend it, scrunch it, twist it and it still retains its shape. Because of that, it's flexible and moves with the card. It also holds color extremely well and is textured. It's quite awesome stuff and can be found at www.rubbernecker.com Tim Holtz gives an awesome tutorial on how to use it at that website. Check it out!!
The flower was first stamped on watercolor paper with versamark pigment ink and embossed with black embossing powder. I then watercolored it with Adirondack reinkers: Butterscotch, Wild Plum and Bottle. I used an aqua pen to color the image. Finally I added a light layer of glue with the Sakura Quickie Glue Pen and sprinkled ultrafine crystal glitter over the stamen.
The background panel and flower are both lifted with dimensionals, and the petals are all cut into the center to give them the look of movement.
I hope this helps explain a bit about how this card was made. This is my first tutorial...Yikes!!
Recipie: Stamps - Rubbernecker - Bold floral
Inks - Versamark, Adirondack: Butterscotch, Wild Plum, Bottle, Adirondack Alcohol ink: oregano and copper, blending solution
Paper: Black, su purely pomegranate, certainly celery, glossy white, watercolor
Accessories: Grungeboard, brads, Sakura Quickie Glue Pen, Ultrafine glitter, aqua pen, sanding block, dimensional tape
Labels:
grungeboard,
polished stone,
Rubbernecker
Subscribe to:
Posts (Atom)