Showing posts with label Inque Boutique. Show all posts

Sunday, March 22, 2009

Surprise Frances!! *grin*


Each Monday, I post a card that was made for a weekly challenge that a group of eight of us do together. We've been challenging each other for almost 2 years now, and Frances (StampOwl) has even set up a blog for us to share some of our contributions. Well, the 24th is her birthday, and since she's a day ahead of most of us, one of our members thought it'd be fun to turn the tables on her. You see, she's in charge of the challenges this month and has challenged us to make a Scrapling card. Well, since some of our members like to give the old *BUZZER* when challenges are not followed correctly, we thought it'd be fun to change her challenge. We all made Owl cards instead and conveniently forgot to send her the memo stating the change. *grin* Evil little monsters aren't we?

Head on over to our blog to see what the other girls have done and to wish Frances (who we affectionately call *Hoots*) a Happy Birthday. Click HERE.

Okay... now onto the card details:
I started off creating my bg. I took a 5x5 square piece of Memoirs (Inque Boutique) dp and scored it from corner to corner. I then sewed along the score lines. Went back to my Scor-Pal and repeated the process from the other corner. I then scrunched the paper in my hand into a ball, unfolded it, and rubbed Brushed Corduroy (Ranger Distress Ink) over the edges and the wrinkles. I took another strip of dp and sewed horizontal lines across it and did the same with it as the first.

The Patterned Birds and Bugs owl (Inkadinkado) was stamped with Vintage Sepia (Versafine), heated, then colored with copics. I also added a touch of glitter with my Quickie Glue Pen and Ultrafine Transparent Glitter.
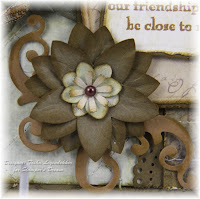
The flower was made with the 5-petal Flower Punch (Stampin' UP!), a Martha Stewart Flower Punch, and a Carl CarlaCraft flower Punch. All were ink distressed with Brushed Corduroy and wrinkled up a bit. The flourishes were diecut with the Doodle Parts die (Spellbinders). The papers I used were all Prismatics: Birchtone Light and Medium and Tawny Medium.

The sentiment was stamped with Vintage Sepia (Versafine) onto leftover handmade dp from a card I posted a few days ago HERE. It was then diecut and embossed with the Curved Rectangle Nestabilitey (Spellbinders), and popped up on the Labels II (Spellbinders) piece that I cut out of the Inque Boutique dp.

The ribbon is organdy and various fibers, and the lacy border was made with a Martha Stewart border punch. The metal photo corner is by We R Memory Keepers, and the teeny tiny Chocolate Pearl is by Kaisercraft.

That about sums up the card. I hope you all have a fantastic week.
Happy Stamping!
Tosh

Supplies:
Stamps - Patterned Birds and Bugs (Inkadinkado), Inque Boutique
Paper - Memoirs (Inque Boutique), Birchtone Light and Medium and Tawny Medium (Prismatics) Simply Smooth White (Prism)
Ink - Vintage Sepia (Versafine), Brushed Corduroy and Old Paper (Ranger Distress Ink)
Accessories - Labels II Nestabilities and Curved Rectangles Nestabilities (Spellbinders), Doodle Parts diecuts (Spellbinders), Copics, Metal Photo Corner (We R Memory Keepers), Quickie Glue Pen, Ultrafine Transparent Glitter, Sewing Machine, Flower Punches - Martha Stewart, Carl CarlaCraft 5-Petal Flower (Stampin' UP!), Lacy border punch (Martha Stewart), Chocolate Pearl (Kaisercraft), dimensional tape.

Wednesday, January 7, 2009

Elegant Nightingale


When I saw today's sketch on SCS, found HERE, I immediately thought of my Inque Boutique images that I got from Stamper's Dream. I haven't used them in ages, and they're so gorgeous!!!

So, I hauled out my Nightingale and my Aged and Elegant set, and went to work. I love this sketch and how this card turned out.

To start, I stamped the nightingale with Espresso Dye Ink (Adirondack) onto Champagne Metallic cs (Prism), and colored it with my copics.

I then rock and rolled the flourishes with Cool Caribbean and True Thyme (Stampin' UP!), spritzed them with my Extra Fine Mist spray bottle by Judikins (I love this mister...it's awesome!!), and stamped them onto Buttercream (Prism). The mats and flowers are Birchtone (Prism), Buttercream, and Tres Jolie (My Mind's Eye) dp.

The flowers are made from Martha Stewart flower punches and 2 Pewter Pearls (Kaisercraft), and the sentiment is stamped with True Thyme (SU) and is from the Aged and Elegant set (Inque Boutique).

Finally, I punched the corners with my Lace Border punch by Martha Stewart, and added some organdy ribbon. (Which I crinkled by lightly heating with a heating tool).

All the edges are ink distressed with Mushroom Dye Ink (Adirondack), and each panel is raised with dimensional tape!!


Supplies:
Stamps - Nightingale, Aged and Elegant (Inque Boutique)
Paper - Tres Jolie (My Mind's Eye), Birchtone, Buttercream, Champagne Metallic (Prism)
Ink - Espresso, Mushroom (Adirondack Dye), Cool Caribbean, True Thyme (SU)
Accessories - Copics, Martha Stewart Flower and Lace Border Punches, Pewter Pearls (Kaisercraft), Organdy Ribbon, Heat Tool, Dimensional Tape, Extra Fine Mist Spritzer (JudiKins)


I hope the first half of your week is just fantastic, and that the last half is even better!! *grin*
Happy Stamping!!
Tosh

Wednesday, October 29, 2008

Shabby and Happy!!

Woo-Hoo!! It's Wednesday, and time to make a card with Rox's sketch on SCS. Click HERE for today's sketch.

Do you have one of those friends, who no matter how bad of a day you're having, you always end up laughing with by the end of your conversation? Well, I made this card for a dear friend of mine who blesses me that way often, thus the "happy thoughts" sentiment.

I haven't used my Inque Boutique stamps for quite some time, so I thought I'd pull them out today. I used Shabby Chic (IB) for the medallions, and Everyday Whimsy (Wordsworth) for the sentiment.

I just got my new Stampin' Up Curly Label Punch, so of course I had to use it...*grin* Actually, this card is full of punches and diecuts...Nestabilities, Circle (SU), and Martha Stewarts border. The medallions are super dimensional.

The paper, well, I had my Frost dp (Memory Box) still out from yesterday, and thought it would go beautifully with these images. All the Cardstock is Prismatics. (Birchtone Dark, Herbal Garden Light and Dark, Vanilla Cream, Rose Dark)

I added Clear/Silver Rhinestone stickers (Kaisercraft) to the centers of the medallions, and ink distressed all the edges with Frayed Burlap and Walnut (Ranger Distress Inks).

I hope you're all having a blessed week!
Happy Stamping!!
Tosh

Supplies:
Stamps - Shabby Chic (Inque Boutique) Everyday Whimsy (Wordsworth)
Paper - Frost (Memory Box), Birchtone Dark, Herbal Garden Light and Dark, Vanilla Cream, Rose Dark
Ink - Frayed Burlap, Aged Mahogany, Walnut (Ranger Distress Ink)
Accessories - Nestabilities, Punches, Rhinestone Stickers, Ribbon

Thursday, October 23, 2008

Pink Manger Kisses

I made this card for two challenges on SCS today. Since it's Breast Cancer Awareness month, SCS is hosting a challenge to make cards with any amount of pink on them to send them to Chemo Angels. If you'd like to know more about this generous program, click HERE. For the challenge itself and how you can help, click HERE.

This card also fits under the Ways to Use it Challenge on SCS found HERE. We were to make a card with a sentiment of only "one word".

I stamped the Manger Kisses (Stampendous) with Tuxedo Black (Memento) ink twice onto Neenah Natural White and colored it with my copics. I cut out both angels and popped them up with Dimensional tape and added Frosted Lace stickles to the wings and flower. The flower has a Blush Pearl (Kaisercraft) in the center.

The Believe sentiment is by Inque Boutique's "A Word or Two" set, and is colored in with a pink copic. That should about do it for the details...

I hope you are having a fantastic week!!
Happy Stamping!!

Supplies: Stamps - Manger Kisses (Stampendous), Believe (A Word or Two - Inque Boutique) Paper - Je' Taime (My Mind's Eye), a textured dp (?), Blush Red Medium, Vanilla Cream, and Suede Brown Medium (Prismatics), Neenah Natural White Ink - Tuxedo Black (Memento), Tea Stain (Ranger Distress Ink) Accessories - Stickles, prima flower, Pearl (Kaisercraft), Sewing Machine, Copics, Nestabilities, Scalloped Rotary cutter

Sunday, October 12, 2008

A card for jstarbright

It's time once again for a CCEE challenge. This week it's our favorite, where we choose a stamper from SCS with a unique screen name. Dawn L chose *jstarbright* this month. Our requirements were as follows:
1. Patterned Paper
2. Birds
3. a Star
4. Buttons and Brads
5. Bonus...Joni collects covered bridges and love listening to music. We could include both of those if we wanted to.

Well, I didn't have any covered bridges, and the music wasn't flowing, but if you look carefully, I believe I met all the other criteria...*grin*


Be sure to check out what the other girls have done HERE.
The image is colored with copics and is layered with dimensional tape. The edges are ink distressed with Antique Linen (Ranger Distress ink), and I sewed around each panel.

I hope you have a fantastic week ya'll!!
Happy Monday!

Supplies:
Stamps - Chickadee and Holly (Stampourri), Sentiment (Birdies - Inque Boutique)
Paper - Winterwonderland (Kaisercraft), Bazzill, Neenah Solar White
Ink - Tuxedo Black (Memento), Antique Linen (Ranger)
Accessories - Copics, Nestabilities, Ribbon (American Craft), Brads, Red Glitter, Cuttlebug Stars Diecut, Button, Twine, Sewing Machine, Dimensional Tape

Sunday, October 5, 2008

JustRite Batik

It's time once again for a CCEE challenge. This week, Dawn (DawnL on SCS) challenged us to make our own DP. Well, SCS has a fabulous Batik tutorial , by Lynn in St. Louis,
that I wanted to try. I added some Perfect pearls to mine to give it a real shimmery look.

So, I inked up my holly image (Inque Boutique's Savoir Faire See D's set) with Versamark and clear embossed it with Detail Clear ep onto watercolor paper. Then I sprayed it with a mixture of water, Bottle Adirondack Dye Ink, and about a smidgen of perfect pearls powder in a little Mini Mister bottle (all of which you can find at Rubbernecker Stamp Company). Then, according to the tutorial, you place a sheet of paper over the embossed and sprayed paper, and heat it until you see the image come through the paper. And, Woila!! This was so much fun!! I know I'll be doing this again!! Sorry I covered it up so much. When I play with sketches, I never know how they're going to end up.

Now, I have to tell you about these new JustRite images!! They are soooooooo awesome!! I'm in love!!! I can't get enough of them!! This one is 3 1/4" and is from the Christmas Stamp Ensemble. It's FABULOUS!!! I embossed it with Detail Gold ep (Judikins) onto the smooth side of Sage Dark Prismatic cs, and Neenah Natural White. Gorgeous! I also punched out a border with my Martha Stewart punch. After all the layers were cut, I edged each piece with my Krylon Gold leafing pen. I love the finished look.

Finally, I added the organdy ribbon and heated the ends with a heat tool just a bit to crinkle them up a tad. Some gold brads in the corner, and it's finished!!

That's it. Sorry for the absence. I've been at a wedding in Iowa since Thursday. I have some more fun stuff for you this week though, so check back.

Thanks for stopping by. Hope you had a fantastic weekend!!

Supplies:
Stamps - Christmas Stamp Ensemble (JustRite), Savoir Faire (Inque Boutique)
Paper - Sage Dark (Prismatics), Neenah Natural White, Watercolor
Ink - Versamark, Bottle (Adirondack Dye Ink)
Accessories - Nestabilities, Clear EP, Gold EP, Border Punch, Organdy Ribbon, Corner Ticket Punch (SU), Krylon Gold Leafing Pen, Gold Brads, Iron, Mini-mister, Perfect Pearls, Dimensional tape

Wednesday, September 17, 2008

Christmas Peace


Rox provides such wonderful sketches for us each week for the SCS Sketch Challenge, that I find I rarely miss one. This one was really fun for me. The main panel is covered with crystal lacquer and a sprinkle of ultrafine crystal glitter.

I stamped Penny Black's Nature's Dance with Versamark onto Vanilla Cream and embossed with Malachite ep. I then sponged over it with Antique linen and sponged with edges with Walnut Ranger Distress Inks. The berries are Xmas Red Stickles. I spread a thin coat of Diamond Glaze (JudiKins) all over the main image and sprikled a touch of ultrafine crystal glitter (Art Institute)to give it sparkle to match this gorgeous dp by My Mind's Eye. If you click on the photo, you'll be able to see the sparkle better.

All the edges are ink distressed with Walnut RDI, as well as the Martha Stewart snowflakes. The Latte Pearls are Kaisercraft, and I have a Heidi Swapp ghost snowflake in the upper right hand corner that has a touch of Coffee Ice stickles on it. I finished it off with some Island Blossom dew drops and the beautiful Copper ribbon by May Arts. The Peace sentiment is Inque Boutique (Staphanie Barnard Christmas), and is cut out with nestabilities.

Thanks so much for stopping by today. I hope you're having a wonderful day filled with peace and inspiration!!

Supplies:
Stamps - Nature's Dance (Penny Black), peace sentiment (Stephanie Barnard Christmas-Inque Boutique)
Paper - Laundry Line (My Mind's Eye), Vanilla Cream, Sage Medium, Blush Red Dark (Prismatics)
Ink - Versamark, Aged Mahogany and Walnut (Ranger Distress Ink)
Accessories - Malachite embossing powder (JudiKins), Island Blossom (dew drops), Cuttlebug, Nestabilities, Snowflake punch (Martha Stewart), Latte Pearls (Kaisercraft), Copper Ribbon (May Arts), Corner Ticket Punch (SU), dimensional tape

Sunday, September 14, 2008

JustRite Week at Stamper's Dream

I tell ya!! Michelle has such a talented design team. I've been checking out all the samples this week, and talk about creative, beautiful, and just plain super fabulous!! WOW!!

It's been JustRite week at Stamper's Dream this week, so Michelle is offering some phenomenal blog candy. But, you've figured that out already, haven't you!!! Anyway, all you have to do is comment on one of her blog posts since Monday, and you'll be entered into a drawing to win a JustRite C-45 Monogram Stamper. And she just sweetened the deal...if she reaches 100,000 hits, she'll have a drawing for the JustRite Curlz Font and borders kit too. All you have to do is leave a comment on her pinecone card!! How fabulous is that!?!?!?! So head on over to the Stamper's Dream blog and check it all out!! She's having the drawing sometime on Sunday. And, not only does she have some of the older sets, she has many of the new JustRite sets in right now!! She ordered them all, so as they arrive, she'll be making them available in her store!!

Now, I've been wanting to make an acetate Cami tri-fold card for quite some time. There's an excellent tutorial on SCS. Just click HERE. I started off by cutting and scoring. I then punched a circle out of the upper part of the middle panel. I did this with my Cuttlebug and Nestabilities (Spellbinders). After that, I stamped the large swirl (Nightingale - Inque Boutique), with black Stazon, on the end panel. Now I can fold it up and see where I need to place my JustRite circle image that I created with the Damask 1" Borders set, and their small letters. After arranging my letters on the wooden stamper, I inked it up with Groovy Guava (SU) and then colored the dots with a black marker. I huffed...and stamped. I added a few rhinestone stickers to bling it up a bit and layered it with dimensional tape onto Light Blush Red Prismatic cardstock. The back piece is the same with the edges cut with my scallop rotary cutter.

For the front of the card (which is actually the middle panel) I stamped the Inque Boutique Nightingale dots down the side ad added an open scalloped circle frame that I cut with my Cuttlebug diecuts. The circles are each coated with Silver Stickles also.

Finally, I added a flower to the slot that holds the card together, and coral dots around the scalloped frame with a Souffle pen.

Supplies for the acetate card:
Stamps - Damask, small letters (JustRite), Nightingale (Inque Boutique)
Paper - Light Blush Red (Prismatics) Black, Acetate
Ink - Black Stazon
Accessories - Glitter, slot punch (SU), ScorPal, scallop rotary cutter, Cuttlebug, nestabilities, rhinestone stickers, stickles


Here's another "Thank You" card that I made for
my son. He recently turned 18. Now you'd think I would plan ahead knowing he would need thank you notes...but nooooooo. I was scrambling to make these after his birthday. So, I needed something fast and simple to make. Of course I thought of the JustRite stampers for this. You can make virtually any sentiment in many combinations. I used the Curlz Font and Borders kit and the small letters one to make this circled Thank you. I embossed the bottom panel with the Cuttlebug Houndstooth embossing folder, and framed each piece with black and Going Grey (SU). Now, since this was to be a masculine card, I don't know what I was thinking using this particular font. Thankfully my son was so worried about getting these out that he didn't pay attention to that part. WHEW!!!

Thank you so much for visiting my blog!! I appreciate every one of you. Hopefully you've been inspired this week, becuase all of us have had fun creating examples with this fabulous product. I hope you have a blessed weekend!!

Supplies:
Stamps - Curlz Font and small letters (JustRite)
Paper - Gray, Light Gray and Black (Prismatics), Neenah Solar White
Ink - Tuxedo Black (Memento)
Accessories - Houndstooth (Cuttlebug embossing folder), nestabilities, rhinestone stickers

Sunday, August 3, 2008

My first Acetate card...

Boy is this ever hard to photograph!! Kudos to those of you who have mastered photographing acetate cards, because I struggled with this...oh how I struggled!!

Well, it's time again for my weekly CCEE card. This month Frances (who I call Hoots...aka StampOwl on SCS) was in charge of coming up with the challenges. Her first challenge was to create an acetate card, and it must be goofy since Clown day is in a couple of days, and the 6th is Lucille Ball's birthday. Well, both of these were a stretch for me. Goofy? Not my forte. Acetate? Never done it. Well, I found it's not nearly as hard to work with acetate as I feared. I purchased these wonderfully thick Clear Card Sheets from Cornish Heritage Farms. This is TOUGH stuff!!

Here's my take on a goofy acetate card. If you'd like to see what the other CCEE girls have done with acetate, click HERE. We'd also love to have you play along. Just follow the instructions on the CCEE Stampers blog.

I stamped the Inque Boutique pumpkin with Tuxedo Black (Memento) on Papertrey white and colored it with my copics. The face has a touch of glitter that I adhered with my Quickie glue Pen. The swirls from the Halloween Distressed set were stamped with black Stazon and colored on the back with an orange Sharpie pen. I then stamped the web and spider on the back piece. I also added some black rhinestone stickers (K&Company) randomly on the card front.

Finally, I added orange ribbon that I got as a sample from Amuse. Thank you!!

Here's a close-up of the inside panel. I should have added glitter to the web. I think I'll do that later.

Thanks so much for stopping by!! I sincerely hope you have a fabulous week!!


Supplies:
Stamps - Halloween Distressed (Inque Boutique)
Paper - Clear Card Sheet (Cornish Heritage Farms), Bazzill, White (Papertrey), Black
Accessories - Nestabilities (Spellbinders), Copics, Glitter, Quickie Glue Pen, Orange Sharpie, Scotch mounting tape, Rhinestone stickers (K&Company)

Wednesday, July 30, 2008

Harvest Memories...

Fall is my absolute favorite season, and I'm a huge Northwoods Stamps fan!! So I thought I'd use this Harvest Mailbox image today. (We're roasting here in CA)

I love the deep etched rubber and the cozy scenes that Northwoods stamps are known for. They're a treat to color!!! I colored this image with copics, and paper toled some of the elements.

Here's a close up so you can see the dimension.

The side piece was cut with the largest nestabilities circle diecut, and stamped with "Miss You" from the Inque Boutique Sentiment Set.

I punched all the circles for the eyelets with my crop-a-dile, and popped up each panel with Scotch mounting tape. Finally, I finished it off with some chocolate twill ribbon.

CHECK THIS OUT!!

Michelle at Stamper's Dream has all her fabulous PRISMATICS in stock!! I would highly suggest checking them out!! The colors are phenomenal, the texture is fantastic, and the variety is awesome!!

Thanks so much for stopping by!! I hope the rest of your week is just awesome!!


Supplies:
Stamps - Harvest Mailbox (Northwoods), Miss You (Inque Boutique Sentiments)
Paper - Holiday Plaid and Reading Flowers (Chatterbox), Herbal Garden Medium and Dark (Prismatic)
Ink - Tuxedo Black (Memento)
Accessories - Copics, Nestabilities (Spellbinders), Twill Ribbon, Eyelets (Making Memories), Crop-a-dile, Scotch mounting tape, slot punch (Stampin' Up)

Tuesday, July 22, 2008

Dirty Dog!!

One layer cards? So not my forte. Now I've made them in the past (3 times), but only if they're a challenge...not because I just decided to make a one layer card for the fun of it. PAHLEASE!! Talk about stepping out of my comfort zone!!

Well, since today is Dare To Get Dirty on SCS, I decided to try to combine all three of today's challenges. Michelle's - Masculine, JulieHRR's - Basic White, and Christine's - Watercolor.

You can only see the other cards if your a fan club member, so go down to my previous post and learn about how to sign up.

Now, my DH is always in the doghouse, but this card could be for any guy that is a *stinker*. Believe me, I'm surrounded by BIL's, friends, even my son, that can be terribly ornery. And this card would be perfect for them. I think it could even be for those gf's that have an ornery side to them....I have a few of those too. LOL

For this card I used my scorepal to make the top look like bricks, watercolored my doghouse, and ink distressed the edges with slate (Adirondack). There's a slight colorwash behind the doghouse that is more visible irl. I also used a decorative scissors to cut the bottom of my card...you know dogs and their chewing habits...*grin*

Supplies:
Stamps - Dog Lover (Inque Boutique)
Paper - White
Ink - Black Onyx (Versamark), Chocolate Chip, Cranberry Crisp (Stampin' Up), Slate (Adirondack)
Accessories - Black embossing powder, waterpen, SU reinkers, Key Tag Punch (SU), Cranberry Crisp stitched ribbon (SU), eyelet (making memories), crop-a-dile

Sunday, July 20, 2008

Tea Staining Technique

This month is all about techniques with the CCEE group. And this week we were to use Tea Staining. We also had to have music somewhere on the card because this is also the week we choose a Catchy Name on SCS. CNFS. jazztobi is the name we're featuring today!

If you'd like to see what the other girls did with this technique, click HERE. We'd love to have you play along with us too. See what kind of paper you can create!

All my bg's and my butterfly were tea stained. I know...what's with the bluish purple look? Well, I didn't like the look of my paper that I soaked in tea for like, forever. So I took my flavored teas by Stash (Chocolate Hazelnut, Pomegranate raspberry green tea, and acai berry herbal tea, dropped them in boiling water for about a minute, took them out and dripped them all over my paper. I thought the paper would turn out brown and red. Nope, This is the result. WAY COOL!! I loved the look!! I stamped the music bg from Unity Stamp Company on the bg panels with Latte (Adirondack), and ink distressed them with Frayed Burlap (Ranger Distress Ink).

The Sunflower (Paper Inspirations) and butterfly (Inque Boutique) were thumped. I inked up the entire flower image with More Mustard (SU), and colored and thumped with Really Rust, Bravo Burgandy, and Chocolate Chip (SU). The leaves and stem were thumped with Always Artichoke and Chocolate Chip (SU). After getting the image inked up, I spritzed it twice and stamped it on Vanilla Cream (Prismatic) paper. The butterfly was inked up with Wild Wasabi, Rock -n- Rolled in True Thyme and thumped with Always Artichoke and Ballet Blue (SU).

The Inque Boutique sentiment was stamped with True Thyme (SU).

Here's a close up so you can see the dimension and sparkle.
The flower center has a mixture of Coffee and
Cinnamon Stickles. I also added a bit of sparkle to the leaves
and petals with my Quickie Glue Pen and Ultrafine Crystal Glitter. I found the charm at Walmart in the jewelry section, and the little pearl is by KaiserCraft.

I'd like to take this time to tell you how awesome Prismatics are!! I'm in paper heaven!! They are textured on one side, and smooth on the other. And the soak up ink divinely. I loved staining these papers. I've also just sponged the paper directly and rubbed the ink pads directly on it. All with awesome results. Michelle at Stamper's Dream will have it in stock very soon, so keep checking her store. Love the stuff!!


Supplies:
Stamps - Sunflower (Paper Inspirations), Butterfly, sentiment (Inque Boutique), Music bg (Unity Stamp Company)
Paper - Herbal Garden Light and Medium, Twilight, Vanilla Cream (Prismatics)
Ink - Latte (Adirondack), Frayed Burlap (Ranger Distress), More Mustard, True Thyme - sentiment (Stampin' Up),
Accessories - charm, stickles, sewing, pearl, glitter, organdy ribbon, corner rounder, scotch mounting tape

Friday, June 27, 2008

Shabby Chic Inque

Here's the card I promised you. Have I told you lately how much I love Inque Boutique? I know...it's getting old. But I had to make one more card to show you how fabulous Inque Boutique stamps are. I used Shabby Chic and Aging Gracefully for this one, with the SCS Flap Fold Card layout. I didn't make mine a tri-fold as Rose Ann did though.

The flap and square panel are both stamped with the diamonds (Shabby Chic) in River Rock, with the leaves rock-n-rolled with River Rock and Bravo Burgundy. The swirls were stamped with Chocolate Chip, and all the edges were ink distressed with River Rock and Bravo Burgundy.

The flower center is a rhinestone sticker that I got from Laurie. The packet has a variety of these gorgeous gems by Prima Marketing. The flower is by Petaloo, and the leaves are petals from another flower that I colored with copics to get the green I was looking for. Behind the flower is just a punched scalloped circle in which I hid a Basicgrey Magnetic Snap. The other magnetic piece is behind the pocket!! I love these snaps. They're so flat and tiny and they hold the flap down securely.

The floral piece on top of the tag is sliced on the bottom so it slides over the pocket and doesn't slide all the way down inside. It too is rock-n-rolled with River Rock and Bravo Burgundy. The sentiment (Aging Gracefully) is stamped with Chocolate Chip.

I finished off the card with some beautiful reversible satin ribbon by May Arts.

Now, head on over to Stamper's Dream for the Everything Inque Sale on Saturday, June 28. Just type AMAZING in the coupon code when checking out and you'll get 20% off everything by Inque Boutique!!! Including their gorgeous paper pads.


Supplies:
Stamps - Shabby Chic and Aging Gracefully (Inque Boutique)
Paper - River Rock, Bravo Burgandy (Stampin' Up)
Ink - River Rock, Bravo Burgandy, Chocolate Chip (Stampin' Up)
Accessories - Magnetic Snap (Basicgrey), Flower (Petaloo) Rhinestone Sticker (Prima), Dew Droplets, Rhinestone stickers (K&Company), Sewing Machine, Copics, May Arts Ribbon

Everything Inque!!


Hey ya'll....

I just wanted to let you in on a big Inque Boutique SALE that Michelle is having at Stamper's Dream tomorrow, Saturday, June 28!! You don't want to miss it.

As you know, I'm a huge Inque Boutique fan, and EVERY Inque product (including their gorgeous paper) will be 20% off!! Inque already provides you with a slew of stamps in their sets for a minimal price, and on Saturday you get them 20% off!! All you have to do to get the discount, is enter the coupon code AMAZING at check out. How cool is that? So please, go have a look.

I'm working on a card right now with one of Inque's sets. I'll have it up later today. You know me...I take forever to create a card!! LOL While you're waiting, click Here to check out some of the GORGEOUS cards Michelle's Design Team has made with some of Inque Boutique stamps and paper.

Wednesday, June 25, 2008

Handmade DP and a Bird


Have you ever had it where you want to use decorative paper, but you don't have the color or pattern that will work with the image you want to use? Or, perhaps you don't want to spend the money on dp when you can make it yourself. No matter what the reason, making your own is very easy.

All you need is a sponge, dye ink, and the images of your choice. I used the Inkssentials blending tool and the Inkssentials blending foam to make my bg because I like the way it blends the colors together, and I only used one sponge for the 3 different colors I used. And the images I used are all from Inque Boutique.

Now, I have to tell you. I'm a huge Inque Boutique fan. I probably have 3/4 of their sets. They're gorgeous, they're wonderful to work with, and they're inexpensive. Not only that, but each stamp has the image imprinted on the back, so when you stamp with your clear blocks you can see exactly what it's going to look like. And.......you get a lot for your buck!! They have quite a few on their image sheet and they're all a good size. Even their mini-sets are good sized images. Can ya tell I love them yet? *grin*

I first took some white paper, inked up my sponge with Adirondack Latte and sponged in a circular motion all over half of the paper. You'll have to continue to re-ink your sponge until you get the desired look. I then used Salmon in strategic places over the Latte. After I got the muted shabby look that I wanted, I stamped the lacey pattern from Inque Boutique's, Boutique Grunge set, in Latte, and the dandelion images with stamped off salmon and Lake Mist. The filagreed piece on the left has Lake Mist as the bg color, with the image stamped with Oregano. I then Ink distressed all the edges a bit with Latte. That's it. Easy peasy!!

I stamped the Bird, from Inque's Birdies set, with Black Soot Distress Ink by Ranger and colored it with copics. The Gemstones are by Hero Arts, and the Dew Drops are from the Cowboy Collection. The ribbon is Stampin' Up and Chocolate Velvet by American Craft, and all the ovals were cut with Nestabilities diecuts and my Cuttlebug. The flowers are paper toled too. (two layered)

This card also fits under SCS's Ways To Use it challenge today. Way cool!! The challenge was to use birds!! Got it covered!!

Supplies: Stamps - Boutique Grunge (50388), Birdies (50202) {Inque Boutique} Paper - White (Papertrey), Bazzill Ink - Salmon, Latte, Lake Mist, Oregano (Adirondack) Accessories - Inkssentials Ink Blending Tool, Inkssentials Blending Foam, Nestabilities, Copics, Dew Drops, Gemstone stickers (Hero Arts), Ribbon (Stampin' Up and American Crafts), Scotch mounting tape, piercing tool, mat pack (Stampin' Up)

Tuesday, May 27, 2008

Outta this world...


It's my nephew's birthday in a few weeks and I thought he'd love this adorable rocket by Inque Boutique!!! I stamped the rocket with Ranger Black Soot and colored it with copics. It's cut out and raised with dimensional tape onto a swiss dot embossed piece of Buckaroo Blue. The background paper is so fun! It's from Cloud 9 Design and the circles look like they're clear embossed!! I also embossed the horizontal River Rock Panel with the cuttlebug traffic jam embossing folder. The sentiment is computer generated.

Supplies:
Stamps - Toys (Inque Boutique)
Paper - Brocade Blue, Buckaroo Blue, Wild Wasabi, River Rock, White (Stampin' Up)
Ink - Black Soot Distress Ink (Ranger)
Accessories - I kan' dee, copics, Swiss Dots and Traffic Jam (cuttlebug embossing folders)

Sunday, April 20, 2008

DDA Journal with Bookmark


The 20th of each month, Jami from SCS gives the Dirty Dozen Alumni a challenge. This month it was as follows:

Challenge Focus: See the Inspiration Photo below. The photo is from BH&G 100 Decorating Ideas Under $100 magazine.
Required Element: Make an Inspiration Journal for yourself or as a gift. It can be any size from tiny to huge.
Restricted Element: No markers (SU, Copic, or any other brand), no watercolor crayons.

Inspirational Photo is HERE

I liked the blue/white/tan combo with the hint of orange/red flowers. I decided to make my journal a prayer journal and used this gorgeous Bible Still Life image by Inkadinkado. I colored it with prisma watercolor pencils and the SU blending pen. I also added some sparkle with my Sakura stardust glitter gelly roll pen.

My scallops were cut with my fiskars rotary cutter.

I made a magnetic bookmark to go with the journal. I figured I could use it in my devotional book. I kept both projects fairly flat so they're easy to keep with me. For the bookmark, I just folded the piece in half and cut with my fiskars rotary scalloped blade cutter. The image Aged and Elegant is by Inque Boutique, and the sentiment heartfelt is a MFT sentiment from Grateful Greetings. I put Basicgrey magnetic snaps, that I got from Eclectic Paperie, on the inside of my bookmark and covered them with a piece of cardstock.
Here's the template I used. I have no idea who designed this template. It was the very first journal I made as a stamper over 12 years ago and was taught to me by my SU demo Laurie Franz. The paper inside is just a 5"x8" pad I got at staples.


I'm including a photo of the back to show how it's attached to the paper pad, and the inside to see how the folder works. You can cover the back of the pad with a 5"x8" piece of cardstock if you like. I left it off to show how you can use just one piece of cardstock to make the journal cover...then enhance it as you like. Here's a photo of the inside pocket too.
I've never done a tutorial before, but hopefully you can figure this out by my photos. If you have any questions, email me at www.stamps4fun@hotmail.com.

Supplies:
Stamps: Bible Still Life (Inkadinkado), Remembering and bookmark image: Aged and Elegant (Inque Boutique), heartfelt (MFT)
Paper: Metallic Papers by Marcella K (K&Company), SU Riverrock, Papertrey White
Ink: Versafine Black onyx, Ranger Antique Linen and Weathered Wood distress ink
Accessories: Prisma watercolor pencils, SU blending pen, dew drops (cowboy), oval nestabilities by spellbinders, piercing tool, piercing template, 5x7 paper pad, scor-pal, basicgrey magnetic snaps

Wednesday, April 16, 2008

Butterfly Ears

Sorry I've been gone so long. I was working hard on my DD projects for SCS. It was a tough theme for me this month, so nothing else got accomplished. I'm finally back in the stamping saddle and hope to post some more real soon. If you haven't checked out the Fan Club gallery on Splitcoaststampers, you really should. There are some amazing ideas that showcase photos. I'm not a scrapbooker, so working with the photos was a challenge for me, but others did some really fabulous stuff.

I realize that this is an odd title for a post. It belongs to Nicole aka (Butterflyears) on SCS. Every Monday (yes I know it's Wednesday) my CCEE friends and I on SCS make a card in honor of a stamper with an unusual name and mail the card to that person. This week it was butterflyears. And since Cindy (mothermark) found out she chose her name based on her dogs ears that look like butterflies, we were to make a card with two butterflies (two ears) and 4 paws (dog).

I just recently got this Inque Boutique stamp set called Dog Lover. It is an absolute precious set. I figured this puppy wanted to play with butterflies, and since we all like to play with our stamps and participate in challenges, this scene was a perfect idea. To see the other butterfly ear creations, click HERE.

I colored the puppy and scene with copics. The tree and grass are hand drawn.

Supplies:
Stamps - Inque Boutique - Dog Lover, SU butterflies (1999 set..not sure which one), Tree leaves - Dee Gruenig Posh limited scene stamps
Paper - SU - Mello Moss, Always Artichoke, Black, Papertrey White
Ink - Ranger Black Soot and Brushed Corduroy Distress Ink
Accessories - Nestabilities, decorative scissors, I kan'dee, American Crafts ribbon (from my dear friend Laurie), scotch dimensional tape
Related Posts Plugin for WordPress, Blogger...
 
Site Design By Designer Blogs