Pages

Friday, May 26, 2017

Diecut Tree Peony ~ Power Poppy


I'm back!!!  Crazy right!!  I usually only post a project once a week, and now I have two posts in one day!!  Since it is Friday already, I have a Power Poppy card to share that I made using the Tree Peony digital stamp.  This image is just stunning and is so easy to color.

I tried something a little different today, and it was super fun.

I printed the image out twice, colored both images, and then, using a background die (Budding Vine by Tonic) I diecut right over one of the Tree Peony images.  I then glued it right on top of the other image giving it a really cool texture and dimension.  I really like how it turned out.  It looks even cooler in person.  If you click on the image below, it will enlarge even more and you will be able to see the diecuts in the flower even more.


For some more inspiration, check out the blogs of my fellow Bloomies:

Copics: Flower ~ B97, B95, B93, B91, Y17, Y15, Y13, C8 Leaves ~ G46, G43, G40 


That sums up my second project for today.  Thank you so much for stopping by!  I hope you have a fabulous weekend doing whatever makes you happy!!

  Happy Stamping!
 
_____________________________________________________________________

StampsTree Peony Digital (Power Poppy)
Paper:  X-Press It
Ink:  Printer
Dies:  Budding Vine (Tonic)
Accessories:  Copics, Dimensional Tape 

...room in my heart ~ Unity/Misti Blog Hop


Hello creative friends!!  Unity Stamps is doing a joint blog hop with My Sweet Petunia, and I am so honored to have the privilege  of joining these talented paper artists!  I have two cards, to share with you today, that I made using some charming Unity Stamps along with the "must have" Misti!!!  Seriously!!  I could not have made my second card without it!!

First of all, I'd like to share a sweet little watercolor card I made using Unity's "...room in my heart" stamp set.  Isn't this young woman and her baby just precious?!?!   

I started by laying a 4'x5" piece of watercolor paper in my Misti, lined up the image where I wanted and stamped it using Onxy Black Versafine Ink.  I left the stamp adhered to the Misti and left the stamped paper in place while watercoloring the image using Gansai Tambi Watercolors.  I then reinked the image and stamped over the colored image to make the lines bolder.  I can honestly say, that without the Misti, I would never be able to line up the image perfectly a second time.


I added a sweet little sentiment, that comes with this set, to the inside.


Now, for my second card.  I really had some fun with this one.  And once again, the Misti was a lifesaver!!    Let me tell you, Unity Red Rubber Stamps and the Misti are a dream team!!

I started by stamping this darling snail/mushroom image, from Unity's Happy Snail Mail set, 6 times onto X-Press It cardstock.  I colored the portions of the image that were going to be visible and started cutting out the layers so I could pop up each one for dimension.


Even a few of the stitched clouds (die by Lawn Fawn) are cut out and burnished to give them some extra depth too.


Below you can really see the dimension.


Now, the sentiment flag was a little tricky.  I wanted to use a new stitched label die I had just purchased from Pretty Pink Posh, but it was solid.  Unity Stamps are Red Rubber, so therefore not see-through, making it a challenge to line up perfectly.  Not with the Misti though.  They work together like they were just meant to be.  Let me explain how:

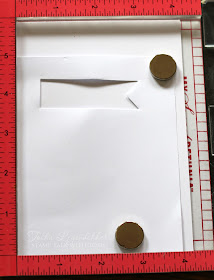
I started by diecutting the flag banner out of a piece of copy paper.  I laid it in my Misti just like you see below.


I then took the "...happy snail mail" sentiment "Just a Note" and laid it exactly where I wanted it to be, in the flag, and closed the lid, therefore adhering it to the other side. (oh....don't forget to take the foam mat out of the Misti when working with your Unity stamps.  They already are mounted onto foam, so the Misti won't close properly if you leave it inside.


I then diecut the flag out of a piece of cardstock and laid it in the negative space of the copy paper.


Lastly, I inked up the sentiment, closed the Misti and voila...a perfectly lined up sentiment!!  It couldn't work any more smoothly!!!


Would you like to win one of 3 Unity Prize packs and winner's choice of an Original or Mini Misti? All you have to do is leave a comment on each blog and you will be entered into the drawing.  You have until noon (central time) on May 30 to comment, and the winners will be posted on both the Unity Blog and the My Sweet Petunia blog on May 31st.

That's it for my projects today.  But don't stop here.  There is a ton of more inspiration to be seen.    Next on the hop is Kris Lancaster.  I've also included a complete list of all the hoppers today:


CopicsMushroom ~ BG07, BG05, BG02, BG01, YG11, YG09, YG06 Snail ~ R08, R05, R22, R21, R11, R00, YR68, YR65, YR61, Y38, Y17, Y15, Y13, Y11 Heart ~ R08, R05, R22

Thanks a bunch for dropping by!!  Enjoy the hop!
  Happy Stamping!


_______________________________________________________________

Mother and Baby
Stamps:  ...room in my heart (Unity)
Paper: Watercolor
Ink:  Onyx Black (Versafine)
Accessories:  Gansai Tambi Watercolors, Misti

Just a Note
Stamps ...happy snail mail (Unity)
Paper:  X-Press It, Black (PTI)
Ink:  Tuxedo Black (Memento)
Dies:  Stitched Labels (Pretty Pink Posh), Stitched Cloud Backdrop (Lawn Fawn), Stitched Rounded Rectangles (Die-Namics MFT)
AccessoriesMisti, Copics, Scor-Pal, White Pearl Pen (Kirarina Wink), Dimensional Tape 

Friday, May 12, 2017

Delft Flowers Always ~ Power Poppy


Happy Friday y'all!!  I have a very, and I mean V-E-R-Y Clean And Simple (CAS) Power Poppy card to share with you today.  My Mother-in-Law is Dutch, so I thought it would be nice to make a card with a Delft theme.  This was super easy to do.  I just used Word to open up my Flowers, Always digital image, recolored it blue, resized it, printed it out and diecut it.  I stamped the sentiment (from  Dynamic Duos: Peonies and Tulips), with Onxy Black Versafine ink using my Misti.  Perfect placement every time!  Lastly I added some sparkle and dimension using some Fresh Snowfall Glitter Accents by Nuvo.

That's it.  Easy-Peasy!!


Here's a close-up so you can see the Glitter Accents dimension better.


Power Poppy is having a sale, in honor of Mother's Day, so be sure to take advantage of this!!!  Check it out HERE!!
And Power Poppy has some new fun things happening!!  Click Here to find out more!!

For some more inspiration, check out the following Bloom Brigaders:
 
Thanks a bunch for dropping by.  I hope you have a delightful weekend.

For those of you celebrating Mother's Day, I hope you have a happy and blessed one.  It's always a day of mixed emotions for me.  I am so blessed to be a mom to two treasured children and a Mother-in-law to the best Daughter-in-law one could ask for.  However, I lost my mom to cancer 22 1/2 years ago, and still miss her terribly.  Although I'm happy for her, because she is with the Lord, the void she left behind is a great one.

I didn't write this for any sympathy, I only wanted to include it because I know this can be a hard weekend for those who don't have good memories of their moms, or those who are enduring a loss of or illness of their mother.  So I pray you get to enjoy some peace and blessings during the days leading up to Mother's Day (which in my opinion can be the hardest), and the day itself.

Happy Stamping y'all!!!
______________________________________________________________

Paper:  X-Press It, Bazzill
Ink:  Printer, Onyx Black (Versafine)
Dies:  Scallop Borders (Pretty Pink Posh), Stitched Rectangles (Waltzingmouse)
Accessories:  Fresh Snowfall Glitter Accents (Nuvo) 

Friday, May 5, 2017

Poppies Frame ~ Power Poppy


http://powerpoppy.blogspot.com/2017/05/frame-it-up.html
Wow!!  Is it really May already?  Where has this year gone?  Not only is it May, but it is a Friday, so I have a Power Poppy card to share with you, along with a new Power and Spark Challenge.  Kathy is challenging us in a super fun way.  She would like us all to "Frame It": either frame an image on a card, decorate a frame, or actually frame your project as a piece of home decor.  If you play along, you will be entered for a chance to win a $50 shopping spree at Power Poppy!!  For all the details, make sure you visit the Power Poppy Blog.

I decided to frame my sentiment with Power Poppy's Poppies image, as well as with a diecut.  I used my Misti to get the images at the exact angle I wanted as well as the sentiment placement in the diecut window.

The Poppies were colored with Copics and I added a little sparkle to their centers with with a Silver Spica pen, and a white little dot using a White Kirarina Wink Pen.  The sentiment was stamped with Versamark, and then was embossed using detailed white embossing powder by Sweet Stamps.  The front panel is also popped up using dimensional tape (Scotch) to give depth to the sentiment.


That's it for my project y'all.  

Check this out!!!
Marcella is releasing a new digi today called Plant Kindness today too.  If you are a lover of anything garden related, you will adore this new charming digital stamp set. 

Now, for some more incredible inspiration, be sure to check out what my fellow Bloomies have to share too.
CopicsPoppies ~ R22, R14, R21, R11, R01, R000, C8, C6, C5, C3 Leaves ~ G46, G84, G85, G43 Background ~ E43, E41, E50

Thank you so much for stopping and for your encouraging comments.  You are truly a blessing!!  I hope you have a lovely weekend!

  Happy Stamping!

____________________________________________________________

StampsPoppies (Power Poppy)
Paper:  X-Press It, Black (PTI), Bazzill
Ink:  Tuxedo Black (Memento), Versamark
Dies:  Stitched Oval Word Window (Die-Namics MFT)
Accessories:  Copics, White Embossing Powder (Sweet Stamps), Dimensional Tape (Scotch)