Pages

Wednesday, December 28, 2016

#LoveWins ~ Power Poppy


I made a card today just for the fun of it!!  And I had a blast!!  Since the Christmas season is behind us now, I decided to make a Valentine card using Power Poppy's Good Thinking: Love Notes set.

I hauled out my Minc Machine and went to work.  This baby came together rather quickly and I think it turned out fabulous.  I have to mention that I had some help though...I used today's Splitcoaststampers Sketch designed by Power Poppy's very own, Ally.  You can find the sketch HERE.

Both sentiments were foiled using the Minc Machine, and I used a Cuttlebug embossing folder for the black panel.  I love the sweet little Photo Frame die from Jillian Vance Designs.  

That's it.  The sketch was an easy layout, which I thought was perfect for a masculine card.

Thanks for dropping by!!  I hope you are having a fabulous week!
  
  Happy Stamping!

_______________________________________________________________________

StampsGood Thinking: Love Notes (Power Poppy)
Paper:  Vintage Cream and Black (PTI), Yes, Please (MME), Retro Gold Glossy Lustre (Paper Temptress)
Ink:  Toner
Dies:  Stitched Dot Instant Photo Frame (Jillian Vance Designs)
Accessories:  Minc Machine, Embossing Folder (Cuttlebug) 

Friday, December 16, 2016

Power Poppy Birthday Move the Soul Gift Bag


Hello creative friends!!  It's been awhile!!  Life has been busy as I'm sure many of yours has been also.  I'm excited to share a sweet Gift Bag I made for a dear friend of ours.  Since his birthday is in the month of December, I thought it would be fun to make it none Christmas to separate it from the Holidays.  

I used Power Poppy's Move the Soul set for the gift bag front.  It seems he and my husband think that one day they will each own a Harley and will take their adventures to the roads.  Silly boys.  Like that's ever going to happen.  LOL  But it's good to dream right?!?!  My Gift Bag Topper tutorial can be found HERE.


http://powerpoppy.blogspot.com/2016/12/some-sweet-treats-for-you.html
Christine has a thoughtful and fun Power and Spark Challenge this month.  Here is the challenge in her words:  

"The idea is to create something that will be a sweet treat for someone else (so think card, tag, hostess gift, etc) designed to help with those quick Christmas gifts."

I hope you'll get a chance to participate!!

For some more inspiration, check out the following Bloom Brigade Blogs:
That's it for today's project!!  I hope you are all safe from crazy weather, and are enjoying all this year's Holiday festivities!!

  Happy Stamping!
 
______________________________________________________________________

StampsMove the Soul (Power Poppy)
Paper:  X-Press It, This Guy (PhotoPlay, Black (PTI)
Ink:  Tuxedo Black (Memento), Onyx Black (Versafine), Antique Linen (Ranger Distress)
Dies:  Double Stitched Circle (Die-Namics), Standard Circle (Spellbinders)
Accessories:  Copics, Enamel Dots, Score-Pal, Kraft Gift Bag 

Friday, November 25, 2016

Whimsical Wreaths ~ Power Poppy


Hello fellow crafters!!  I hope those of you from the states enjoyed a nice Thanksgiving.   I am very blessed and am so thankful for my family, dear friends, and being able to do what I love...papercrafts.  Thank you for visiting and for your kind comments.  I am so grateful!!

Now, for today's project.

Being that it is the 25th, it is time for another digital release, and Marcella went all out!!  That girl!!  I tell ya!  She has designed four charming wreaths with a variety of sentiments to include inside if you like.  I chose to work with the Wreath: Birch and Evergreen, and to make the background pink since I'm still "Thinking Pink" for this month's Power Poppy Power and Spark Challenge.  There is still time to participate too.  If you enter, you could win a free stamp set!!

For a quick explanation about my card:  The image was sized to fit into this banner die and colored with Copics.  I used pointilism to fill the inside of the frame for bit of pop.  The background was diecut and layered over a pink piece of dp.  And lastly, I added a bit of string and a sweet button to finish it off. 


Copics:  C3, G29, YG95, E49, E47, RV21, E44, E43, E41


http://powerpoppy.blogspot.com/
Here are the links to the Instant Gardeners and Bloom Brigaders who have some projects to share today:
Jennifer Dove
Broni Holcombe
Cheryl Scrivens

Debbie Olson
Nancy Sheads


Also, right now...TODAY!!  Power Poppy is having a fabulous sale!!  And I mean F-A-B-U-L-O-U-S!!!  You really should head on over to the Power Poppy Blog for all the delicious details!!  Marcy even has a sweet little surprise!!  Don't you love surprises?!?!?!  Is this incredible, or what!?!?!?


That's it for me today, y'all!!  Thank you so much for dropping by!  I hope you enjoy a nice relaxing weekend!!

  
   Happy Stamping!


______________________________________________________________________________

StampsWreaths-Birch and Evergreen (Power Poppy)
Paper:  X-Press It, White (PTI), Winter Wishes Collection (BoBunny)
Ink:  Printer
Dies:  No Two are alike (Penny Black) Stitched A2 Banners and Rectangles (JustRite)
Accessories:  Copics, String, Button (PTI), Rhinestones (Pizzazz Aplenty), Quickie Glue Pen 

Friday, November 18, 2016

Birthday Party Time ~ Power Poppy


Hello my creative friends!!  Fall has finally arrived here in Central California, and I couldn't be more thrilled!!!  Our trees are finally changing color, and the air is crisper.  I thoroughly enjoyed a brisk 36 degree morning today while walking my dogs.  Yes!!!!

I have a special card to share with you today, using Power Poppy's Party Time set.   You see, it's one of our illustrious leaders' birthday on Sunday, and her name happens to be....JULIE!!  So, if you get a chance...hop on over to her blog and wish her a Happy Birthday!  She most definitely deserves a very special day!!  

Since her birthday is during "my Fall"...I thought I'd incorporate Fall colors.  The cake is colored with Copics, and I paper-pieced the banner using Cartabella's Autumn dp.

That's about about sums up today's project.  Now be sure to check out the following Bloom Brigaders for some more inspiration.


http://powerpoppy.blogspot.com/2016/11/were-dreaming-of-pink-christmas.html


Remember, we're still "Thinking Pink" for this month's Power Poppy Power and Spark Challenge.  We would love to see your Pink Christmas creation!!  If you participate, you could win some free Power Poppy stamps!!


Copics ~ R39, R37, R35 R32, G02, G00, YR18, YR15, YR12, BV31, C5, C3, C1, C0

Thank you so much for dropping by!  I hope you get to enjoy a fabulous weekend!!

Happy Stamping!

__________________________________________________________________________

StampsParty Time (Power Poppy)
Paper:  X-Press It, Autumn (Carta Bella)
Ink:  Tuxedo Black (Memento)
Dies:  Stitched Rounded Rectangle (Die-Namics), Stitched Rectangle (Waltzingmouse)
Accessories:  Copics, Enamel Dots 

Saturday, November 5, 2016

Acorn Ornaments digi ~ Power Poppy


http://powerpoppy.com/products/acorn-ornaments
Okay, some of you may be shocked!!  I'm posting a card two days in a row, and it's not even for a Clear Stamps set release.  Crazy!!  Since today is the 5th of November, Power Poppy has a new digital stamp set for y'all!!  It's called Acorn Ornaments, and they are quite the vintage delight!!  

Now,  I LOVE acorns.  I have sparkly acorns, felted acorns, glass acorns, and even a few acorn ornaments myself.  I have a few pictures to share at the end of this post.  But first, about today's project. 

I mixed some modern papers with some vintage ornaments.  Hope you don't mind.  I also played around with the colors.  I actually have a couple of turquoise glass acorns with copper tops.  They were the inspiration for these ornaments today.  Unfortunately, I used them to decorate an event at our church, and they're packed away right now, so they weren't easily accessible to photograph.

I just received some fun supplies the other day, and included was this mini-clipboard by Fancypants.  It was the perfect size and I thought fit the style I was going for beautifully.  The hardware was easily removed and added again once I decorated it with some charming Perfectly Plaid paper by Lawn Fawn.

For the far right acorn, I tried a technique I found on Pinterest to give it an aged copper look.  It's a tutorial by Copic in the Craftroom.  I need some more practice, but I don't think it turned out too badly for my first time.

I printed the sentiment on a piece of decorated paper, diecut it, and added it to the clipboard along with some enamel dots and ribbon.  That was it.  Today's project only took me 2 hours to color, design, and put together.  That is quite a feat for me, let me tell you!

Here's a list of all the Copics I used:
Copics:  BG49, BG57, BG45, BG70, E09, E39, E97, E95, BG99, Y28, YR23, Y15, Y11,W8, W6, W4, W2, W00


Here are a few pictures of acorns that I have out on display right now.  The two glass acorns below are displayed on a tray with a fun pumpkin that actually lights up.  There are a few painted wooden acorns laying on the tray too.


I love all things felted.  So, of course I needed some felted acorns right?  These babies are on display in a fun twig nest.


And lastly, this ornament is laying at the base of my vintage tree collage.  I leave it up and decorated year round.  This guy is just way too big for my 2 1/2 ft tree, so he's gracing the bottom along with a crown and some other vintage goodies.


That's it for me today y'all.  Be sure to stop by the Power Poppy Blog for a list of all the gals sharing their acorn projects today.   I hope you are enjoying your weekend. 

  Happy Stamping!!


_____________________________________________________________________________

StampsAcorn Ornaments (Power Poppy)
Paper:  X-Press It, Smokey Shadow (PTI), Perfectly Plaid Winter (Lawn Fawn)
Ink:  Printer
Dies:  Double Stitched Squares and Stitched Rounded Rectangle (Die-namics), Postage Stamps (Spellbinders)
Accessories:  Copics, Clipboard (Fancypants), Enamel Dots (MME), Sequins (Pretty Pink Posh), Ribbon (SU!) 

Friday, November 4, 2016

Think Pink with Power Poppy

 
http://powerpoppy.blogspot.com/
Hello friends!!  It's Friday!!  And, not only that, it's the first Friday of the month, so we have a new Power and Spark Challenge which I have the honor of hosting this month.  

Now, if you've followed my blog at all, you know that I love making cards with a vintage flair.  Shoot, I like vintage so much I leave a small vintage decorated tree up year round.  I can't make myself take it down.  It just makes me happy to look at it.

I don't have any pink decorations (I lean more towards turquoise), but I thought it would be fun to make a pink Christmas card, so thus this month's challenge:  Think Pink
Anything goes, as long as you feature pink and Christmas.  That's it.  And if you participate, you could win some free Power Poppy stamps.  What's not to love about that deal!!!

When I saw Marcy's new Holly Golightly this last release, I knew immediately that I wanted to color the leaves pink.  I know it's not traditional, but I like to break minor rules on occasion.  You know...the ones that make you feel like you're rebelling, but you won't get in trouble?  I freak when I get in trouble, so this is as "bad" as I get.

So, since we're going vintage, I had to add some sparkle.  The background was made using a Tapestry diecut (Spellbinders), along with some gorgeous pink/white Prima Paper and Silver Pearl Embossing Powder by Wow!  I just inked up the whole diecut piece with Versamark, poured the ep all over and heated that baby up.  I LOVE the pink shimmery look I ended up with.  It's also backless, so you can see through the die.

The leaves were colored with Copics, (which I added E31 afterwards to, to vintage them up) and I added a touch of sparkle to them with a Quickie Glue Pen and some Dazzling Diamonds glitter (SU!).  Once again, I used my Quickie Glue Pen on the berries, and covered them with some White Opaque Micro Fine Glitter (Glitter Ritz).

Below is a close up so you can see the shimmer of the Silver Pearl ep, as well as a bit of the sparkle on the image.

Oh...and I can't forget...I stamped the image with Gray Flannel Memento Ink to give it a softer vintage feel.


That's it for my project.  The following Bloom Brigaders have some more pink inspiration to share with y'all, so head on by to check out their blogs.
CopicsLeaves ~ R85, R83, R81, R000, E31 Stems ~ E87, E84, E81

Thank you so much for dropping by!  I'm honored that you took the time!
Have a fabulous weekend.
  Happy Stamping!

____________________________________________________________________________

StampsHolly Golightly (Power Poppy)
Paper:  X-Press It, Rossi Belle (Prima), White (PTI)
Ink:  Gray Flannel (Memento)
Dies:  Tapestry, Timeless Rectangle (Spellbinders), Stitched Rectangles (Waltzingmouse)
Accessories:  Copics, Silver Pearl Ep (Wow!), Dazzling Diamonds glitter (SU!), White Opaque Micro Fine Glitter (Glitter Ritz), Quickie Glue Pen 

Friday, October 28, 2016

Bittersweet Wreath ~ Christmas for Power Poppy


http://powerpoppy.com/collections/digital-stamps/products/bittersweet-wreath
Hello creative friends!  I have a "Bittersweet" card to share with you today.  The 25th of this month, Power Poppy released a new digi stamp called Bittersweet Wreath with two "Thankful" sentiments.  An absolute charming set for Thanksgiving.  I thought, why can't it be a Christmas wreath too?  Or a Spring wreath,  or even a Summer Wreath.  This image is so versatile!  

Being me...I immediately thought "white".  So, I got out my Minc Machine and got to work Minc'ing this image with White Foil onto Kraft Cardstock.  I then colored the berries with a red colored pencil and diecut it using a die from Spellbinder's Blossom Tags and Accents dies.  I used a white colored pencil to color the embossed dots that were around the flower shape.


For the tag, I used a new Power Poppy sentiment from the Fully Stocked stamp set.  I stamped it with Versamark onto black cardstock and embossed it with detailed ep (Ranger)  Lastly, I sewed around the two panels, splattered some white acrylic paint, and added a few sequins.  It actually came together pretty quickly.  And for me, that is huge!!

For some more inspiration, check out the blogs of my fellow Bloomies:
That about sums up everything for today!  I hope you have a truly blessed weekend.  I know I am looking forward to staying home.  It's been a crazy busy week.

  Happy Stamping!
 
______________________________________________________________________________

StampsBittersweet Wreath and Fully Stocked (Power Poppy)
Paper:  Kraft and White (PTI), Santa's List (Teresa Collins)
Ink:  Versamark
Dies:  Blossom Tags and Accents and Tags 5 (Spellbinders)
Accessories:  Minc Machine, Minc Foil, Prismacolor Pencils, Sequins, White ep (Ranger), White Acrylic Paint, Sewing Machine

Friday, October 21, 2016

Power Poppy's Happiest Holiday Collection Release Hop


Hey y'all!!!  The day has finally arrive, and not only is the Happiest Holiday Collection available for purchase, but Power Poppy is offering a super special deal!!!!

Buy 4 Clear sets and get the 5th Free ~ code: intheclear
or
Buy 5 digital sets and get the 6th Free ~ code: digilove

How cool is that!  Marcy is so awesome!! 

For my final card this release, I used the Power Poppy stamp set called Holly Golightly!  I adore the sweet tag that you can put any sentiment your heart desires in!!  And the holly branch...exquiste!!  Marcy always includes just the perfect amount of detail!!

Once again, it's all colored with Copics!!

Head on over to the Power Poppy Blog for all the links and more information about the store's special deals!!

Thanks for all the kind comments and for stopping by!  It's a delight to work with Power Poppy images, and to hear you are enjoying them too makes my heart happy!!

  Happy Stamping!!


_______________________________________________________________________________

StampsHolly Golightly (Power Poppy)
Paper:  X-Press It, I Love Christmas (Echo Park)
Ink:  Tuxedo Black (Memento)
Dies:  Fancy Edge with Lattice (Marianne Designs)
Accessories:  Copics, Weave Embossing Folder (We R Memory Keepers), Enamel Dots, Dimensional Tape 

Thursday, October 20, 2016

Paperwhites Minc'd ~ Power Poppy Happiest Holiday Collection


http://powerpoppy.com/products/glistening-paperwhites
Hello, Hello, Hello!!  I'm back after a 1 day hiatus, and I am super excited to share today's card with you!  The Bloom Brigade is featuring a beautiful new stamp set called Glistening Paperwhites, and the minute I saw it, I knew it had to be Minc'd on Vellum!!!  

Since these flowers are "Glistening Paperwhites", it stands to reason that they need to be white, right?  And sparkly... ;)  So I stamped my image onto copy paper and then copied it onto vellum with our copy machine that uses toner ink for the White Foil to adhere too.  I then cut a piece of White Foil to size, laid it on the "tonered" image, and ran it through my Minc machine.  I was in love!!  The white on the vellum is so elegant without anything else done to it.  But I didn't stop there.  Oh no!!  There's more...

Next, I burnished the back of the image to give it texture.  I feel with it burnished, it's easier for the Copic markers to adhere and blend a bit to the Vellum.  There is no scientific proof of this, and I'm, by no means, an expert.  I just like the way they worked after the burnishing.

Lastly I added a touch (and I mean only a touch) of sparkle with my Quickie Glue Pen and Dazzling Diamonds Glitter by Stampin' Up!.  I wanted the White Foil to be the focal point.  Marcy's images have such fabulous detail, and Minc'ing with the Foil captures every little detail, no matter how minute.  If you click on the image, it will zoom in and you can see the detail and sparkle even better.  

Now, glue shows through Vellum, so I just used some metal clips to hold my Minc'd Vellum piece in place and sewed around the image, and added a sage green base to the back.


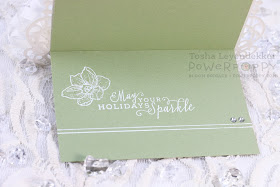
I added a sentiment, as well as one of the individual Paperwhites to the inside (embossed with white detailed embossing powder), and included a pair of white lines (that I hand drew with my White Signo Pigmented ink pen), as well as a couple of Rhinestones to finish it off.

That's it for today's project my friends!!  Tomorrow is THE DAY!!!  All 5 new Power Poppy stamp sets will be available for purchase.  Now tell me...can you choose just one?  I didn't think so.  Each one is so unique and charming.  I have one more project to share with you tomorrow, so please drop by again.

Here are the links to the Bloom Brigaders who have some incredible projects to inspire:

Thanks for visiting!!
   Happy Stamping

_____________________________________________________________

StampsGlistening Paperwhites (Power Poppy)
Paper:  Vellum (PTI), Pearl (Paper Source), Sage Green (Bazzill)
Ink:  Versamark
Dies:  5x7 Mystical Embrace (Spellbinders)
Accessories:  Copics, Sewing Machine, Silk Ribbon (Stamp Simply Ribbon Store), Bow-it-All (Zutter), Quickie Glue Pen, Dazzling Diamonds Glitter (SU!), White Embossing Powder (Ranger)

Wednesday, October 19, 2016

Fully Stocked ~ Power Poppy's Happiest Holiday Collection


http://powerpoppy.com/products/fully-stocked
Hello creative friends!!  Have you been enjoying the peeks?  Are you ready to be enabled some more?  The set we are featuring today is called Fully Stocked, and it is an absolute delight!!  3 charming stuffed stockings, beautifully fonted sentiments, and sweet little extra embellies!!  

I chose the one that looked vintage to me, and colored it with warm neutrals with a hint of color.   I wanted the focus to be the taupe and pink with a splash of sparkle.   I also embossed a mini-white bag to hold a sweet little tag with a holiday sentiment stamped on it.


That's it for my project.  Be sure to stop by the following Bloom Brigaders for some more inspiration:

Thanks so much for dropping by y'all!!  Be sure to visit tomorrow for our last peek before the Power Poppy Release day hop.

  Happy Stamping!

______________________________________________________________________________

StampsFully Stocked (Power Poppy)
Paper:  X-Press It, Wish Season (Fancy Pants), Pearl (Paper Source)
Ink:  Gray Flannel (Memento)
Dies:  Christmas Tag Set (Spellbinders)
Accessories:  Copics, White Mini-Bag (Paper Source), Embossing Folder (We R Memory Keepers), Glitter (Hero Arts), Quickie Glue Pen, Enamel Dots (MME), Lace, Burlap String, 1/2" Corner Rounder (SU!)