Pages

Tuesday, March 31, 2015

Daffodils ~ Power Poppy Preview Day 3


http://powerpoppy.com/products/daffodils
It's already time for Power Poppy's 3rd preview day, and today we're showcasing Daffodils.  I colored this scrumptious bouquet with Copics and added glitter with a Quickie Glue Pen.  The banner and background are both embossed with embossing folders also.  Once again, I burnished the blooms.  You can find the tutorial on the Power Poppy Blog HERE.

Here's a list of the Bloom Brigaders with projects to share today:
Copics:  V17, V15, V12, V01, Y13, Y00, YR02, YR28, YR20, YR00, G14, G12, E35, E33, E31

Tomorrow is the Power Poppy hop and all these fabulous sets will be available.  So, stop by for a bit of inspiration tomorrow.

   Happy Stamping!

_____________________________________________________________

Stamps Daffodils (Power Poppy)
Paper:  White (PTI), Bazzill
Ink:  Tuxedo Black (Memento)
Accessories:  Copics, Embossing Folders (Sizzix and Cuttlebug), Twine (AC), Prisma Glitter (Hero Arts)

Monday, March 30, 2015

Camillias ~ Power Poppy Preview Day 2


http://powerpoppy.com/products/simply-camellias
Hello friends!!  Have you been enjoying this month's Power Poppy previews?  I sure hope so.  I am in LOVE with this month's release, and today I get to share a project I made using the Simply Camellias set.  This set includes a variety of images of camellias in different settings.  I chose to use two of the images, colored them with Copics, cut them out individually and burnished them.  You can find a tutorial on how to do this on the Power Poppy blog found HERE.


Copics:  R59, R35, R29, RV34, RV32, RV21, RV11, YG95, YG93, YG91, YG01, Y26, Y21, Y0000, E31

Here's a list of the Bloom Brigaders who have previews to share today:

Thanks for dropping by today.  Be sure to stop tomorrow for another preview of a fabulous new Power Poppy set!

    Happy Stamping!
____________________________________________________________

StampsSimply Camellias (Power Poppy)
Paper:  Romance Novel (Prima), Kraft and Smokey Shadow (PTI)
Ink:  Tuxedo Black (Memento), Vintage Photo and Black Soot (Ranger Distress), Black Onyx (Versafine)
Dies:  Hanging Sign (Tim Holtz)
Accessories:  Copics, Sequins, Embroidery Thread, Border Punch (EK Success), Distrezz-it-All (Zutter) 

Thursday, March 26, 2015

Power Poppy turns 1!!


It's Power Poppy's first birthday, and I couldn't be more excited to celebrate. I've had the honor of designing for a few different stamp companies over the years, and I have to say, Power Poppy is one of my favorites. 

First of all, Marcella is a delightful person full of life, joy, warmth and encouragement, and she has a passion for uplifting others through creativity, nature, and her gift of writing. Now who wouldn't want to surround themselves with people like that. And this entire team is a good representation of everything she embodies. 

Secondly, her designs exude the afore mentioned characteristics, along with being unique and filled with details that are a delight to discover, color and incorporate into projects. Like many of her fans, I eagerly anticipate her newest creations each month. 

Now, there is another super talented angel who keeps the Bloom Brigade informed, organized and pumped up for each new release too. That is the one and only Julie Koerber. She is another gem amongst this treasure chest of jewels. I truly believe she is one of the reasons our team works so well together. Not only am I blessed to be able to design along side this phenomenally creative team, I am honored to be able to call them friends. 

Congrats Marcy on your First Birthday! It's been a fantastic first year, and I wish you many more with an abundance of success and joy-filled adventures!! 


Okay...now a short blurb about my card.  I used the sweet little Potted Primrose from the appropriately named set Potted Primrose, along with one of it's sweet little sentiments.  I colored it with copics and popped it up in a diecut window frame from Cottage Cutz.  


Here is a list of the Copics I used:  FV2, BV11, Y02, YG17, YG13, YG11, E15, E13, E09

http://powerpoppy.blogspot.com/


Now, would you like a chance to win a wonderful prize celebrating Power Poppy's first birthday?  Of course you would!!  So, head on over to the Power Poppy Blog for all the details!!

 
In case you haven't seen the rest of the Bloom Brigade's birthday projects, here are their links.
Thanks for dropping by today friends!!  

We're gearing up for another incredible release, and like always, you will not want to miss this one.  Previews start Sun. the 29th of March and will continue through April 1st when the new sets will be available for purchase!

    Happy Stamping!!
_______________________________________________________________

StampsPotted Primrose (Power Poppy)
Paper:  Seashore (Prima), White (PTI)
Ink:  Tuxedo Black (Memento), Smokey Gray (Versafine)
Dies:  Springtime Window (Cottage Cutz), Back to Basics Tags (Spellbinders)
Accessories:  Copics, Silk Ribbon (The Simply Ribbon Store), Rhinestone (Pizzazz Aplenty), Border Punch (Martha Stewart), Sewing Machine, Dimensional Tape

Friday, March 20, 2015

Dancing with Daffodils ~ Power Poppy


http://powerpoppy.blogspot.com/
Hello friends!  The Bloom Brigade is sharing projects made with the newly released digital image called Dancing with Daffodils, and I took a little different path this week.  I printed the daffodil image onto Canon Pastel paper and colored it with Faber-Castel Polychromos pencils.  That's it.  It's super easy and fun to try something a little different.

Now, just in case you haven't seen the rest of the Bloom Brigade's inspiration, here are the links to their blogs.  I promise you, you won't want to miss a stop.  These gals know how to enable.  *wink*

For even more inspiration, be sure to stop by the Instant Gardners Blogs.  They debuted this new digi image on the 15th, and these gals can color like no other, let me tell ya!


Thanks for stopping by!  Have a great weekend, and...

   Happy Stamping!
__________________________________________________________________

Stamps:  Dancing with Daffodils (Power Poppy)
Paper:  Pastel (Canon), Vintage Cream and Black (PTI)
Ink:  None (Printer)
Accessories:  Polychromos Pencils (Faber-Castel), Basket Weave embossing folder (Spellbinders), Metal Clip (Tim Holtz)
Burlap String 

Monday, March 16, 2015

Inspire me Monday ~ Power Poppy

http://powerpoppy.blogspot.com/2015/03/inspire-me-monday-depth-with-burnishing.html

Have you ever used the Burnishing technique to add dimension to a project?  Well, I hope to inspire you to try it by sharing a Burnishing Tutorial that I put together, over at the Power Poppy Blog.  I hope you will take a moment to check it out.

    Happy Stamping!

Friday, March 6, 2015

Go for the Gold! ~ Power Poppy Power and Spark Challenge

I have the distinct honor of hosting the Power and Spark Challenge over at Power Poppy today, and I'm going for the GOLD!!! 

My husband's birthday just happens to be March 17, which is St. Patrick's Day in the United States. So, even though he doesn't have a lick of Irish in him, I can't help thinking about Shamrocks, Leprechauns and rainbows, as is tradition here for representing that date. However, this year I'm thinking more about what's at the end of the rainbow y'all: the pot of gold...I mean...that's what we're all really after right? My husband and I have been married for 25+ years now, and I truly feel I struck gold when I married him. 
 

http://powerpoppy.com/
So, as you may have already figured out, I want you to make a project using something gold. It could be paper, sequins, embossing, rhinestones, etc. There just has to be gold somewhere. For all the rules on how you can participate, just click HERE

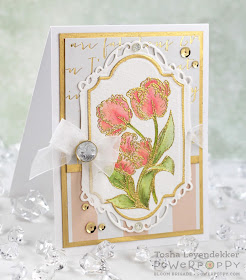
Now about my card.  Don't worry, this isn't the card I'm giving my husband for his birthday...*grin*...he would not be impressed with all the gold I used.  I stamped the tulips, from the Dynamic Duos: Peonies and Tulips set, with Golden Glitz Delicata ink onto Watercolor paper and embossed them with Gold Embossing Powder.  Then I watercolored them with Tombow markers.  I edged the borders with a Gold Leafing Pen (Krylon), and added a few sequins (PrettyPinkPosh), some organdy ribbon, and a sweet little coordinating button.  That's it...easy peasy.


 Since today's challenge was inspired by my husband's birthday, I thought I'd share a (not so recent) picture of us on our Dairy.  


It was taken about a year ago, by our dear friends Bubba and Pat Smethers, in the center of the milking carousel in our milk barn.  You can see a few curious cows above and behind us.  This is us most days.  My hair is quite a bit shorter than it is today, but we're not all gussied up.   If I'm not going anywhere, or expecting important company (like the Smethers') you'll find me in T-shirts with no makeup.  Poor Ed.  Good thing as we get older, our vision is the first to go.  *grin*

That sums up my project and the inspiration behind this month's challenge.  I hope I've inspired you to go for the gold too!

Here are the links to the Bloom Brigaders with inspiration to share with you today:
   Happy Stamping!
_______________________________________________________________

StampsDynamic Duos: Peonies and Tulips (Power Poppy)
Paper:  On Trend (My Mind's Eye), White (PTI)
Ink:  Goden Glitz (Delicata)
Dies:  Labels 28 and Decorative Labels 28 (Spellbinders)
Accessories:  Tombow Markers, Gold Embossing Powder (Ranger), Sequins (Pretty Pink Posh), Gold Leafing Pen (Krylon), Organdy Ribbon, Button (Haberdashery) 

Tuesday, March 3, 2015

Waltzingmouse February Release Hop


Hello my creative friends!!  Welcome to the Waltzingmouse Blog Hop.  I back today to share my last project for this preview.  If you arrived here from Jeanne's blog you are right on track.

I love the classy elegance of this Special Lady image and thought she would look lovely on the top of a gift drawer box.  I used the tutorial HERE because all the measurements were already laid out and I didn't have to take the time to figure it out.  Papercraft Button does a great job of explaining each part to the drawer and how to make the easel.

Next up on the hop is the lovely and super creative Becca.

   Happy Stamping!
____________________________________________________________________

StampsSpecial Lady (Waltzingmouse)
Paper:  Crowded Attic (Tim Holtz), Kraft (PTI), Bazzill
Ink:  Perfect Plumeria (VersaMagic), Vintage Photo and Walnut Stain (Ranger Distress)
Accessories:  Hitch Fasteners (Tim Holtz), Metal Brad 

Monday, March 2, 2015

Easter Wishes and Halftone Hello~ Waltzingmouse

I think I may need a "gold intervention".  Each time I'm trying to come up with an idea for a card, I find myself gravitating to the gold. This is so unlike me. I've been a "silver" girl for over a decade and used to find it super hard to work with gold. It's crazy. I promise tomorrow's project doesn't have any though. Just the two I have to share today.

Today we're featuring the Easter die along with the Halftone Backgrounds set.


For my first card, I wanted the word "Easter" to be prominent, so I diecut it out of Vintage Cream cardstock (PTI), kept the little insert pieces, and diecut it out again using Fancy That dp by My Mind's Eye and inserted it into the Vintage cream piece.  I also did the same for the background using the new Pretty Circle die.  I diecut it twice using Fancy That dp and Gold Mirrored cardstock, and just used the little gold scalloped piece to insert inside the circle.  It's popped up with dimensional tape too.  The little "wishes" sentiment is from the set Say it Loud, and was stamped onto a Waltzingmouse diecut piece using the Pretty Panel #1 die.


I wanted to give my second card a modern grunge look, so I stamped the faded circle image (from the Halftone Backgrounds set) with Golden Glitz Delicata and embossed it with Gold Embossing Powder (Ranger).  I swiped the ink pad over the cardstock and over the embossed dotted background to give it a more distressed look.  Lastly, I added the "hello" diecut along with a tassel that I made out of embroidery string and a little gold Enamel Dot (MME).

That's it for me today.  Tomorrow I have one more project to share and I went back to my "vintage" style, so be sure to drop by again.

If you haven't already, stop by these gals' blogs for some more inspiration:


___________________________________________________________________ 

Easter
StampsSay it Loud! (Waltzingmouse)
Paper:  Fancy That! (My Mind's Eye), Kraft and Vintage Cream (PTI)
Ink:  Golden Glitz (Delicata)
DiesPretty Circle, Pretty Panel #1 and Easter (Waltzingmouse)
Accessories:  Gold Leafing Pen (Krylon), Gold Embossing Powder (Ranger), Gold dots (Pizzazz Aplenty), Dimensional Tape 

Hello
Stamps Halftone Backgrounds (Waltzingmouse)
Paper:  Kraft and Black (PTI)
Ink:  Golden Glitz (Delicata)
Dies:  Hello (Waltzingmouse)
Accessories:  Gold Embossing Powder (Ranger), Dots Embossing Folder (Cuttlebug), Embroidery String, Enamel Dot (MME)

Sunday, March 1, 2015

Kaboom ~ Waltzingmouse Stamps Preview


Did you get a chance to stop by Waltzingmouse stamps and do some shopping?  Well we're here to tempt you some more with some more inspiration.  

Today we're featuring the Kaboom stamp set, and it's coordinating Kaboom die.  For my first card, I stamped the word "Kaboom" onto white cardstock and used Salty Ocean Distress ink to give it the gradiated effect.  I just started at the bottom and worked my way up.  I mounted it over the "explosion" frame (for lack of a better explanation... ;) which was embossed with Silver ep, cut out and popped up over one that I stamped with black so it gave it more of a shadow effect.

For the background on both of my cards, I masked the frame and inked Distress Inks outward for a ray effect.  I didn't ink in a circular motion.  I started with my lightest colors and then added a darker color just around the edge for depth.

I then embossed the lightening bolts with silver and the little explosions with black.  I poked a scissors from the back to make it look like an explosion came through the paper.


My second card is pretty straight forward.  I used the same technique for the background, and popped up the frame and the word "Bam".  Bam was first stamped on watercolor paper and colored with Distress Markers.

That sums up my cards for today.  Would you like to win some Waltzingmouse Store credit?  Or the "hello" die for free?  Click HERE for all the details.

Here are the links to the rest of the Waltzingmoue blog team for some more inspiration:


   Happy Stamping!
_____________________________________________________________

Kaboom
StampsKaboom (Waltzingmouse)
Paper:  White and Black (PTI)
Ink:  Salty Ocean, Pumice Stone and Black Soot (Ranger Distress), Silvery Shimmer (Delicata), Onyx Black (Versafine)
DiesKaboom (Waltzingmouse)
Accessories:  Silver Embossing Powder, Dimensional Tape (Scotch)

Bam
Stamps Kaboom (Waltzingmouse)
Paper:  White and Black (PTI)
Ink:  Cracked Pistachio, Peacock Feathers and Salty Ocean (Ranger Distress), Onyx Black (Versafine)
Accessories:  Distress Markers (Tim Holtz)