Pages

Sunday, June 30, 2013

Waltzingmouse Stamps June Release Blog Hop


Hello there everyone!!  It's release day over at Waltzingmouse stamps!!  All the new sets are available for purchase.  I wanted to share a card today I made using the new Fine Feathers set.  Claire outdid herself once again with this set.  The feathers are so intricately detailed, stamp beautifully, and look so real!!  I'm in stamp love!!  If you've arrived from Teresa's Blog, you're on the right track.  Otherwise, be sure to start at Claire's  blog for a complete list of those hopping today.

This card is pretty straight forward because I wanted the images to shine.  I just stamped a variety of the feathers with Versamark and embossed them with white embossing powder.  Easy!

Now, you have a chance to win a stamp set of your choice.  All you have to do is leave a comment on the blogs of the designers that are sharing previews and you will be entered into a random drawing.  You have until July 2 at 3:59 am Pacific to do so.  The winner will be posted July 4th on Claire's Blog.  It's just that easy!


That's it for me today.  Next up on the hop is Becca.

I hope you've enjoyed the previews and have been inspired to get inky!
Happy Stamping!!

Saturday, June 29, 2013

Waltzingmouse June Release Previews ~ Day 3


Hello everyone!!  Welcome to day 3 of the Waltzingmouse Stamps June Release preview.   My post is going to be very short.  I don't have any internet so I'm using my daughter's phone and laptop.  

I made my card today using the new Country Labels 14 set.  I just adore the sentiment "Love you to bits".  And the Labels 14 frames are so charming!

The little "Loved" bingo card and heart were cut from Summer Stories dp by Teresa Collins, and the framing was created using Decorative Labels 27 and Labels 27 dies by Spellbinders.  The Rose is from Prima, and the little flourish was made using the Fantastic Flourish One diecut by Spellbinders.

That's it for me today.  Hopefully my internet will be up and running soon.  I have a lot to share with you in the next few days.

Here's a list of the other WMS DT members who are sharing previews today:


Thanks so much for stopping by!  I hope you are having a fantastic weekend!!
Happy Stamping!!

Friday, June 28, 2013

Waltzingmouse June Release Previews ~ Day Two


Hello again friends.  I hope you enjoyed yesterday's previews.  I tell you, the DT pulled out all the stops in their creations.  And today you won't be disappointed either.  We have a beautiful Fine Feathers set along with a Crackle Background and Reverse Crackle Background to share with you.

Oh how I love the sentiment "You're an angel" in this Fine Feathers set.  Claire even included a little halo in this set.  How clever and charming.  I tell you, she truly thinks of everything.  And not only are there feathers, but there is this little pair of wings.  How super sweet are they!!!!  I stamped them with Smokey Gray Versafine and using my Quickie glue Pen, I added some glitter to them.   I also added some Stardust Stickles to my little Prima Rose.  The Border was diecut using a couple of the A2 Curved Borders One dies by Spellbinders.  I also scored the background using my Scor-Buddy.

Can you see the Crackle background behind the "You're an Angel" sentiment?  The Crackle Background and Reverse Crackle Background can be found in a Large and Small size.  I stamped the small Crackle Background with Wheat (VersaMagic) while the cardstock was still in the die from the Labels and Tags set (Spellbinders).


For my second card I thought the feathers would look beautiful if they were Rock ~ n ~ Rolled.  I used Turquoise Gem and Jumbo Java (VersaMagic) for the first one, and Sahara Sand and Jumbo Java for the second, although it's hard to see the variation of colors of the second in this photo.  I also snipped into the feathers randomly to give them depth and texture, although, again, it's hard to tell in the photo.


Two sentiments were used.  I framed the first using a Labels 28 die (Spellbinders), and I embossed the bottom one with White ep.

That's it from me today.  Be sure to stop by the rest of the teams blogs to see what they're up to.  Here's the list of those participating today:


______________________________________________________________

You're an Angel
Stamps:  Fine Feathers and Crackle Background (Waltzingmouse Stamps)
Paper:  White (PTI)
Ink:  Wheat (VersaMagic), Onyx Black and Smokey Gray (Versafine)
Accessories:  Labels and Tags and A2 Curved Borders One dies (Spellbinders), Rose (Prima), Glitter, Quickie Glue Pen, Scor-Buddy

Fine Feathers
StampsFine Feathers (Waltzingmouse Stamps)
Paper:  Vintage Cream (PTI), Miss Empire (Kaisercraft)
Ink:  Turquoise Gem, Jumbo Java and Sahara Sand (VersaMagic), Tea Dye and Vintage Photo (Ranger Distress), Onyx Black (Versafine), Versamark
Accessories:  Labels 28 die (Spellbinders), Button (PTI), White Embossing Powder, Jute String 

Thursday, June 27, 2013

Friday Flourishes ~ Beach Life


Happy Friday Flourishes Friends! How is the weather in your neck of the woods? Is that summer heat getting you down? Well today the Flourishes Senior Design Team has a treat for you focusing on three beautiful summery sets: Beach Life, Seaside Life and Guiding Light, because we know that this time of year makes you long for those cool ocean breezes.


I love the Flourishes set Beach Life!  The adirondack chair was just calling to me. (*grin*)  The sound of the ocean waves crashing is so relaxing to me, so I thought I'd create a scene using the Victor Hugo quote with the chair and sailboat images.

I wanted to do some masking and embossing, so I started by cutting out a masked shape using Eclipse Tape.  I also stamped the adirondack chair onto the Eclipse Tape and cut it out to place over my stamped image so after I was done adding the ink, it was a clean white surface to color.

I used all Ranger Distress Inks:  Water ~ Tumbled Glass and Stormy Sky, Sky ~ Squeezed Lemonade, Spiced Marmalade and Barn Door, Sand ~ Pumice Stone, Gathered Twigs and Brushed Corduroy.  My sand got a bit dark, but this was my second attempt (I forgot the water on the first one...doh!!) and I liked how the sky and water turned out.

I colored the chair and the little sailboat with Copics, and embossed the frame using a Standard Rectangle die (Spellbinders).  Lastly, I added some score lines using my Scor-Buddy, rounded the corner using a Corner Rounder Punch, and added some waves with a white Sharpie.  I also used a white colored pencil to add a bit of texture to the clouds.

I also wanted to mention that Beach Life is currently out of stock, but it should be in the store soon.  So be sure to check back.  It's a sweet set with tons of summer lovin' possiblities!!
I used R24 for the sailboat.

That's it for me today...a one-layer CAS card.

Now, head on over and visit the rest of the gals if you haven't already been to their blogs:

Thanks for stopping by!!
Happy Stamping!


______________________________________________________________________


Waltzingmouse June Release Previews ~ Day One


Hello friends, and welcome to Day 1 of Waltzingmouse's Release Previews.  Today we are sharing previews of two charming sets:  You're A Doll, and its compliment, You're A Doll Additions.  The first set is full of images you can mix and match to build and decorate nesting dolls.  The possibilities are endless.  In fact, I used some of the images for something other than their intentions for my second card.

For my first card I wanted to share this beautiful Nesting Doll image.  Isn't she charming?  I colored her with Copics and framed her using a couple of Spellbinders Dies:  Opulent Ovals and Timeless Rectangles.  The background was created using Nostalgia Core'dinations cardstock along with the embossing folder Dandiya (Couture Creations).  I then sanded the embossed layers, and added some pearls around the oval frame (Zva Creative).


This new You're A Doll set combines beautifully with a previously released set called Folk Art Labels No. 25, so I thought why not just combine a sentiment from the You're A Doll Additions set with it and include it on the inside.  A perfect fit!!


 Okay, now for my second project.  I took what's supposed to be the nesting doll caps, turned them upside down, added a leafy center and woila....they look like tulips.  The circle opening is supposed to be used for the doll faces, but I put flowers (included in this set) in the centers instead and added some rhinestones.   The sentiment is from the You're A Doll Additions set.

Well, that's it from me today.  Be sure to check out what the rest of the Design Team has to share.  With this creative bunch, you won't want to miss a stop.

Here's a list:

That's all folks!
Thanks so very much for stopping by.
Be sure to visit tomorrow for some more previews.


__________________________________________________________

Stamps:  You're A Doll and You're A Doll Additions (Waltzingmouse)
Paper:  Cryogen White and Nostalgia Core'dinations
Ink:  Tuxedo Black (Memento), Purple Hydrangea (VersaMagic), Tuxedo Black (Versafine)
Accessories:  Labels 25, Opulent Ovals and Timeless Rectangle Dies (Spellbinders), Copics, Pearls (Zva Creative, Want2Scrap, Kaisercraft), Dandiya Embossing Folder (Couture Creations 

Thursday, June 20, 2013

Flourishes June Release Focus and Messenger Bag Tutorial


HELLO Flourishes Friends! Lots to tell you today... Today the Flourishes Team and I are excited to show you one more look at the June stamp Releases. We liked everything so much we just couldn't stop at the Sneak Peeks. Be sure to visit the Flourishes Blog today too.  The sweet and talented Stacy is the Designer Focus.


I adore the new S'more Fun Flourishes set.  I love camping, and these images are perfect.  In fact working with them has me craving a camping trip something awful!!  ;)

I decided to design a Messenger Bag to hold these two cards.  I might just include one card with a gift card inside too.  I haven't decided yet.  I've included a tutorial at the end of this post.

 But first let me show you closer look at the two 4x4 cards.  I love the S'mores and charming lantern in this S'more Fun set.


I added some Metallique - Steel Candi pieces to each card also.


The images are framed with a Postage Stamp die (Spellbinders), and the dp is Bluebell (My Mind's Eye)

Now, let me explain how I made the Messenger Bag:

Supplies you'll need:

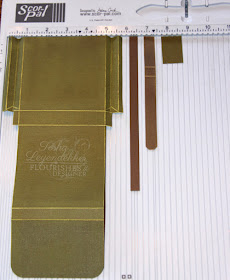
6 1/8" x 12" piece of Carstock (I used Kraft-Core by Core'dinations)
3/8" x 8" Cardstock (Handle)
1/2" x 6" Cardstock (Strap)
1" x 1/2" Cardstock (Back patch over strap)
Scor-Tape or any other strong double-sided adhesive
Buckles (Tim Holtz ida-ology)
Scor-Pal
Piercing Tool 
Stylus or Bone Folder (for scoring)
Magnetic Discs (Basicgrey)


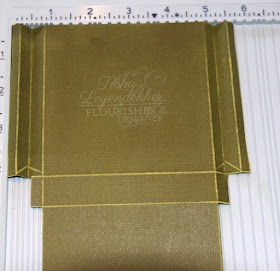
I started by scoring along the long side of the cardstock at 1/4", 1" on both sides (that will leave 4 1/8" in the center)
Then turn the cardstock on it's side and score at 4 1/8", 4 7/8", 9" and 9 1/2"


Now, cut off the scored pieces starting from the shortest end up about 7 1/4".  Stop when you get to the 1" scored piece.


I then scored down the middle of the two 1" pieces along each side and scored a mountain at the base so it will hold its shape when completed.


Now accordion fold the sides and add your Scor-Tape to the 1/4" pieces along each side.


For the strap, score at 1 3/4" and 2 1/4".


I used a Corner Rounder punch for the flap of the bag.
Then, lay the strap over the top and slide the buckle over it to see where you're going to need to pierce the main hole for the buckle.  You want the buckle to end right at the base of your flap.


Pierce the holes and add your patch to the back to hide the end of the strap.  For the handle, I just used my Scor-Tape to adhere it to the inside of the bag. 
I also added a Magnetic Disc (Basicgrey) behind the base of the buckle and on the inside of the front of the bag so it will stay closed.


Here's what it looks like finished.  I sewed along the edges, but you don't need to do that.  And I added a "Happy Camper" sentiment from the S'more Fun Flourishes set.  It was framed with Petite Oval dies (Spellbinders).  I also used a small corner rounder punch for the end of the strap.  Since I used Kraft-Core by Core'dinations, I sanded the cardstock to give the bag a worn look.


Here's a look at the finished back of the bag.
That's finally it for today's project.


Well, I'm the caboose for this little hop, so here's a list with the team links so you don't miss a stop.  These gals are full of inspiration!!
And remember that today is your last chance for this month's New Release Bundle of stamps at 10% off. AND for more fun SALE news... Looking to add to your ribbon collection in your stamp room? Well, now is the time to stock up! Flourishes is having a bonanza of a ribbon sale. Nearly everything in our warehouse needs to go to make room for new collections! Most ribbon can be found at prices up to 40% off retail! And, once these ribbons are gone, they will be gone! So, hop on over and shop now for the best selection!


Here's a list of the Copics I used on the cards:


_____________________________________________________________

Stamps:  S'more Fun (Flourishes)
Paper:  Kraft-Core Nostalgic Collection (Tim Holtz), Bluebell (MME), Vintage Cream and Kraft (PTI)
Ink:  Tuxedo Black (Memento), Vintage Photo (Ranger Distress)
Accessories:  Copic Markers, Postage Stamp and Petite Oval Die (Spellbinders), Buckles (Tim Holtz idea-ology), Metallique - Steel Candi, Sewing Machine, Scor-Pal, Scor-Tape, Magnetic Disc (Basicgrey) 

Monday, June 17, 2013

Waltzingmouse Blog Party ~ Summertime Fun


It's the 17th, and that means it's time for a Waltzingmouse Stamps Blog Party.  This month's theme is "Summertime Fun".  So I thought this would be a perfect time to haul out my "My Island" set and get to playing.  I first stamped the palm trees with Tea Leaves Chalk Ink (VersaMagic), then added the distressed oval with Smokey Gray (Versafine), and lastly the sentiment using Onyx Black (Versafine).  I love how the design turned out.

To finish off the card, I added some score lines along the top and left side and some Washi Tape (Webster's Pages).  And there you have it.  A one layer CAS card that says summer to me.  Oh how I wish I were on an island right now.  :)

We'd love to have you join us too.  All you have to do is make a card, with this month's theme, using Waltzingmouse images and link it on the Waltzingmouse Stamps Blog.  On the 20th of the month – we will highlight a few of the entries that really catch our eye and you'll be able to see those here on the WMS blog.  We give special attention to designs that  use WMS use images in a unique and creative way.  We will also select and announce our winner of the FREE stamp set of choice, using a random generator from those participating in the Blog Party!  Click HERE for more details.
_________________________________________________________________

StampsMy Island (Waltzingmouse Stamps)
Paper:  White (PTI)
Ink:  Tea Leaves (VersaMagic), Smokey Gray and Onyx Black (Versafine)
Accessories:  Scor-Buddy, Washi Tape (Webster's Pages), Rhinestone (Pizzazz Aplenty)