Pages

Wednesday, October 29, 2008

Shabby and Happy!!

Woo-Hoo!! It's Wednesday, and time to make a card with Rox's sketch on SCS. Click HERE for today's sketch.

Do you have one of those friends, who no matter how bad of a day you're having, you always end up laughing with by the end of your conversation? Well, I made this card for a dear friend of mine who blesses me that way often, thus the "happy thoughts" sentiment.

I haven't used my Inque Boutique stamps for quite some time, so I thought I'd pull them out today. I used Shabby Chic (IB) for the medallions, and Everyday Whimsy (Wordsworth) for the sentiment.

I just got my new Stampin' Up Curly Label Punch, so of course I had to use it...*grin* Actually, this card is full of punches and diecuts...Nestabilities, Circle (SU), and Martha Stewarts border. The medallions are super dimensional.

The paper, well, I had my Frost dp (Memory Box) still out from yesterday, and thought it would go beautifully with these images. All the Cardstock is Prismatics. (Birchtone Dark, Herbal Garden Light and Dark, Vanilla Cream, Rose Dark)

I added Clear/Silver Rhinestone stickers (Kaisercraft) to the centers of the medallions, and ink distressed all the edges with Frayed Burlap and Walnut (Ranger Distress Inks).

I hope you're all having a blessed week!
Happy Stamping!!
Tosh

Supplies:
Stamps - Shabby Chic (Inque Boutique) Everyday Whimsy (Wordsworth)
Paper - Frost (Memory Box), Birchtone Dark, Herbal Garden Light and Dark, Vanilla Cream, Rose Dark
Ink - Frayed Burlap, Aged Mahogany, Walnut (Ranger Distress Ink)
Accessories - Nestabilities, Punches, Rhinestone Stickers, Ribbon

Tuesday, October 28, 2008

A Chickadee Christmas

If you're a regular visitor to my blog, you'll know that I'm a huge Northwoods fan!! So when I saw this Chickadee Holiday stamp at Michelle's Store, Stamper's Dream, well....I had to have it! I love the family feel of it with the baby bird tucked in the warm house and the mother and father close by.

I stamped the image with Black Onyx Versafine onto watercolor paper, and colored it with watercolor pencils and the Stampin' Up blending pen.

I LOVE the dp I used for this. It's from the Frost Collection by Memory Box. There are gorgeous distressed papers in greens and blues! Perfect for holiday images!!

For the snow, I just painted on Liquid Applique with a paint brush and sprinkled a bit of Crystal Glitter to add a touch of sparkle.

The front bird is popped up, and all the edges are ink distressed with Frayed Burlap (Ranger Distress Ink). To finish it up, I pierced along each side with an ornare piercing template, added some Dew Drops and Pewter Pearls (Kaisercraft), and a touch of glitter to the berries and holly leaves.

I hope your week is off to a great start!!
Happy Stamping!!
Tosh

Supplies:
Stamps - Chickadee Holiday (Northwoods)
Paper - Frost (Memory Box), Birchtone Light and Dark (Prismatics), Watercolor
Ink - Black Onyx Versafine
Accessories - Watercolor pencils, Dew Drops, Blending Pen, Pearls, sponge, glitter, Liquid Applique, dimensional tape, piercing tool and template


Check this out!!
Michelle has added a new stamp line to her store...Whiff of Joy!! These images are precious!! If you like to color as much as I do, you won't want to miss these. Head over there and see what she has. She also is having a sale on all her Halloween images and supplies, and has a variety of JustRite products.

Monday, October 27, 2008

Paper Crafts Gourmet...check this out!

http://farm4.static.flickr.com/3069/2967469371_f16b471972.jpg?v=0

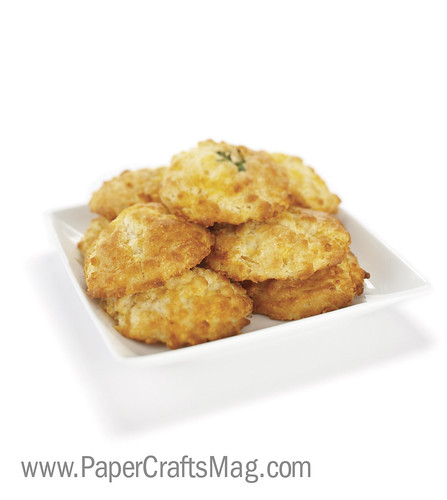
Don't these look Yummy?!?! They're called Cheesy Garlic Drop Biscuits, and this recipe, along with a variety of others, can be found in Paper Crafts new Gourmet recipe book that you need to check out. Not only does it include the recipes, but it shows you how to create fantastic packaging for your baked goods!! How awesome is that?!?! Click HERE. The recipes below were created by Alisa Bangerter.

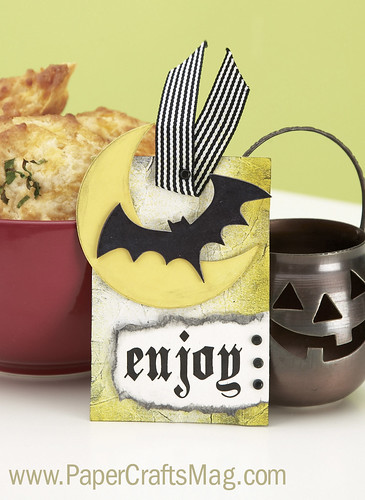
Here's a tag by Alisa to go with this fabulous recipe listed below: You can find this and others in the Paper Crafts Gourmet Book HERE.

http://farm4.static.flickr.com/3248/2964800547_0deb10438a.jpg?v=0

Cheesy Garlic Drop Biscuits

Alisa Bangerter

This is a perfect recipe to pull out if you are short on time because there is no rolling or cutting. The cheese and garlic add extra kick to a plain biscuit, and kids love them. They are the perfect accompaniment to serve with soups or stews, and are great served with a salad.

INGREDIENTS

2 c. flour

2 tbsp. granulated sugar

4 tsp. baking powder

1 1/2 tsp. garlic powder

1/2 tsp. salt

2/3 c. butter or margarine

1 1/2 c. grated cheddar cheese

1 1/4 c. milk

Chives (optional)

DIRECTIONS

Mix together dry ingredients. Cut in butter with pastry cutter until mixture is fine. Add cheese and mix well. Add milk and stir until just moistened. Drop by spoonfuls onto greased baking sheet. Sprinkle top with chopped dried or fresh chives if desired. Bake at 400 degrees for approx. 15 minutes.

And the supplies and instructions for the project:

Enjoy Halloween Tag

Designer: Alisa Bangerter

SUPPLIES: Cardstock: (ivory) Dye ink: (Black) Stewart Superior Corp.; (Summer Sun) Stampin’ Up! Specialty ink: (Mango Lemonade color wash) Stewart Superior Corp. Color medium: (black chalk) Craf-T Products Accents: (black brads) Making Memories; (chipboard bat, moon) Melissa Frances Fibers: (black striped ribbon) Pebbles Inc. Font: (Black Family) www.dafont.com Adhesive: (foam tape) Finished size: 3" x 4 1/2"

1 Make tag from cardstock. 2 Crumple tag and smooth out. Spray edges with color wash; let dry. Apply chalk. 3 Ink chipboard moon; let dry. Chalk edges and adhere. 4 Ink chipboard bat; let dry. Adhere with foam tape. 5 Print sentiment on cardstock; trim and tear edges. Chalk edges and adhere with foam tape. Attach brads. Attach ribbon with brad.


Sunday, October 26, 2008

For Cindy...

I can't believe it's time for another CCEE challenge already. Is the weekend really over? *sigh*

Well, this week we were challenged by Dawn Lusk to create a card with this A Lil' Behind set by H&M Stamps. Heather was kind enough to send Cindy Motherway enough sets for all of us CCEEers. Thanks Heather!! This set is a lot of fun.

Dawn added another element to this challenge though, and that was to add some type of chipboard. Mine is the sentiment.

Now, I realize I'm not Michelle Zindorf. Far from it. This is my first time trying to make a scene using her brayer technique...well other than the time she was featured on SCS, but I did something completely different than this at that time. My moon/sun is too bright for the bg, but I didn't want to mess it up anymore, so, this is it. The tree branch is from Stampscapes, and I hand drew the fence. For awesome tutorials on how to create a "Zindorf" card (please don't be afraid after seeing my humble attempt, I've seen many others do beautifully) click HERE.

Check out what the other CCEEers have created HERE.

I hope you all had a relaxing weekend and are refreshed to start anew!!
Happy Stamping!!
Tosh

Supplies:
Stamps - A lil' Behind (H&M Stamps) Stampscapes
Paper - Island Mist Light, Birchtone Light, Medium and Dark (Prismatics), Neenah Solar White
Ink - Wild Wasabi, Bashful Blue, Brilliant Blue, Pumpkin Pie (Stampin' Up), Butterscotch and Slate (Adirondack Dye Ink), Frayed Burlap (Ranger Distress Ink)
Accessories - Word Window Punch (Stampin' Up), Crop-a-dile, Eyelets, Hemp, sponges, 1 3/8" Circle punch (Stampin' Up), Perfect Medium Brush (Ranger), Detail Clear ep (JudiKins)


Oh, you're probably wondering about the title....well, it was Cindy Motherway's birthday a week ago. I'm a bit late, but I wanted to make her a card with this image since it was inspired by her. She was quite the horseback rider in her younger days too I hear! So, this butt's for you Cindy....*grin*

Saturday, October 25, 2008

A Sweet and Sassy Christmas

I made this card today for the Inspirational Challenge on SCS, and for the Organization Chemo Angels. HERE is the photo that inspired me. I loved the colors of the quilt. For more info on how you can donate to the Chemo Angels, click HERE.

I also was excited to use this darling Sweet and Sassy image called Decorating Tree. It's a Rachelle Anne Miller Design, and I love her darling images.

I stamped the image twice onto Neenah Solar White with Tuxedo Black (Memento) and colored it with my copics.

The Everyday Blessings dp is Papertrey, as is the ribbon. The sentiment is from the A Cardinal Christmas (SU) set. (I love the font of this..I know, I've used it a lot...grin). And the Soft Pink Rhinestone stickers are Kaisercraft.

Thank you so much for stopping by!! I hope you all are having a fabulous weekend.

Happy Stamping!!

Supplies:
Stamps - Decorating Tree (Sweet and Sassy Rachelle Anne Miller), A Cardinal Christmas (SU)
Paper - Papertrey, Neenah Solar White
Ink - Tuxedo Black (Memento)
Accessories - Copics, Corner Tag Punch (SU), Quickie Glue Pen, Crystal Glitter, Grossgrain Ribbon, Rhinestone Stickers, Dimensional Tape

Thursday, October 23, 2008

Pink Manger Kisses

I made this card for two challenges on SCS today. Since it's Breast Cancer Awareness month, SCS is hosting a challenge to make cards with any amount of pink on them to send them to Chemo Angels. If you'd like to know more about this generous program, click HERE. For the challenge itself and how you can help, click HERE.

This card also fits under the Ways to Use it Challenge on SCS found HERE. We were to make a card with a sentiment of only "one word".

I stamped the Manger Kisses (Stampendous) with Tuxedo Black (Memento) ink twice onto Neenah Natural White and colored it with my copics. I cut out both angels and popped them up with Dimensional tape and added Frosted Lace stickles to the wings and flower. The flower has a Blush Pearl (Kaisercraft) in the center.

The Believe sentiment is by Inque Boutique's "A Word or Two" set, and is colored in with a pink copic. That should about do it for the details...

I hope you are having a fantastic week!!
Happy Stamping!!

Supplies: Stamps - Manger Kisses (Stampendous), Believe (A Word or Two - Inque Boutique) Paper - Je' Taime (My Mind's Eye), a textured dp (?), Blush Red Medium, Vanilla Cream, and Suede Brown Medium (Prismatics), Neenah Natural White Ink - Tuxedo Black (Memento), Tea Stain (Ranger Distress Ink) Accessories - Stickles, prima flower, Pearl (Kaisercraft), Sewing Machine, Copics, Nestabilities, Scalloped Rotary cutter

Wednesday, October 22, 2008

A Pink Christmas

I made this card for today's Sketch Challenge on SCS.

I stamped the Winter Wonderland tree (Impression Obsession) with White Craft Ink onto Blush Red Light Pristmatic CS and embossed with White ep. I then sponged around the tree with Aged Mahogany (Ranger Distress ink) to make the tree pop a bit more. All the panels are edged with White Craft ink also.

I then Diecut my "A Cardinal Christmas" (SU) sentiment with one of my Double Ended Tag Diecuts (Spellbinders), sponged the edges with the Aged Mahogany and craft white, and tied the ribbon to the edges.

The Tree and snowflakes have Rhinestone Stickers by Hero Arts and Kaisercraft.


Supplies:
Stamps - Winter Wonderland Tree (Impression Obsession), Sentiment (A Cardinal Christmas - SU)
Paper - Blush Red Light and Dark, Vanilla Cream (Prismatics) Laundry Line dp (MME)
Ink - Craft White (SU), Aged Mahogany (Ranger Distress Ink)
Accessories - Double Ended Tags (Spellbinders), Snowflakes (Making Memories), Copics, Detailed White EP, Rhinestone Stickers (Hero Arts, and Kaisercraft), Sponge, Corner tag Punch (SU), Ribbon

Monday, October 20, 2008

Cardinal Suspension

It's a new week, and I'm off to a late start!! LOL Every week I have a CCEE card uploaded by Sunday evening. They are not due until Monday, but since I'm on the west coast my card would not be up til much later than everyone else's....like today for instance.

Well, today I have a good excuse. I was visiting my son for parents weekend at college. He's over 1000 miles away and we hadn't seen him in about 7 weeks. We had an awesome time and look forward to seeing him again over Thanksgiving break.

So, onto my card. Dawn L challenged us this week to make a suspension card. You will find an awesome tutorial for it by Beate HERE at SCS. The rest is pretty self explanatory. I cut out my opening with my rectangle Nestabilities and colored my cardinal with Copics.

To see what the other girls have created, check our CCEE Stampers blog. Remember, you can play along too. Just check that blog for details.


Supplies:
Stamps - A Cardinal Christmas (Stampin' Up)
Paper - Cosmo Cricket, Frosted Orange and Blush Red Dark (Prismatics)
Ink - Tuxedo Black (Memento), Tea Stain (Ranger Distress Ink)
Accessories - Copics, Nestabilities, stretchy illusion cord

Thursday, October 16, 2008

Pink Paislee with a mind of it's own!!


Michelle at Stamper's Dream, has a new stamp line in her store called Pink Paislee! There are some that are elegant, some that are adorable, and there's even decorative paper!! I used the set Tinsel Town and I LOVE it!! I only used the tree and a framed sentiment, but there's also fantastic snowflakes, a beautiful bird and so much more!!

Boy did this card take on a life of it's own. I realize it's quite busy, but I really am happy with it. I followed SCS's Sketch challenge from yesterday. The dp's are some of my absolute favorite's from the Laundry Line (My Mind's Eye). So, to fit in with their sparklin' country style, I added a bit of sparkle to my images and paper. For the back circle, I embossed Island Mist Medium Prismatic cardstock with my snowflakes Cuttlebug embossing folder. I then brayered over it with Versamark and embossed with Irridescent Ice (SU).

The trees were stamped with Pesto (Adirondack Dye Ink) onto the Island Mist Medium (Prismatics) and were glittered with Crystal Ultrafine Glitter.

I just received these FABULOUS felt snowflakes by Stampin' Up a couple of days ago and thought they'd fit wonderfully with this card!! I'm in LOVE!! They're gorgeous and you get so many in a package.

The rest is pretty self explanatory!!
Have a super day!!
Happy Stamping!!

Supplies: Stamps - Tinsel Town (Pink Paislee) Paper - Laundry Line (MME), Island Mist, Birchtone Light (Prismatics) Ink - Frayed Burlap, Aged Mahogany (Ranger Distress Inks), Versamark, Pesto (Adirondack Dye Ink) Accessories - Nestabilities, Felt snowflake (SU), Dew Drops, White Gel Pen, Irridescent Ice ep (SU), glitter, Ribbon, Dimensional Tape

Wednesday, October 15, 2008

Merry Chrismoose!!

I always look forward to participating in Rox's Sketch Challenges on Wed. And today was no exception!! I had a ball with this layout!

The Merry Chrismoose (Stampendous) image is stamped with Tuxedo Black (Memento), colored with copics, cut out, and mounted onto Light Birchtone (Prismatics). I also sewed around all the panels. The rest is pretty self explanatory.

Check this out!
Michelle is also having a sale on all her Halloween stamps!! Be sure to take advantage of the sale while her supplies last!!!


Supplies:
Stamps - Merry Chrismoose (Stampendous)
Paper - Laundry Line (My Mind's Eye),
Light, Medium and Dark Birchtone (Prismatics)
Ink - Tuxedo Black (Memento), Walnut (Ranger Distress ink)
Accessories - Copics, Nestabilities, Sewing machine, Ribbon (Making Memories), Brads, Small Oval Punch (SU), Button, Twine, Dimensional Tape

Sunday, October 12, 2008

A card for jstarbright

It's time once again for a CCEE challenge. This week it's our favorite, where we choose a stamper from SCS with a unique screen name. Dawn L chose *jstarbright* this month. Our requirements were as follows:
1. Patterned Paper
2. Birds
3. a Star
4. Buttons and Brads
5. Bonus...Joni collects covered bridges and love listening to music. We could include both of those if we wanted to.

Well, I didn't have any covered bridges, and the music wasn't flowing, but if you look carefully, I believe I met all the other criteria...*grin*


Be sure to check out what the other girls have done HERE.
The image is colored with copics and is layered with dimensional tape. The edges are ink distressed with Antique Linen (Ranger Distress ink), and I sewed around each panel.

I hope you have a fantastic week ya'll!!
Happy Monday!

Supplies:
Stamps - Chickadee and Holly (Stampourri), Sentiment (Birdies - Inque Boutique)
Paper - Winterwonderland (Kaisercraft), Bazzill, Neenah Solar White
Ink - Tuxedo Black (Memento), Antique Linen (Ranger)
Accessories - Copics, Nestabilities, Ribbon (American Craft), Brads, Red Glitter, Cuttlebug Stars Diecut, Button, Twine, Sewing Machine, Dimensional Tape

Friday, October 10, 2008

An Elzybell Christmas Tree


I don't normally do the Limited Supplies Challenge on SCS, only because I'm too chicken to break the rules. This weeks didn't seem too hard to me though. It's titled "Rock, Paper, Scissors", and is hosted by a dear, dear lady...Judy (StampingQueenJAR). Love the title, love the challenge. Click HERE for the rules.

I LOVE Elzybells stamps and rarely get to use them. Well, I ordered some new ones again this year and am determined to use every one. Today, I just inked up the tree with Black Onyx Versafine and stamped it onto Birchtone Medium Prismatic Paper. I highlighted it a bit with my copics and a white gel pen, then cut it out and mounted it onto White Prismatic Paper after sponging Denim Adirondack Dye ink on the bg. I then ink distressed the edges with Frayed Burlap and Brushed Corduroy Ranger Distress Ink. The ornaments have Xmas Red Stickles on them, and the star has some clear ultrafine glitter. The flakes on three of the square panels are from Stampin' Ups Snowflake set. I also added some Bon Bon Sugar Coating Glitter to the snowflake centers, and some piercing with an ornare template on either side of the sentiment panel and along the top. I finished off the card with a few Dew Drops and a gold cord bow.

I hope you all have a blessed weekend!!
Happy Stamping!!

Supplies:
Stamps - Elzybells, Snowflakes (SU)
Paper - DaisyD's, Mystic Blue Medium, Birchtone Medium and Dark, White (Prismatics)
Ink - Black Onyx (Versafine), Frayed Burlap, Brushed Corduroy (Ranger), Denim (Adirondack)
Accessories - Dew Drops, Copics, White Gel Pen, Sugar Coating Glitter (Doodlebug), Gold Cord, piercing tool, piercing template

Thursday, October 9, 2008

A Stamper's Dream Dreamy Challenge!!

The Stamper's Dream Dream Team is excited to announce that they will be doing a Dreamy Challenge the second Thursday of every month. And you can participate too. Just make a card with glitter on it, and link it to the comments section of Michelle's blog, and if you upload to Splitcoaststampers.com (we'd love to see it there too), just use keyword SDDC1. And to make this challenge even sweeter, (pun intended), Michelle has some awesome Holiday goodies which she will be giving to a winner chosen by Random.org.

This week we're working with a new product by Doodlebug, that Michelle just started carrying!! Glitter is so popular right now, and oh so fun to use, so we're using the Doodlebug product called "Stick With It". It's two sheets of double-sided adhesive shapes. The one we're using is called "Fancy That" and it's full of swirls and sentiments.

All you do is peel off the shape (making sure to keep the top protective strip in place) and lay the shape where you would like to feature it on your card or project. As soon as you have your design laid out, peel off the protective strip and apply your Doodlebug Sugar Coating glitter, rubbing over it with your fingers to make sure it adheres well. Doodlebug has a fabulous line of Sugar Coating Glitter, with a variety of colors, that each of the Design Team members is using.
Flock can also be used, and Michelle has some awesome colors of Fun Flock too!! I made a card with the Fancy That (Doodlebug) Adhesives and Fun Flock, awhile back. Click HERE to see how the flock looks.

A little tip: After you adhere your Double sided adhesive to your project, before removing the protective tape, rub your embossing buddy over the paper. That will help to keep the excess glitter from sticking. After removing the tape and applying the glitter, flip the paper over and flick it with your finger a few times. That should also help to remove the glitter without it blowing up into your face.

So,
check out the Stamper's Dream DT's blogs to see the different ways this product can be used. They're a talented and creative group. You won't want to miss their designs!!

Amy
Charmaine
Cindy
Laurie
Michelle


Now for the other details of my card. I stamped the Ornate Seasons (Inkadinkado) image with Black Onyx Versafine onto Crabapple Medium (Prismatics) and used my Quickie Glue Pen to add Beetle Black Sugar Coating to the bird. I also added White Sugar Coating to the edges of my flourishes to highlight them.

The paper edges are ink distressed with Rose Romance (SU) and Slate (Adirondack Dye Ink), and the corners are punched with the Corner Ticket Punch (SU). Finally, I added a bit more bling with some Rhinestone Stickers (Kaisercraft).


Supplies:
Stamps - Ornate Seasons (Inkadinkado)
Paper - DaisyD's, Crabapple Medium (Prismatics), Black
Ink - Black Onyx (Versafine), Rose Romance (SU), Slate (Adirondack Dye)
Accessories - Stick With It Adhesive Transfers (Doodlebug), Rhinestone Stickers (Kaisercraft), Corner Ticket Punch (SU), Sugar Coating Glitter (Doodlebug), Quickie Glue Pen


Wednesday, October 8, 2008

Silver and Gold Baubles

It's Wednesday!! Half of the week is now past, and I think it took my mojo with it. Boy did I struggle with today's SCS sketch. Different papers, different colors, etc.

Well, here's the final result. I stamped the Balls and Stars (Artful Stamper) image with Craft White onto black cardstock and set it with my heat tool. I also stamped it with Tuxedo Black (Memento) and colored the ornaments with my copics. I cut out the white and mounted them onto the black and proceeded to trace the designs with my Quickie Glue Pen. I then added the colors...gold on the green, black on the red, and white on the blue. The ornament tops also have gold, and the flakes, white.

After that, I added the hangers with my black glaze pen, and some Black and Crystal Rhinestone stickers (Kaisercraft) to my flakes and edges. Peace is also embossed with Detail Black EP (JudiKins).

Finally, I coated my ornaments with 3D Crystal Lacquer to give them dimension and shine.

I hope you're all having a fabulous week!
Happy Stamping!!

Supplies:
Stamps - Balls and Stars (Artful Stamper) Peace Sentiment (Wordsworth)
Paper - Gold, Silver, Black (Stampin' Up)
Ink - White Craft, Black Onyx Versafine
Accessories - Glitter, Quickie Glue Pen, Corner Tag Punch (SU), Black Glaze Pen, Rhinestone Stickers (KaiserCraft), Dimensional tape

Sunday, October 5, 2008

JustRite Batik

It's time once again for a CCEE challenge. This week, Dawn (DawnL on SCS) challenged us to make our own DP. Well, SCS has a fabulous Batik tutorial , by Lynn in St. Louis,
that I wanted to try. I added some Perfect pearls to mine to give it a real shimmery look.

So, I inked up my holly image (Inque Boutique's Savoir Faire See D's set) with Versamark and clear embossed it with Detail Clear ep onto watercolor paper. Then I sprayed it with a mixture of water, Bottle Adirondack Dye Ink, and about a smidgen of perfect pearls powder in a little Mini Mister bottle (all of which you can find at Rubbernecker Stamp Company). Then, according to the tutorial, you place a sheet of paper over the embossed and sprayed paper, and heat it until you see the image come through the paper. And, Woila!! This was so much fun!! I know I'll be doing this again!! Sorry I covered it up so much. When I play with sketches, I never know how they're going to end up.

Now, I have to tell you about these new JustRite images!! They are soooooooo awesome!! I'm in love!!! I can't get enough of them!! This one is 3 1/4" and is from the Christmas Stamp Ensemble. It's FABULOUS!!! I embossed it with Detail Gold ep (Judikins) onto the smooth side of Sage Dark Prismatic cs, and Neenah Natural White. Gorgeous! I also punched out a border with my Martha Stewart punch. After all the layers were cut, I edged each piece with my Krylon Gold leafing pen. I love the finished look.

Finally, I added the organdy ribbon and heated the ends with a heat tool just a bit to crinkle them up a tad. Some gold brads in the corner, and it's finished!!

That's it. Sorry for the absence. I've been at a wedding in Iowa since Thursday. I have some more fun stuff for you this week though, so check back.

Thanks for stopping by. Hope you had a fantastic weekend!!

Supplies:
Stamps - Christmas Stamp Ensemble (JustRite), Savoir Faire (Inque Boutique)
Paper - Sage Dark (Prismatics), Neenah Natural White, Watercolor
Ink - Versamark, Bottle (Adirondack Dye Ink)
Accessories - Nestabilities, Clear EP, Gold EP, Border Punch, Organdy Ribbon, Corner Ticket Punch (SU), Krylon Gold Leafing Pen, Gold Brads, Iron, Mini-mister, Perfect Pearls, Dimensional tape